When you add a Card to a Board, it has default columns that provide general information you may want see. However, you can also customize columns to optimize the Card's usefulness for you or your team.
For example, you may want to edit your People List Card so that it displays each User's Badges or update your Item List Card so that you see the Last Comment on each project. Customizing columns can be incredibly useful for Report Cards in List view as well. Editing columns allows you to highlight particular Impacts or indicate statuses without needing to open Items individually.
Overall, column customization transform Cards into dynamic tools that can provide a wide variety of information to viewers.

Example of a People List Card with columns customized to show each User's Badges
In this article, you will learn about:
- Who can edit columns on on a Card
- How to edit columns on Item List Cards
- How to edit columns on People List Cards
- How to edit columns on Report Cards
Who can edit columns on a Card?
- The Board's Owner, if they have the "Board Creator" permission.
- The Board's Editors, if they have the "Board Creator" permission.
- The Card's Editors
- Anyone with the "Board Manager" permission for Boards in the Board's Location.
- Anyone who can access the Board and has the "Card Manager" permission for Cards in the Card's Location.
How to edit columns on Item List Cards
There are two ways to edit the columns on Item List Cards. You can make a temporary change and you can make a permanent change that is saved for the next time you or another User views the Board.
Make a temporary change
Temporarily editing columns is great for shared Boards where you want to see certain information during your current viewing session, but don't want to make permanent edits for other Users.
To temporarily add and remove columns:
- Hover your mouse over an existing column header. It will highlight gray, and a dropdown arrow will appear.
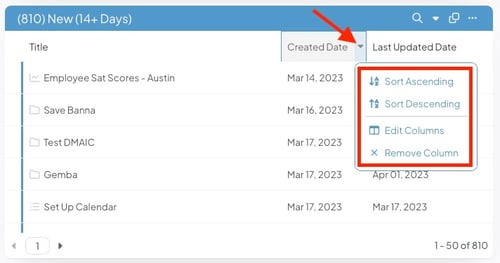
- Select the dropdown arrow to expand your options for temporarily customizing the columns on your Item List Card.
- To order the Item List based on the column you have highlighted in gray, select Sort Ascending or Sort Descending.
/Ofie/Ofie%20Profile%20Pic.png?width=50&height=50&name=Ofie%20Profile%20Pic.png) Pro Tip: If your Item List has a Key People or Key Dates column, you can use it to quickly sort your Item List by any Team Role or Item Date respectively.
Pro Tip: If your Item List has a Key People or Key Dates column, you can use it to quickly sort your Item List by any Team Role or Item Date respectively.
-
- To add, remove, and change the width of columns, select Edit Columns. The Edit Columns window will open.
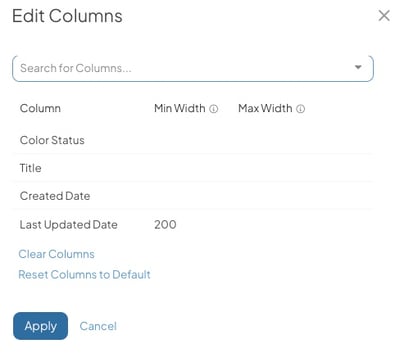
- Search for Columns: Expand the drop-down to choose any additional columns that should be shown on the Card.
- To remove an existing column, hover over it so that it's highlighted blue and click the x button that appears to its right.
- To remove all existing columns, click Clear Columns.
- To return all columns to the default selections that appear when a new Card is created, select Reset Columns to Default.
- To change the order of the included columns, drag and drop them into the desired positions.
- To change a column's minimum width, enter the desired number of pixels in the column's Min Width field.
- To change a column's maximum width, enter the desired number of pixels in the column's Max Width field.
- To add, remove, and change the width of columns, select Edit Columns. The Edit Columns window will open.
- To remove only the column you have highlighted in gray, select Remove Column.
Pro Tip: You can also temporarily change the width of your columns by hovering your mouse between two columns until your cursor changes into a vertical line with two arrows. Then, you can click and drag the border between columns to change the width.
Remember that these changes will disappear the next time you visit the Board. Other Board viewers will not see your temporary edits.
Make a permanent change
To permanently edit the columns on an Item List Card, you must edit the Card's View.
Pro Tip: Item List Cards have multiple Views that affect what columns are available for customization. Check out this article to learn about the different views available for Item Lists.
Edit the Card's View by selecting the ellipsis in the top right corner of the Card header.
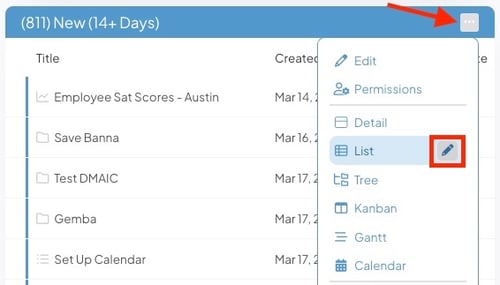
- Hover over the current View (which will be highlighted), and select the pencil icon. This will open the Edit Card View widow.
- The options in the Edit Card View window depend on the current View, as described below.
- Detail and Calendar View:
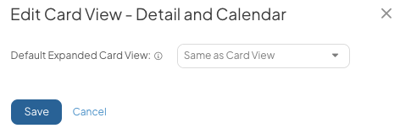
- There are no column customization options for Detail and Calendar View. You can only pick what View should be used when the Card is expanded.
- Default Expanded Card View: Expand the drop-down to choose in which View this list should open when expanded. By default, the expanded list will use the same View as the regular Card.
- Click Save.
- Kanban View:
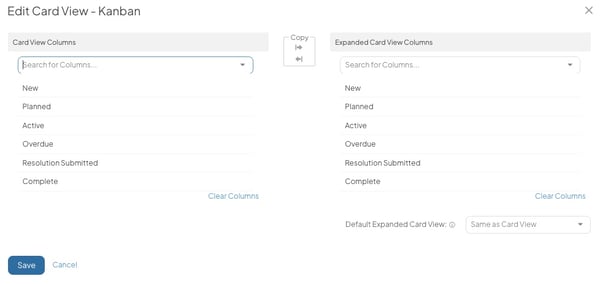
- In Kanban view, you can pick which Item Statuses are included in the Kanban.
- Under the Card View Columns header, each column currently displayed on the Item List Card will be listed. Any changes made to this section will affect only the appearance of the Card itself.
- Search for Columns: Expand the drop-down to choose any additional columns that should be shown on the Card.
- To remove an existing column, hover over it so that it's highlighted blue and click the x button that appears to its right.
- To remove all existing columns, click Clear Columns.
- To change the order of the included columns, drag and drop them into the desired positions.
- Under the Expanded Card View Columns header, each column currently displayed in the expanded version of the Card will be listed. Any changes made to this section will only affect the appearance of the expanded version of the Card.
- Search for Columns: Expand the drop-down to choose any additional columns that should be shown on the expanded view.
- To remove an existing column, hover over it so that it's highlighted blue and click the x button that appears to its right.
- To remove all existing columns, click Clear Columns.
- To change the order of the included columns, drag and drop them into the desired positions.
- Under the Copy header:
- Click the right arrow to copy the formatting from the "Card View Columns" section to the "Expanded Card View Columns" section.
- Click the left arrow to copy the formatting from the "Expanded Card View Columns" section to the "Card View Columns."
- Default Expanded Card View: Expand the drop-down to choose in which View this list should open when expanded. By default, the expanded list will use the same View as the regular Card.
- Click Save.
- The List, Tree, and Gantt Views:

- In List, Tree, and Gantt View, you can add columns that show any Field, Attribute, Location, Key Person or Key Date on the Item. You can also show Votes, Likes, Milestones, Impacts, Last Comments, Weighted Scores, and more!
- Under the Card View Columns header, each column currently displayed on the Item List Card will be listed. Any changes made to this section will affect only the appearance of the Card itself.
- Search for Columns: Expand the drop-down to choose any additional columns that should be shown on the Card.
- To remove an existing column, hover over it so that it's highlighted blue and click the x button that appears to its right.
- To remove all existing columns, click Clear Columns.
- To change the order of the included columns, drag and drop them into the desired positions.
- To change a column's minimum width, enter the desired number of pixels in the column's Min Width field.
- To change a column's maximum width, enter the desired number of pixels in the column's Max Width field.
- Detail and Calendar View:
Pro Tip: Changes you make to a Card's columns in the Edit View window will be applied when you PDF the Board or Item List Card.
How to edit the columns on People List Cards
There are two ways to change the columns on People List Cards. You can make a temporary change and you can make a permanent change that is saved for the next time you or another User views the Board.
Make a temporary change
Temporarily editing columns is great for shared Boards where you want to see certain information during your current viewing session, but don't want to make permanent changes for other Users.
To temporarily add and remove columns:
- Hover your mouse over an existing column header. It will highlight gray, and a dropdown arrow will appear.
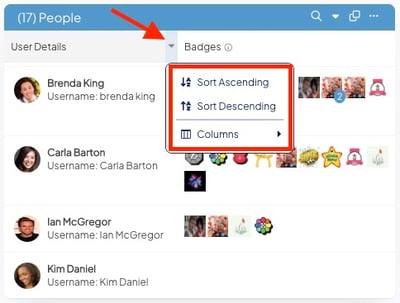
- Select the dropdown arrow to expand your options for temporarily customizing the columns on your People List Card.
- To order the People List based on the column you have highlighted in gray, select Sort Ascending or Sort Descending.
- To add and remove columns, select Edit Columns. An additional menu will appear with checkboxes beside a list of possible columns.
- Select a checkbox to add the column to the Card, and unselect a checkbox to remove the column.
Remember that these changes will disappear the next time you visit the Board. Other Board viewers will not see your temporary edits.
Make a permanent change
To permanently edit the columns on a People List Card, you must edit the Card's View.
Edit the Card's View by selecting the ellipsis in the top right corner of the Card's header.
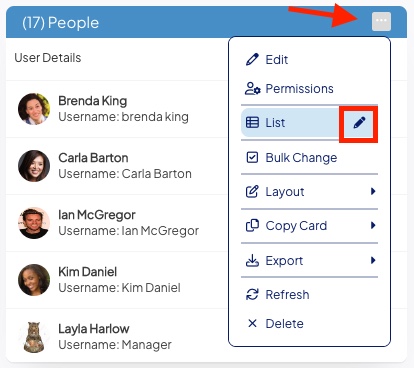
- Hover over List View (which will be highlighted), and select the pencil icon that appears to its right.
- The Edit Card View window will open.
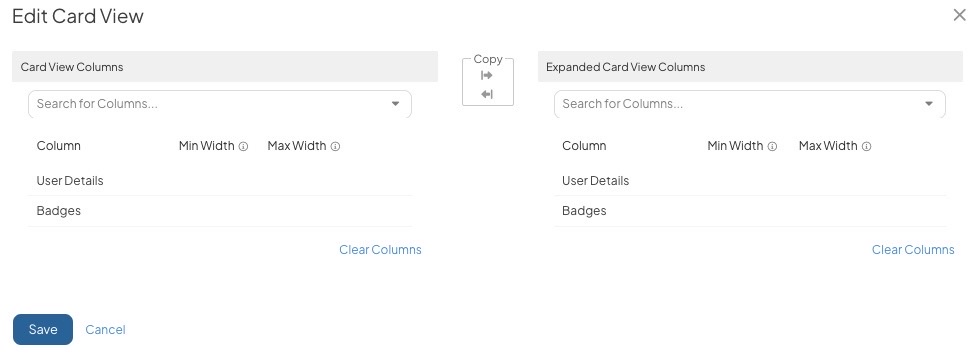
- Under the Card View Columns header, each column currently displayed on the People List Card will be listed. Any changes made to this section will affect only the appearance of the Card itself.
- Search for Columns: Expand the drop-down to choose any additional columns that should be shown on the Card.
- To remove an existing column, hover over it so that it's highlighted blue and click the x button that appears to its right.
- To remove all existing columns, click Clear Columns.
- To change the order of the included columns, drag and drop them into the desired positions.
- Under the Expanded Card View Columns header, each column currently displayed in the expanded version of the Card will be listed. Any changes made to this section will only affect the appearance of the expanded version of the Card.
- Search for Columns: Expand the drop-down to choose any additional columns that should be shown on the expanded view.
- To remove an existing column, hover over it so that it's highlighted blue and click the x button that appears to its right.
- To remove all existing columns, click Clear Columns.
- To change the order of the included columns, drag and drop them into the desired positions.
- Under the Copy header:
- Click the right arrow to copy the formatting from the "Card View Columns" section to the "Expanded Card View Columns" section.
- Click the left arrow to copy the formatting from the "Expanded Card View Columns" section to the "Card View Columns."
- Under the Card View Columns header, each column currently displayed on the People List Card will be listed. Any changes made to this section will affect only the appearance of the Card itself.
- Select Save.
How to edit columns on a Report Card
When you add a Report Card in List view to a Board, you can edit the columns. The following Reports have a List view:
- Activity Reports: Activity by Person, Activity by Persona, Activity by Location, and Activity by Template.
- Engagement Reports: Engagement by Location and Engagement by Persona.
- Impact Reports: Impact by Person, Impact by Location, Impact by Item, and Impact by Impact Value.
- Attribute Reports: Activity by Attribute and Impact by Attribute.
There are two ways to change the columns in the List view of Report Cards. You can make a temporary change and you can make a permanent change that is saved for the next time you or another User views the Board.
Warning: Currently, column customization is only available on Report Cards in List view.
Make a temporary change
Temporarily editing columns is great for shared Boards where you want to see certain information during your current viewing session, but don't want to make permanent changes for other Users.
To temporarily add and remove columns:
- Hover your mouse over an existing column header. It will highlight gray, and a dropdown arrow will appear.
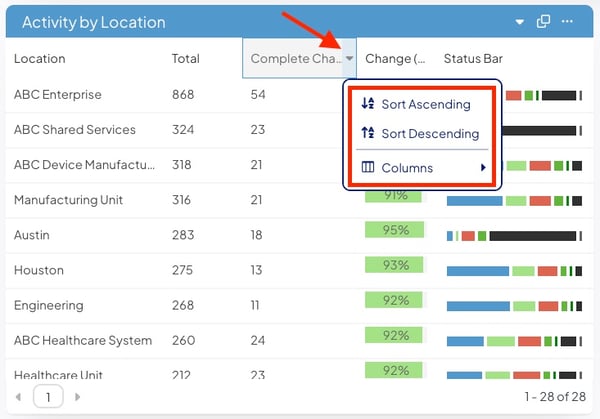
- Select the dropdown arrow to expand your options for temporarily customizing the columns on your Report Card.
- To order the Report based on the column you have highlighted in gray, select Sort Ascending or Sort Descending.
- To add and remove columns, select Edit Columns. An additional menu will appear with checkboxes beside a list of possible columns.
- Select a checkbox to add the column to the Card, and unselect a checkbox to remove the column.
/Ofie/OG%20Ofie.png?width=50&height=50&name=OG%20Ofie.png) Pro Tip: "Impact by" Reports have many column options that allow you to view detailed Impact data. If you are unsure about what data will be displayed in each column, check out this article to learn more about key Impact terminology.
Pro Tip: "Impact by" Reports have many column options that allow you to view detailed Impact data. If you are unsure about what data will be displayed in each column, check out this article to learn more about key Impact terminology.
Remember that these changes will disappear the next time you visit the Board. Other Board viewers will not see your temporary edits.
Make a permanent change
To permanently edit the columns on a Report Card's List view, you must use the Edit Columns option in the Report Card Edit Window.
Note: You will only see the option to Edit Columns when List View is selected.
Edit the Card's columns by hovering over the Card's header and selecting the ellipsis.
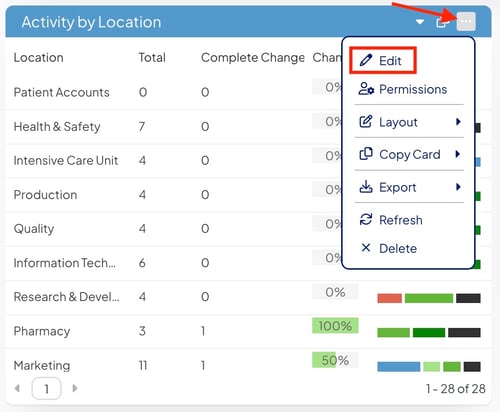
- Select Edit. This will open the Report Card Edit window.
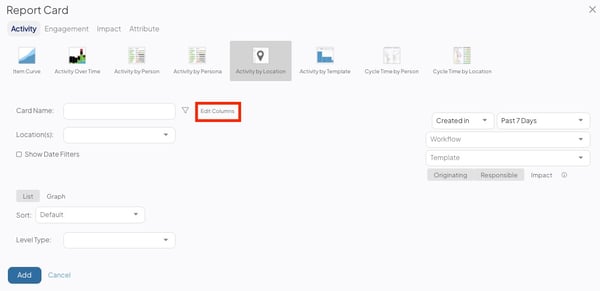
- Select Edit Columns. The Edit View window will open.
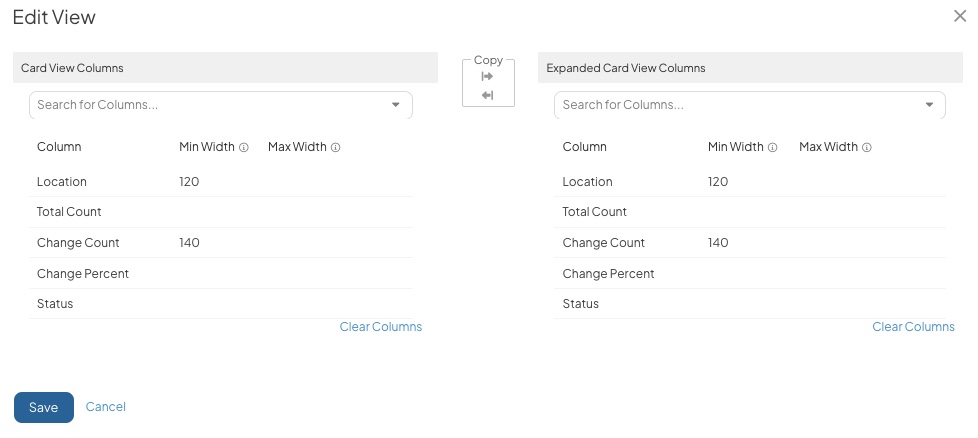
- Under the Card View Columns header, each column currently displayed on the Report Card will be listed. Any changes made to this section will affect only the appearance of the Card itself.
- Search for Columns: Expand the drop-down to choose any additional columns that should be shown on the Card. The options in this drop-down will be specific to the type of Report you have selected.
- To remove an existing column, hover over it so that it's highlighted blue and click the x button that appears to its right.
- To remove all existing columns, click Clear Columns.
- To change the order of the included columns, drag and drop them into the desired positions.Select Edit Columns. This will open the Edit View window.
- Under the Card View Columns header, each column currently displayed on the Report Card will be listed. Any changes made to this section will affect only the appearance of the Card itself.
-
- Under the Expanded Card View Columns header, each column currently displayed in the expanded version of the Card will be listed. Any changes made to this section will only affect the appearance of the expanded version of the Card.
- Search for Columns: Expand the drop-down to choose any additional columns that should be shown on the Card. The options in this drop-down will be specific to the type of Report you have selected.
- To remove an existing column, hover over it so that it's highlighted blue and click the x button that appears to its right.
- To remove all existing columns, click Clear Columns.
- To change the order of the included columns, drag and drop them into the desired positions.Select Edit Columns. This will open the Edit View window.
- Under the Copy header:
- Click the right arrow to copy the formatting from the "Card View Columns" section to the "Expanded Card View Columns" section.
- Click the left arrow to copy the formatting from the "Expanded Card View Columns" section to the "Card View Columns."
- Under the Expanded Card View Columns header, each column currently displayed in the expanded version of the Card will be listed. Any changes made to this section will only affect the appearance of the expanded version of the Card.
- Select Save.
Pro Tip: "Impact by" Reports have many column options that allow you to view detailed Impact data. If you are unsure about what data will be displayed in each column, check out this article to learn more about key Impact terminology.
Congratulations! You can now customize columns on your Cards so that the most important information is always visible. Be sure to check out the articles below for more information on the types of Cards mentioned in this article and some related topics.