An Item List Card is a list of Items that meet your selected filter criteria. They help you easily find the Items that require action or relate to your responsibilities.
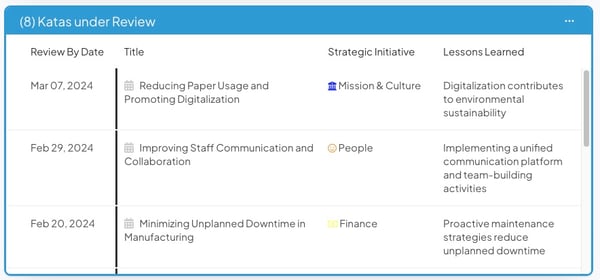
Example of an Item List Card.
![]() The filters on an Item List Card work in conjunction with any Board filters or Location filters.
The filters on an Item List Card work in conjunction with any Board filters or Location filters.
Keep reading to learn about the following:
- Adding a new Item List Card to a Board
- Managing existing Item List Cards
- Working with Item List Cards
Add an Item List Card
Who can add an Item List Card?
- The Board's Owner, if they have the "Board Creator" permission.
- The Board's Editors, if they have the "Board Creator" permission.
- Anyone with the "Board Manager" permission for Boards in that Board's Location.
![]() Boards can have up to 16 Cards. Once a Board has 16 Cards, you won't be able to add or copy additional Cards to that Board.
Boards can have up to 16 Cards. Once a Board has 16 Cards, you won't be able to add or copy additional Cards to that Board.
Add a new Item List Card
Open the Board with which you want to work, then:
- Click Add in the top right corner of the Board.

- Click Item List in the resulting drop-down menu and the Item List Card window will open.
- Name (required): The name will appear in the Card's primary header and can be used to identify this Card.
- Add any necessary filter rules.
- Click Add. The Card will be created and added to the top left position on the Board.
Copy a custom Item List onto a Board
Open the Custom List with which you want to work, then:
- Click Actions at the top of the page.
- Click Copy to Board in the resulting drop-down menu and the Copy to Board window will open.
- Choose Existing: Use this field to search for and select the Board to which this list should be added.
- Click Copy. The List will be added to the top left position on the Board as a Card with the same name.
Managing Item List Cards
The following people can update and configure existing Item List Cards:
- The Board's Owner, if they have the "Board Creator" permission.
- The Board's Editors, if they have the "Board Creator" permission.
- The Card's Editors
- Anyone with the "Board Manager" permission for Boards in the Board's Location.
- Anyone who can access the Board and has the "Card Manager" permission for Cards in the Card's Location.
Edit an Item List Card's filters
To edit an Item List Card's filters, locate the Card with which you want to work, then:
- Click the ellipsis in the top right corner of the Card.

- Click Edit in the resulting drop-down menu.
- Update the filters as necessary.
- Click Save.
/Ofie/Ofie%20Profile%20Pic.png?width=50&height=50&name=Ofie%20Profile%20Pic.png) Pro Tip: Do you want to change how many Items appear on each page of your Item List Card? While editing your Card, expand the Item Filter's View Options. In the Max field, you can pick how many Items should appear on each page. This is a great way to create a Card showing only your top Items or prevent Board viewers from needing to scroll through a long List.
Pro Tip: Do you want to change how many Items appear on each page of your Item List Card? While editing your Card, expand the Item Filter's View Options. In the Max field, you can pick how many Items should appear on each page. This is a great way to create a Card showing only your top Items or prevent Board viewers from needing to scroll through a long List.

Edit an Item List Card's View
There are six Item List View Types. Each View provides a unique way to display and organize the Items in your List.
Most Views can be customized. To edit an Item List Card's View:
- Select the ellipsis in the top right corner of the Card.

- Hover over View in the drop-down menu and select the View you want the List to use.

- The Item List Card will refresh and display the chosen View.
After you've chosen the appropriate View, you can further customize the Item List Card's format. To do so:
- Click the ellipsis in the top right corner of the Card.
- Hover over View, then hover over the View you want to edit, and select the pencil icon that appears to the right.

- The options on the resulting Edit View window depend on the current View, as described below.
- Detail and Hierarchy View
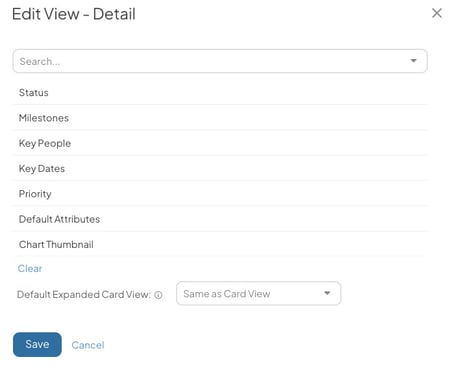
- In Detail and Hierarchy View, you can customize which information to display for each Item in your List.
- Search: Use this field to search for and select additional Item Details to include.
- The order in which you add Item Details does not matter. When you save your changes, the Item Details will automatically be rearranged into the default order of information.
- To remove an Item Detail, hover over it so that it's highlighted blue and select the x icon that appears to its right.
- To remove all Item Details, select Clear.
- In Detail and Hierarchy View, you can customize which information to display for each Item in your List.
- Detail and Hierarchy View
-
-
- Default Expanded Card View: Expand the drop-down to choose in which View this list should open when expanded. By default, the expanded list will use the same View as the regular Card.
- Click Save.
-
-
- Kanban View:
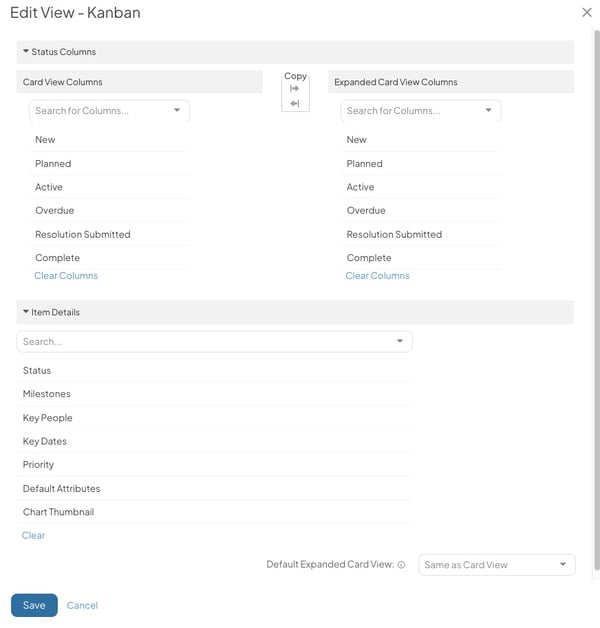
- Under the Card View Columns header, each column currently displayed on the Item List Card will be listed. Any changes made to this section will affect only the appearance of the Card itself.
- Search for Columns: Expand the drop-down to choose any additional columns that should be shown on the Card.
- To remove an existing column, hover over it so that it's highlighted blue and click the x button that appears to its right.
- To remove all existing columns, click Clear Columns.
- To change the order of the included columns, drag and drop them into the desired positions.
- Under the Expanded Card View Columns header, each column currently displayed in the expanded version of the Card will be listed. Any changes made to this section will only affect the appearance of the expanded version of the Card.
- Search for Columns: Expand the drop-down to choose any additional columns that should be shown on the expanded view.
- To remove an existing column, hover over it so that it's highlighted blue and click the x button that appears to its right.
- To remove all existing columns, click Clear Columns.
- To change the order of the included columns, drag and drop them into the desired positions.
- Under the Copy header:
- Click the right arrow to copy the formatting from the "Card View Columns" section to the "Expanded Card View Columns" section.
- Click the left arrow to copy the formatting from the "Expanded Card View Columns" section to the "Card View Columns."
- Under the Item Details header, you can customize which information to display for each Item in your List.
- Search: Use this field to search for and select additional Item Details to include.
- The order in which you add Item Details does not matter. When you save your changes, the Item Details will automatically be rearranged into the default order of information.
- Under the Card View Columns header, each column currently displayed on the Item List Card will be listed. Any changes made to this section will affect only the appearance of the Card itself.
- Kanban View:
-
-
-
- To remove an Item Detail, hover over it so that it's highlighted blue and select the x icon that appears to its right.
- To remove all Item Details, select Clear.
-
-
-
-
- Default Expanded Card View: Expand the drop-down to choose in which View this list should open when expanded. By default, the expanded list will use the same View as the regular Card.
- Click Save.
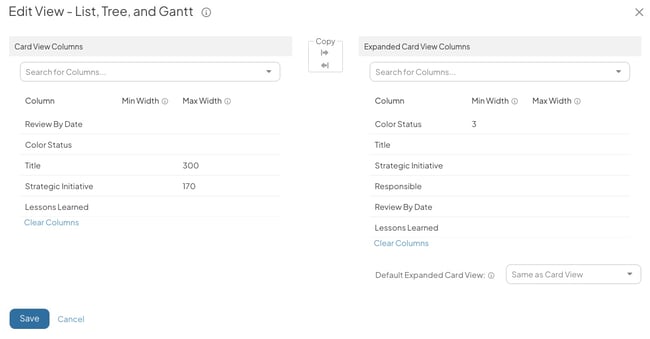
- List and Tree View:
-
-
-
- Under the Card View Columns header, each column currently displayed on the Item List Card will be listed. Any changes made to this section will affect only the appearance of the Card itself.
- Search for Columns: Expand the drop-down to choose any additional columns that should be shown on the Card.
- To remove an existing column, hover over it so that it's highlighted blue and click the x button that appears to its right.
- To remove all existing columns, click Clear Columns.
- To change the order of the included columns, drag and drop them into the desired positions.
- To change a column's minimum width, enter the desired number of pixels in the column's Min Width field.
- To change a column's maximum width, enter the desired number of pixels in the column's Max Width field.
- Under the Card View Columns header, each column currently displayed on the Item List Card will be listed. Any changes made to this section will affect only the appearance of the Card itself.
-
-
-
- Under the Expanded Card View Columns header, each column currently displayed in the expanded version of the Card will be listed. Any changes made to this section will only affect the appearance of the expanded version of the Card.
- Search for Columns: Expand the drop-down to choose any additional columns that should be shown on the expanded view.
- To remove an existing column, hover over it so that it's highlighted blue and click the x button that appears to its right.
- To remove all existing columns, click Clear Columns.
- To change the order of the included columns, drag and drop them into the desired positions.
- To change a column's minimum width, enter the desired number of pixels in the column's Min Width field.
- To change a column's maximum width, enter the desired number of pixels in the column's Max Width field.
- Under the Copy header:
- Click the right arrow to copy the formatting from the "Card View Columns" section to the "Expanded Card View Columns" section.
- Click the left arrow to copy the formatting from the "Expanded Card View Columns" section to the "Card View Columns."
- Default Expanded Card View: Expand the drop-down to choose in which View this list should open when expanded. By default, the expanded list will use the same View as the regular Card.
- Click Save.
- Under the Expanded Card View Columns header, each column currently displayed in the expanded version of the Card will be listed. Any changes made to this section will only affect the appearance of the expanded version of the Card.
- Gantt View:

- Under the Card View Columns header, each column currently displayed on the Item List Card will be listed. Any changes made to this section will affect only the appearance of the Card itself.
- The Expanded checkbox: When selected, the first level of the tree will be expanded. When unselected, the tree will be collapsed by default.
- Left Grid Width: Enter a number of pixels to determine the width of the left side of the Gantt View List.
- Default Interval: Use the drop-down to select a default time interval for your Gantt List.
- By default, Automatic will be selected, meaning the interval will dynamically change depending on the time range of the Item List.
- If you want your List to always show a certain interval, then you can choose between Weeks, Months, and Years.
- Search for Columns: Expand the drop-down to choose any additional columns that should be shown on the Card.
- To remove an existing column, hover over it so that it's highlighted blue and click the x button that appears to its right.
- To remove all existing columns, click Clear Columns.
- To change the order of the included columns, drag and drop them into the desired positions.
- To change a column's minimum width, enter the desired number of pixels in the column's Min Width field.
- To change a column's maximum width, enter the desired number of pixels in the column's Max Width field.
- Under the Expanded Card View Columns header, the view settings for the expanded version of the Card will be listed. Any changes made to this section will only affect the appearance of the expanded version of the Card.
- Use the same instructions for the Card View Columns to configure your expanded View.
- Default Expanded Card View: Expand the drop-down to choose in which View this list should open when expanded. By default, the expanded list will use the same View as the regular Card.
- Under the Card View Columns header, each column currently displayed on the Item List Card will be listed. Any changes made to this section will affect only the appearance of the Card itself.
-
-
-
- Under the Copy header:
- Click the right arrow to copy the formatting from the "Card View Columns" section to the "Expanded Card View Columns" section.
- Click the left arrow to copy the formatting from the "Expanded Card View Columns" section to the "Card View Columns."
- Under the Copy header:
-
-
- Calendar View:
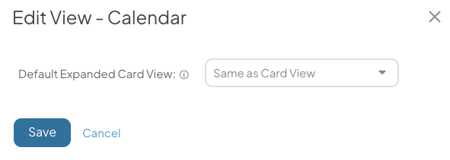
- Default Expanded Card View: Expand the drop-down to choose in which View this list should open when expanded. By default, the expanded list will use the same View as the regular Card.
- Click Save.
- Calendar View:
Pro Tip: Changes you make to a Card's columns in the Edit View window will be applied when you PDF the Board or Item List Card.
Working with Item List Cards
View the filters applied to the Card
To quickly see which filters are applied to an Item List Card, click the filter icon in the Card’s header.

This opens the Item Filter:
- If you have permission to edit the Card, you can update the filter criteria directly from this view.
- If you do not have permission, the Item Filter will be displayed in read-only mode.
Bulk change Items from an Item List Card
You may find yourself needing to update several Items on a Card with the same information. Rather than opening and editing each Item one at a time, you can bulk change them directly from the Item List Card.
To bulk change Items, you must have the appropriate permissions to make any given change to each of those Items. If you don't have the right permissions to make the chosen change to one of the selected Items, that Item will not be affected by the bulk change.
You can initiate the bulk change by selecting the ellipsis in the top right corner of the Card and selecting Bulk Change in the resulting drop-down.

If you don't have permission to edit the Card, you must expand the Card and select the Actions button. Then select Bulk Change in the drop-down menu.

![]() Pro Tip: For detailed information about bulk changing Items, check out this article.
Pro Tip: For detailed information about bulk changing Items, check out this article.
View an Item List Card's Impact
![]() Only people with the "View Report Data" and "View Impact" permissions will be able to generate an Impact Summary Report.
Only people with the "View Report Data" and "View Impact" permissions will be able to generate an Impact Summary Report.
If you're interested in the total impact of the Items included on the Item List Card, you can generate an Impact Summary Report exclusively for those Items. To do so, locate the Card with which you want to work, then:
- Click the ellipsis in the top right corner of the Card.
- Click Impact in the resulting drop-down menu and the Report will open.
![]() For more information about the Impact Summary Report, check out this article.
For more information about the Impact Summary Report, check out this article.
Search an Item List Card
To search for a particular Item in an Item List Card:
- Hover over the Card and click the magnifying glass icon that appears in its top right corner. The "Search Card" field will appear.

- Enter your search term into this field and hit enter/return or click the magnifying glass icon again to search the list.
- Click the x icon that appears next to the magnifying glass to cancel your search.
Quickly Edit Items on your Card without opening the Item
When you are viewing an Item List Card, you can edit Items from the Card without needing to open the Item. Check out this article for information on how to edit Items in a List.
Maximize an Item List Card
Maximize the Item List Card when you want to see the List in full screen. This is a great way to increase focus on the Card and view the List in more detail.
To expand a Card:
- Hover over the Card and select the maximize icon.

Pro Tip: Any Quick Filters on the Board will be present in the expanded view of the Item List Card.