
Board filters allow you to filter data across an entire Board without needing to configure filters separately on each Item-based Card.
There are two types of Board filters covered in this article:
- Item Filters: Advanced filters that use combinations of rules and criteria to control which Items appear on the Board. These are configured in the Board’s Item Filter window.
- Quick Filters: Simple drop-down filters displayed across the top of the Board that allow users to quickly filter Board data.
 Pro Tip: Boards can also be filtered by Location using the Board Location Filter. For more information, see the support page on filtering Boards by Location.
Enable and configure Board filters
To enable filters or set their default values, you must have permission to edit the Board. Only the following people can do so:
- The Board's Owner
- Anyone with the "Board Manager" permission for Boards in that Board's Location.
Enable filters and set their default values
To manage a Board's filters, navigate to that Board, then:
- Click Actions in the top right corner of the Board.

- Click Edit in the resulting drop-down and the Edit Board window will open.
- Expand the Filters section.
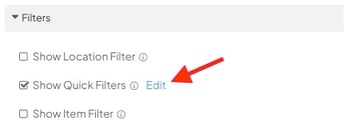
To enable Quick Filters, check the Show Quick Filters checkbox.
- To edit the default Quick Filters, click Edit next to the "Show Quick Filters" checkbox.
- In the resulting window:
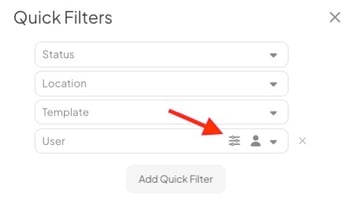
- Click Add Quick Filter and a drop-down listing the available filters will open.
- Search for and select the filter you want to add. That filter will appear in its own field on the Quick Filters window.
- To add a default criterion to any Quick Filter—one that will be applied to the Board each time it is opened—add that criterion to the filter's field. People will be able to change this criterion when viewing the Board, but the filter will revert to the default the next time they access it.
- Some Quick Filters support additional criteria that can also be configured by default. When available, an Additional Options icon will appear when hovering over the Quick Filter. Select the icon to configure the extra criteria. When extra criteria is defined, the icon will turn blue.
- Leave the Quick Filter blank if you don't want a default value to be applied.
- To delete an existing Quick Filter, hover over its field and click the x button that appears to its right.
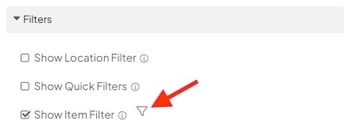
To add an Item Filter to the top of the Board, check the Show Item Filter checkbox.
- To add default rules to the Item Filter, select the filter icon.
- In the resulting window, add or update the default filters that will be applied to the Board each time it's accessed, then click Save.
Select Save to finalize the changes to your Board.
Using the Quick Filters
Once Quick Filters have been enabled on a Board, anyone viewing the Board can temporarily update the parameters of those filters but the filters will revert to their default state the next time they access the Board.
Quick Filters are displayed across the top of the Board beneath its title.
If a Quick Filter has a default value, it appears highlighted in blue and displays a count of the applied criteria.
-
Hover over the count to view a tooltip showing which criteria are applied.
-
When you open a Quick Filter, selected values appear at the top of the dropdown for easy reference.
To temporarily change the Quick Filters' values:
- Expand each filter's drop-down and select the value(s) by which Items referenced by this Board should be filtered.
- For date-based Quick Filters, click the calendar icon inside the field and select the start date and end date for the filter.
- To quickly clear all selections in a Quick Filter, select the x icon inside it.
Filtering by Item Dates
Quick Filters that target a specific Item Date, such as Created Date or Completed Date, let you select a date range using a calendar. When applied, these filters are highlighted in blue and display a calendar icon.
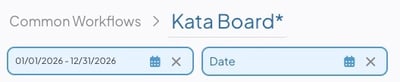
If you want more flexibility over which Item Date you filter by, use the Date Quick Filter. It lets you select the Date type you want to filter, such as Created, Completed, Start, or Due, without needing a separate filter for each Date type. It also supports flexible date ranges, such as the start of last month or the end of this year.
Advanced Quick Filters
Some Quick Filters include advanced options for more precise filtering while maintaining the speed and simplicity of Quick Filters. These options allow you to apply secondary criteria depending on the filter being used.
To access these options, hover over the Quick Filter and select the Additional Options icon. When secondary criteria is applied, the icon will turn blue.
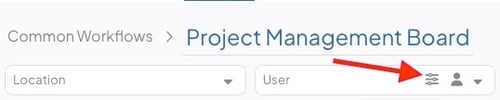
The following Quick Filters support advanced options:
- Location: Specify the Location Type (Originating, Responsible, Participating, Impact, or Investment) and whether to include nested Location data (Location & Below).
- When the Location Type is set to Impact or Investment, this Quick Filter affects both the Items returned and the Impact or Investment data displayed in Reports, Item List columns, and Impact Widgets.
- The secondary criteria configured for this Quick Filter do not affect Card Visibility filters, Goal Widgets, Goals in Reports, Items displayed in X-Matrices, People Lists, People Widgets, or users included in Activity Feed Cards. For these components, only the primary Location selection is used.
- Attribute: Specify the Attribute Type when the Attribute is used in multiple contexts, such as Items, Ad Hoc, and Impact.
- When the Attribute Type is set to Impact, this Quick Filter affects both the Items returned and the Impact data displayed in Reports, Item List columns, and Impact Widgets.
- The selected Attribute Type does not affect Card Visibility filters.
- Impact: Specify the Resolution Type (Actual, Forecast, Target) and Amount Type (Unknown, One-Time, Recurring, Range, Custom Schedule) for the selected Impact.
- This Quick Filter also filters individual Impact data on Reports, Item List columns, and Impact Widgets.
- Investment: Specify the Resolution Type (Actual, Forecast, Target) and Amount Type (Unknown, One-Time, Recurring, Range, Custom Schedule) for the selected Investment.
- This Quick Filter also filters individual Investment data on Reports, Item List columns, and Impact Widgets.
- Parent: Choose whether to include the selected parent Item in the results, and whether to include only first-level child Items or all nested child Items.
- User: Specify the Team Role the selected user must have.
- The selected Team Role does not affect Activity Feed Cards.
- Currency: Specify the Resolution Type (Actual, Forecast, or Target) the selected currency must appear in.
- This Quick Filter only affects which Items are returned. It does not filter individual Impacts.
Using the Board's Item Filter
If an Item Filter has been added to a Board, a filter icon will appear at the top right.

When no rules are applied, the filter icon is gray. When the filter contains rules, the icon turns blue.
To temporarily change the Item Filter's rules:
- Click the filter icon, and the Item Filter window will open. Any existing global filters will be listed.
- Update the filters as needed and click Save.