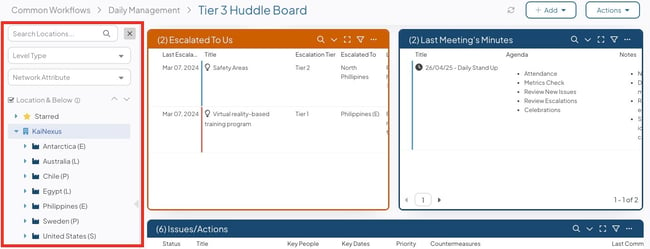
If the Location filter has been enabled for a Board, a collapsible Location panel will appear along its left-hand side which displays your organization's Network structure — the hierarchy of Locations within the organization.
The Location panel gives you the ability to apply a Location filter to every Card on the Board without needing to manually add that filter to each one.
When no Locations are selected in this panel, data from the entire organization will be shown on the Board. If one or more Locations are selected:
- Cards that have been assigned a Location not included in the Location filter will not be shown.
- Any shared series from a Chart outside the selected Location(s) will disappear from the Board's Chart Cards.
- Items from Locations not included in the Location filter will not be referenced by any Item-based Cards — Item List Cards, Reports, etc.
- People from Locations not included in the Location filter will not be referenced by any people-based Cards — People List Cards, Reports, etc.
![]() For information on filtering a Board by global filters and quick filters, check out this article.
For information on filtering a Board by global filters and quick filters, check out this article.
Enable and configure the Location filters
To enable the Location filter or set its default value, you must have permission to edit the Board. Only the following people can do so:
- The Board's Owner
- Anyone with the "Board Administrator" permission for Boards in that Board's Location.
To manage a Board's Location filter, navigate to that Board, then:
- Select Actions in the top right corner of the Board.

- Select Edit Board.
- Expand the Filters section.
- To add a Location filter to your Board, select the Show Location Filter checkbox:
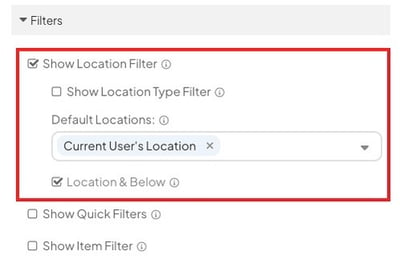
- Show Location Type Filter checkbox: When selected, Originating, Responsible, and Impact Location toggles will be included on the Location Filter. Selecting one or more Location Types will populate Items that have the selected Location as the matching Location Type.
- If unselected, the Location Filter will always search for Items where the Location selected is the Originating or Responsible Location.
- Default Location Type(s): Pick which Location Types should be selected by default each time someone views the Board.
- Originating and Responsible can be selected simultaneously, but Impact is single-select only.
- Default Locations: Use this field to search for and select the Locations which should automatically be selected and applied to the Board each time someone views it.
If this field is left blank, no Locations will be applied by default. People will be able to choose a Location from the Locations panel, and their selection will still be applied the next time they access the Board.
- The Location & Below checkbox: This option only appears when a Location is added to the "Default Locations" field.
When enabled, the Board will show data for the selected Locations and any Locations nested under them by default. People will be able to change this setting from the Locations panel, but it will revert to the default the next time they access the Board.
- The Location & Below checkbox: This option only appears when a Location is added to the "Default Locations" field.
- Show Location Type Filter checkbox: When selected, Originating, Responsible, and Impact Location toggles will be included on the Location Filter. Selecting one or more Location Types will populate Items that have the selected Location as the matching Location Type.
- Click Save to finalize the changes to this Board.
Working with the Locations panel
If the Locations panel is collapsed, click it to expand it. Your organization's Network structure will appear. If a default value has been configured for this Board, those Locations will be automatically selected and any changes you make will revert to the default the next time you access the Board.
If no default value has been configured, your selections will carry over into your next session.
Click a Location to select it. If you want to select multiple Locations, hold down the Ctrl key while clicking on each Location. To select all Locations in a range, hold down the Shift key while clicking the first Location in the range and then the last Location in the range.
Once a Location has been selected, an x icon will appear to the right of the Search Locations field. Click the x icon to clear the current selections.
If Location & Below is checked, Cards will show data for the Locations you select and any Locations nested under them.
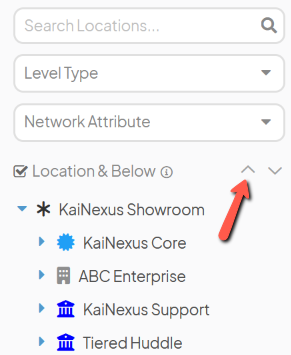
Navigating the Network structure
By default, only the top two tiers of Locations will be visible in the Network.
- If a Location has other Locations nested beneath it, there will be a right caret icon to its left. Click that icon to expand that Location by one tier.
- If a Location has been expanded to show its nested Locations, there will be a down caret icon to its left. Click that icon to collapse that Location, hiding any Locations nested beneath it.
- To expand all Locations by one tier, click the expand icon at the top of the Network structure. Each additional click will expand the Network structure by one more tier.
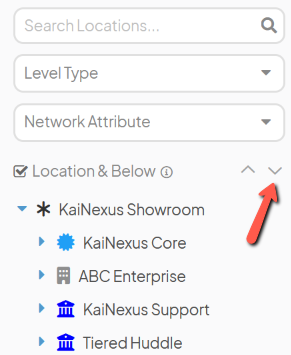
- To collapse the entire Network to the top tier, click the collapse icon at the top of the Network structure.
Search for the Location you want to select
/Ofie/Ofie%20Profile%20Pic.png?width=50&height=50&name=Ofie%20Profile%20Pic.png) Pro Tip: Is there a Location you search for often? You can star Locations to pin them to the top of the Location Filter, making them easier to access later.
Pro Tip: Is there a Location you search for often? You can star Locations to pin them to the top of the Location Filter, making them easier to access later.
- Enter the name of a Location into the Search Locations field and hit enter/return or click the magnifying glass icon to search for a particular Location. This will narrow down the list of Locations, but you'll still need to click the Location to select it.
- Level Type: Expand the drop-down to choose the Level Type(s) in which you're interested. This will narrow down the list of Locations to only include Locations of that type (and the Locations they're nested under). Once the Network is filtered:
- Click the Location(s) you want to select, or
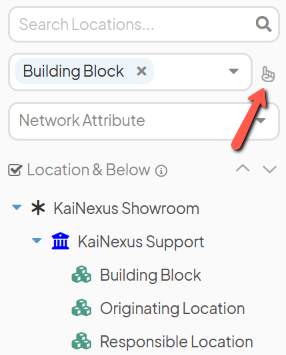
- Click the pointer icon that appears beneath the "Search Locations" field to quickly select all Locations of that type.
-
- Network Attribute: This drop-down will only appear if your organization has Network Attributes enabled. Expand this drop-down to choose the Network Attribute by which you want to filter the Network and the "Attribute Value" drop-down will appear. The Network will not be filtered until an Attribute Value is selected.
- Attribute Value: Expand this drop-down to select the Attribute Value(s) in which you're interested. This will narrow down the list of Locations to only include Locations with that Value (and the Locations they're nested under). Once the Network is filtered:
- Click the Location(s) you want to select, or
- Click the pointer icon that appears beneath the "Search Locations" field to quickly select all Locations with that Value.
- Attribute Value: Expand this drop-down to select the Attribute Value(s) in which you're interested. This will narrow down the list of Locations to only include Locations with that Value (and the Locations they're nested under). Once the Network is filtered:
- Network Attribute: This drop-down will only appear if your organization has Network Attributes enabled. Expand this drop-down to choose the Network Attribute by which you want to filter the Network and the "Attribute Value" drop-down will appear. The Network will not be filtered until an Attribute Value is selected.
Using the Location Type Filter
Warning: The Location Type Filter must be enabled in the edit Board window to take advantage of this feature.
The Location Type Filter allows you to filter a Board for a specific Location Type. When enabled, you'll see Originating, Responsible, and Impact toggles on the Location Filter.
When the Location Type Filter is present, only Items that have the selected Location as the corresponding Location Type will appear on the Board.
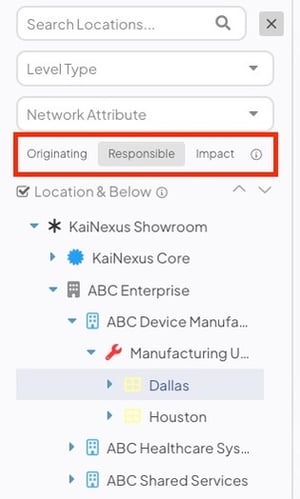
Example of Location Type Filter. This Filter would populate Items where Dallas is the Responsible Location.
The Location Type Filter is especially useful if your organization utilizes Impact Locations. Selecting "Impact" on the Location Type Filter populates Items that have the selected Location as an Impact Location, making it easy to see the Impacts across different Locations.
Additionally, Impact data displayed in Widgets, columns, and Reports will be filtered to include only Impacts tagged with the selected Location.
Pro Tip: If the Location Type Filter is not enabled, the Location Filter will always populate Items where the selected Location is the Responsible or Originating Location.
The Show User Counts checkbox
The Show User Counts checkbox is located at the bottom of the Location Filter and is unselected by default. When the checkbox is selected, the number of Active and Capture Users in each Location will populate beside the Location name, giving you a quick way to reference how many people are in any given Location.
/Location%20Filter%20with%20User%20Counts.jpeg?width=227&height=318&name=Location%20Filter%20with%20User%20Counts.jpeg)
The number of Users in each Location will also appear as a tooltip when you hover over the name of the Location.
![]() Ofie Tip: Adding the number of Users in each Location may not equal the total number of people in your organization because it's possible for Users to exist in more than one Location.
Ofie Tip: Adding the number of Users in each Location may not equal the total number of people in your organization because it's possible for Users to exist in more than one Location.
What happens if a Card has its own Location filters?
The Card’s Location filters will work in conjunction with the Board’s Location filters. For example, if your Board is filtering by the “Warehouse B” Location and you add an Item List Card filtered to show Items in the “Executive” Location, only Items affiliated with both "Warehouse B" and "Executive" will be returned.