/Ofie/Ofie%20Profile%20Pic.png?width=50&height=50&name=Ofie%20Profile%20Pic.png) Warning: Your organization must have the Advanced ROI Module to utilize the features on this support page.
Warning: Your organization must have the Advanced ROI Module to utilize the features on this support page.
An Item's Originating and Responsible Location indicate where the work began and where the work is performed. However, what if the outcome of the work is experienced in a different part of your organization?
Impact Locations allow you to associate individual Impacts with any Location in your Network.

Example of a Resolution Panel with two Impacts, each tagged with a different Impact Location.
When you assign Locations to Impacts, you gain the ability to filter data based on which parts of your organization experienced the outcome of your improvement work, not just the areas creating or performing the work.
Benefits
- Impact Locations help you categorize outcomes from large, cross-departmental projects that affect multiple areas of your organization.
- By specifying which organizational divisions are impacted, Impact Locations allow you to communicate the value of your improvement work to stakeholders more effectively.
- Impact Locations provide a way to compare different divisions based on the Impact generated, ensuring strategic alignment with organizational goals.
Adding an Impact Location to an Impact
You assign Locations to Impacts while entering an Item's Resolution.
Pro Tip: Learn how to submit an Item's Resolution by visiting this support page.
In the Resolution window:

- Respond "Yes" to the "Did this result in a change?" question.
- In the list of Impact Types, select an Impact.
- Warning: The Impact must have Impact Locations enabled for you to give it an Impact Location. Contact your Customer Success Manager to update an Impact's configuration.
- When an Impact Type has Impact Location enabled, there will be an Impact Location field below the other settings for the Impact. Use it to associate a Location with your Impact.

- The Impact Location field will auto-populate with the Item's Responsible Location.
-
- To change the Impact Location, select the x icon next to the default Location and use the field to search for a different Location.
- Depending on the Impact's configuration, this field can be required or optional and single or multi-select. It can also be filtered to only allow for Locations nested beneath the Item's Responsible Location.
- If the field is single-select and the Item has multiple Responsible Locations, the first listed Responsible Location will auto-populate. If desired, the Impact's configuration can be updated so that neither Responsible Location auto-fills.
Pro Tip: Use the Location Search feature for help finding a specific Location in the Network.

- After you save the Resolution, your Impact and the assigned Impact Location will appear in the Resolution Panel.

Filter and display data by Impact Location
Impact Location can be used across the platform to filter and display data based on where the impact occurred, including areas such as Reports, Boards, and Item Lists.
Reports
Filtering Reports by Impact Location helps you collect data based on which Location is receiving the impact of your improvement work.
In the Reports section, most Reports will have a Location Type filter where you can toggle between Originating, Responsible, and Impact Location.

- The Location Type filter controls which of an Item's Locations should be referenced. When you select Impact, only an Item's Impact Location(s) will be referenced.
- In the example image above, the Impact by Item Report will only display data for Impacts tagged with the Manufacturing Location.
Boards
By default, the Location Filter on Boards returns results based on an Item's Originating and Responsible Locations. However, it's also possible to filter a Board by Impact Locations.
To do so, you first need to ensure the Location Type filter is added to your Board's Location Filter.
Important: You must have permission to edit the Board to add the Location Type filter.
Assuming you have permission, follow these steps to add the Location Type filter:
- Select Actions in the top right corner of your Board.
- In the resulting drop-down, select Edit Board.
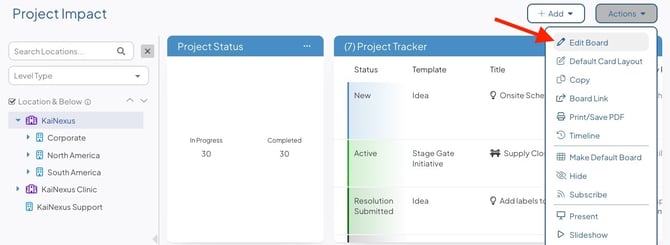
- Under the filters header, select the Show Location Filter checkbox if it is not already selected.

- Select the Show Location Type Filter checkbox.

- Select Save.
Now, you can pick which Location Type is referenced by the Location Filter. Select Impact to filter to Board by Impact Locations.

- Only Items with at least one Impact matching the Location selected in the filter will appear in Item List Cards, Widgets, and Report Cards.
- Impact data displayed in Widgets, columns, and Reports will be filtered to include only those tagged with the selected Location.
Pro Tip: Impact Widgets and Custom Impact Columns can be configured to display data for a specific Impact Location. This gives you two design options when building a Board: filter the entire Board by Impact Location to switch views dynamically, or set individual components to fixed Impact Locations for more targeted reporting.
Item Lists
Impact Locations helps you isolate Items with Impacts tagged with specific Locations.
To filter Items by Impact Location, use the Item Filter.
- In the Items section, you can open the Item Filter by selecting the filter icon.

- Use the Location criteria to build your rule.

- In the Any drop-down, select Impact.

- Select Save.
Your Item List will now include only Items that have at least one Impact tagged with your specified Location.