In KaiNexus, a List with no filters will include every Item you have permission to see. You can use advanced filters to narrow down the list so that only Items with certain features are included.
Filter a list of Items
To filter a list of Items in the "Items" section:
- Select the filter icon at the top of the List. If you do not see this option, you may need to first select Filters to expand the list's filters.

- Add rules that determine which Items appear on the List
- Configure the view options
- Configure the additional column options
- Determine how the List is sorted
/Ofie/Ofie%20Profile%20Pic.png?width=50&height=50&name=Ofie%20Profile%20Pic.png) Pro Tip: You can also filter a List using the five Quick Filters at the top of the List. Quick Filters are a great way to narrow down a List fast without opening the Item Filter window.
Pro Tip: You can also filter a List using the five Quick Filters at the top of the List. Quick Filters are a great way to narrow down a List fast without opening the Item Filter window.
The Rules section
When you open the Item Filter window, the Rules section will be expanded by default. This is where you'll build your list of filter criteria or "rules" that control which Items appear on the List. You can add as few or as many as you need.
The Match requirement
The Match requirement determines how the rules in each rule group will interact with each other. Expand the drop-down to choose between the following options.
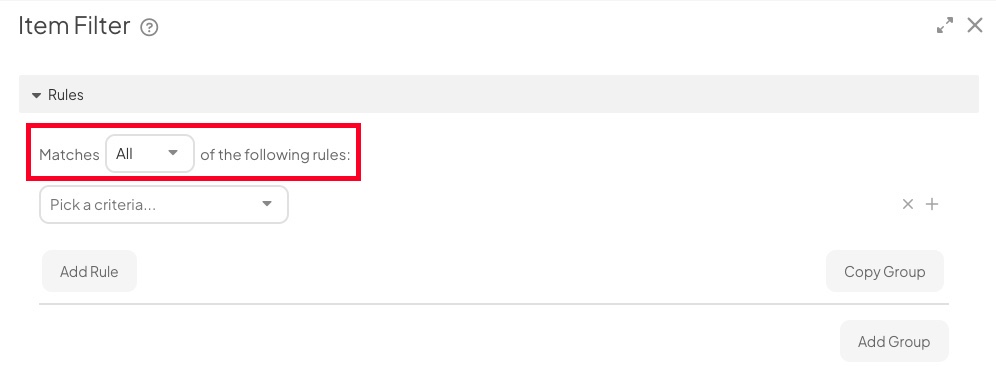
- All: With this configuration, Items included in the List must match every rule in this group of criteria.
- Any: With this configuration, Items included in the List must match at least one of the rules in this group of criteria.
Add a rule
The rules determine the Items that will be included on the list. To add a rule:
- Click either Add Rule or the plus icon to the right of an existing rule. A new criteria drop-down will appear beneath the existing rule(s).
- Use the Pick a criteria field to search for and select the criterion around which you want to build a rule. You can either type what you are looking for, or you can use the dropdown. There are lots of criteria you can choose from, divided into the following categories:
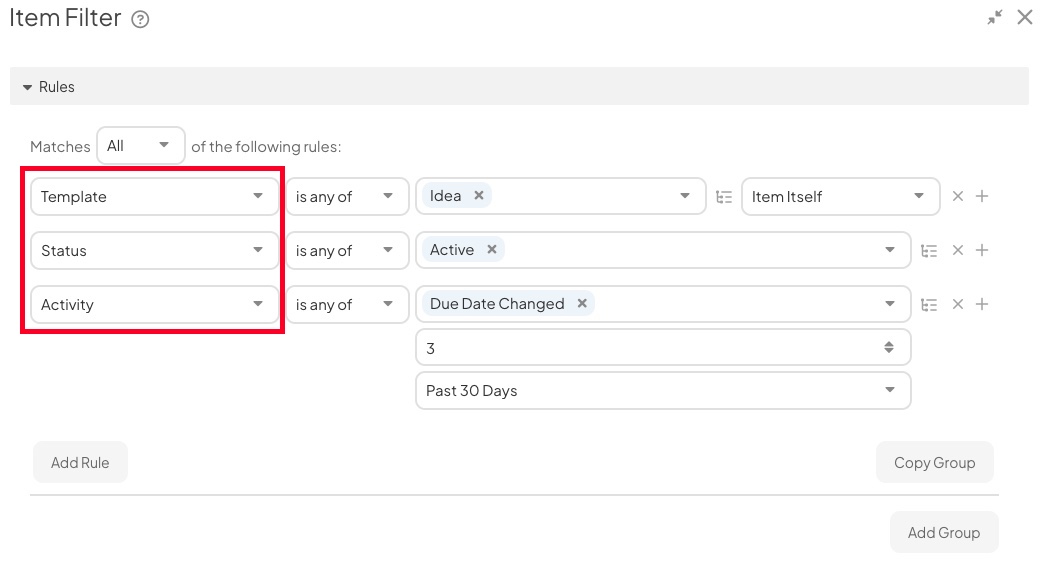
- Common: This category includes the most commonly used criteria, typically relating to the basic descriptors of an Item, such as Template, Location, and Status.
- Resolution: This category includes criteria related to Items' Resolutions and impacts.
- Specialized: This category includes more complicated criteria, such as activity, bottlenecks, and milestones.
- Dates: This category includes key dates in an Item’s lifecycle.
- Date Fields: This category includes any date fields that have been configured by your organization.
- Number Fields: This category includes any number fields that have been configured by your organization.
- Weighted Scores: This category includes any Weighted Score Groups that have been configured by your organization.
- Your Location's Attributes: This category includes all of the Attributes that have been configured by your organization and assigned to your Location.
- Other Attributes: This category includes all of the Attributes that have been configured by your organization but have not been assigned to your Location.
- Once you've selected a criterion, the logic and condition fields will appear to its right.
- The Logic: Expand this drop-down to select the condition that should be applied to this rule. Depending on the type of criterion included in the rule, you'll be able to choose from the following:
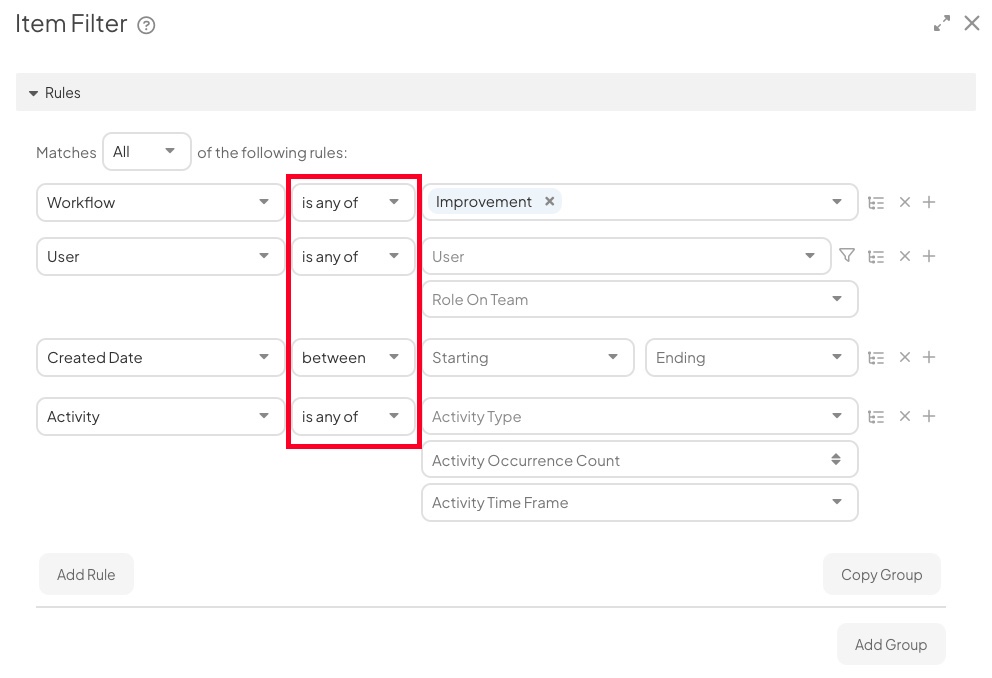
- Is any of: With this configuration, Items must match one or more of the selected options.
- Is all of: With this configuration, Items must match all of the selected options.
- Is not any of: With this configuration, Items must not match one or more of the selected options.
- Is not all of: With this configuration, Items must match none of the selected options
- Between: This configuration only appears when working with a date, date field, number field, or Weighted Score criterion. With this configuration, Items' relevant value must fall within the specified range.
- Is any: This configuration only appears when working with a date, date field, number field, or Weighted Score criterion. With this configuration, Items must have some value in the specified field
- Is none: This configuration only appears when working with a date, date field, number field, or Weighted Score criterion. With this configuration, Items must not have a value in the specified field
- Matches: This configuration only appears when working with the Keyword criterion and is the only possible configuration for that criterion. With this configuration, Items must match the specified keyword.
- The Condition: The field(s) to the right of the Logic drop-down is used to determine the condition(s) that Items should meet to be included in this List. The rule's criterion determines which condition fields are available.
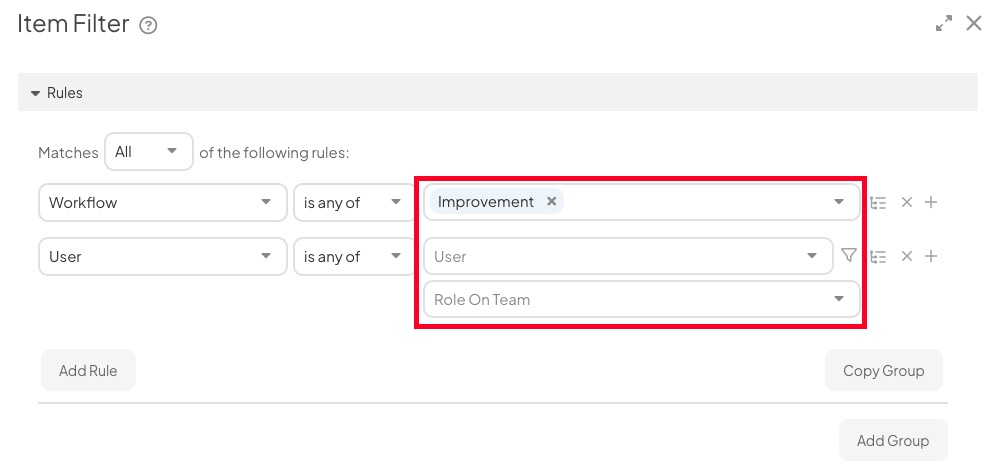
- Most rules will have a nesting structure icon to their right. When you select the icon, an additional field will appear. Use this field to pick whether the rule is applied to the Item Itself, the Item's Parent, the Item's Children, or the Item & Descendants.
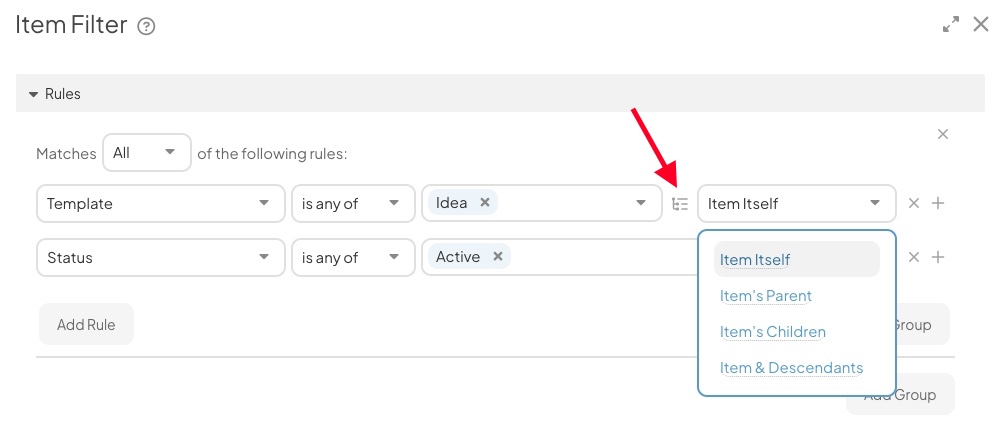
Pro Tip: You only need to use the nesting structure icon if you want certain rules to apply to an Item's Parent or Children. By default, each rule will apply to the Item Itself unless you specify otherwise.
-
- Item Itself: Select this option to apply the rule to the Item. The List will include all Items that meet your criteria.
- Item Itself is selected by default.
- Item Itself: Select this option to apply the rule to the Item. The List will include all Items that meet your criteria.
-
- Item's Parent: Select this option to apply the rule to the Item's Parent. The List will include Items nested under Parent Items meeting your criteria. For example, you can use this option to find tasks nested under certain projects.
- Item's Children: Select this option to apply the rule to the Item's Children. The List will include Items with nested Items meeting your criteria. For example, you can use this option to find projects with overdue tasks nested beneath them.
- Item & Descendants: Select this option to apply the rule to the Item and its Descendants. The List will include Items that meet your criteria and Items with Descendants that meet your criteria.
- Descendants refers to all of an Item's nested Items, even those that are nested multiple levels beneath it.
Delete a rule
To delete an existing rule, click the x icon to its right.
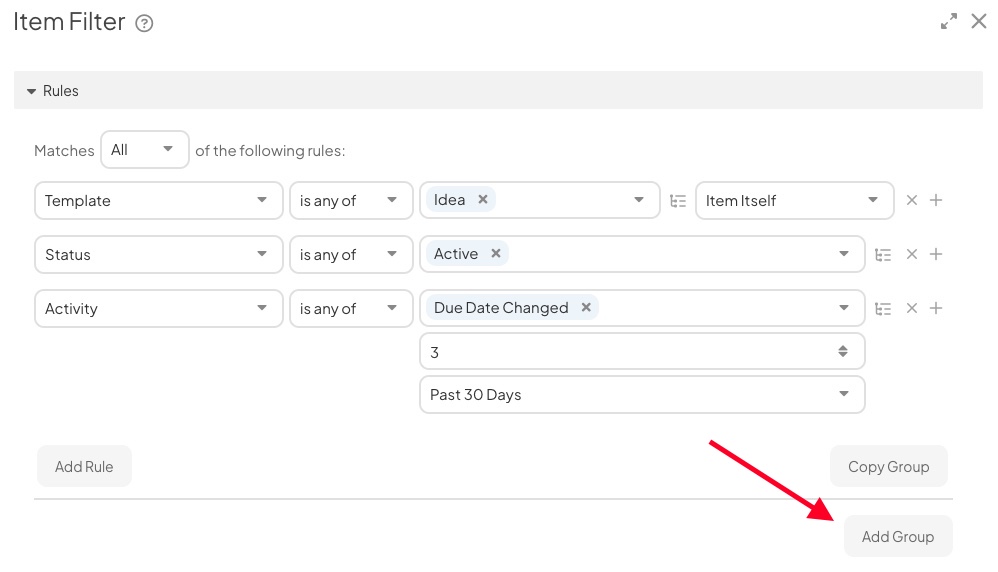
Groups of rules
You can add multiple groups of rules to create more complex combinations of rules and logic. For example, if you want to create a filter where Items can either meet conditions A and B or meet conditions B and C, you might create two groups — one for each of those pairs.
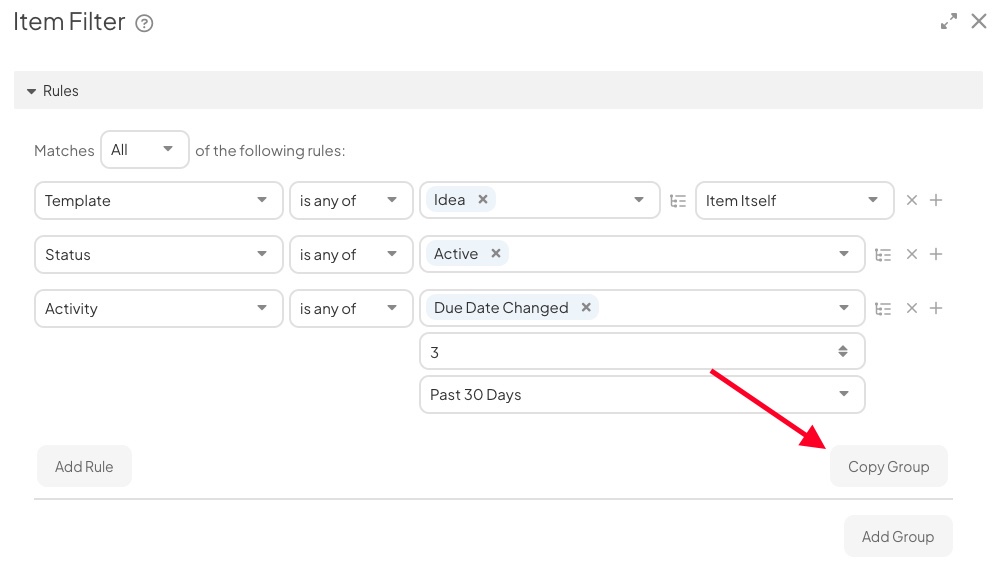
You can either create a new group of rules from scratch or copy an existing group. Copying an existing group is useful when you want to make small changes to the criteria of a previous group and don't want to rebuilt it from scratch.
To add a new group of rules:
- Select Add Group at the bottom of the Rules section. A new group will appear beneath the existing group(s).
To copy an existing group of rules:
- Select Copy Group beneath any existing group of criteria. A new group will appear beneath the copied group with matching criteria already populated. From there, you can make changes where needed.
After you add a new group, the Group Logic drop-down will appear beside the Add Group button at the button of the Rules section. Expand the drop-down to choose whether the Filter should use "And" or "Or" logic between the groups.

- And: With this configuration, Items included in the list must meet the requirements of every group in the filter.
- Or: With this configuration, Items included in the list must meet the requirements of at least one group in the filter.
- Configure the Match requirement and rules for this group as described above.
To delete a group of rules, hover over the group and click the x icon that appears in its top right corner.
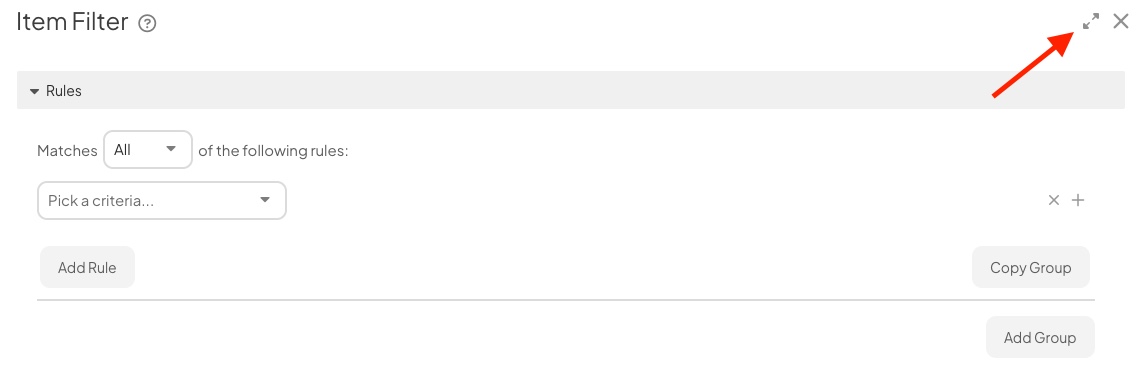
![]() Pro Tip: If you are building a complex filter, give yourself more space by expanding the Item Filter to full screen.
Pro Tip: If you are building a complex filter, give yourself more space by expanding the Item Filter to full screen.
The View options
Click the View Options section to expand it. This is where you'll configure how Items are represented in the list. These options will vary depending on the View the list is currently using.

- Max: Enter the number of Items to appear on each page of your List.
- By default, 50 Items will appear on each page of your List.
- There is a maximum limit of 250.
Warning: Increasing the number of Items shown on each page of your List past 50 could negatively impact performance, resulting in slower load times.
- Density: This option is only available for the List, Tree, and Gantt Views. Click one of the following radio buttons to pick the list's appearance.
-
Comfortable: When selected, the rows on the list will have more whitespace, making it easier to read.
-
Compact: When selected, the rows on the list will have less whitespace, allowing for more data to be visible.
-
- The Wrap Text checkbox: This option is only available for the List and Tree Views. When enabled, if the text within a column exceeds the space available, the text will wrap to the next line. If not enabled, the text will be truncated instead.
- Show Archived: Click one of the following radio buttons to decide whether archived Items should be included on the list.
-
- Exclude Archived: When selected, no archived Items will be included on the list.
-
- Only Archived: When selected, no unarchived Items will be included on the list.
-
- Both: When selected, archived Items and unarchived Items will be included on the list.
- Chart Thumbnail: Click one of the following radio buttons to decide which Chart Thumbnail should be displayed in Chart Thumbnail columns and Item Details. This option is not available in Calendar View.
- Simple: When selected, a simple Chart Thumbnail without data labels will be displayed.
- Detailed: When selected, a more detailed Chart Thumbnail including axis labels, data series names, and a legend will be displayed.
- Attribute Notes: This option is only available for List and Tree View. Click one of the following radio buttons to decide how notes should be displayed when your List includes an Attribute column.
- Show: When selected, Attribute Notes will appear in the Attribute column beneath the displayed value(s).
- Hide: When selected, Attribute Notes will not appear in the Attribute column. You must hover over the displayed value to read the note in a tooltip.
Pro Tip: Want to include Attribute Notes when exporting your Item List to XLSX? Here’s how it works:
- Attribute Notes are always included if your List is in Detail, Gantt, or Hierarchy View, or if select Include All Columns while in List or Tree View.
- If your List is in List or Tree View and you select Include Current Columns, Attribute Notes will only be included if you’ve chosen to show them in the List’s View Options.
- Auto Refresh: Click one of the following radio buttons to decide whether the Item List automatically refreshes when you open and close an Item in the List.
- On: When selected, the Item List will automatically refresh when you open and close an Item in the List. This ensures that any edits made to an Item are reflected in the List. We recommend keeping this functionality enabled in most cases.
- Off: When selected, the Item List will not refresh when you open and close an Item in the List. This can improve navigation if the List has a long load time. However, any edits you make to Items won't be reflected in the List until you manually refresh it.

- Chart Visual: This option is only available for the Detail View. Click one of the following radio buttons to decide how Charts should be shown on the list.
- Default: When selected, Charts will appear on the list in the same format as any other type of Item, with the addition of a small thumbnail of the Chart.
- Chart Only: When selected, Charts will appear on the list with only their title and a larger Chart thumbnail; additional information such as key dates and people will not be included. All other types of Items will be unaffected by this setting.

-
The Show Parents checkbox: This option is only available for the Tree, Gantt, and Hierarchy Views. When enabled, the parent of any Items that meet the filter requirements will be included on the list even if that parent does not meet the filter requirements itself.
-
The Show Children checkbox: This option is only available for the Tree, Gantt, and Hierarchy Views. When enabled, the children of any Items that meet the filter requirements will be included on the list even if those children do not meet the filter requirements themselves.
-
By default, when this checkbox is enabled all children will be included on the list. To only include children of certain workflows, expand the Workflows drop-down to the right of the checkbox and select the workflows that should be included.
-
-
The Filter Children checkbox: This option is only available for the Tree, Gantt Views, and Hierarchy View. When enabled, a filter icon will appear next to the checkbox that you can use to control which children are included on the list.
- Click the filter icon to open a new Item Filter window from which you can filter the list of children.

- Calendar Dates: This option is only available for the Calendar View. Click one of the following radio buttons to decide how Items should be represented on the calendar.
- Span Dates: When selected, Items will span across days from start to end on the calendar.
- Start and Due Only: When selected, only the start and due dates of Items will appear on the calendar.
- Start Only: When selected, only Items' start dates will appear on the calendar.
- Due Only: When selected, only Items' due dates will appear on the calendar.

- Max Height: This option is only available for the Hierarchy View. Set the maximum height for each Item card in the Hierarchy View. If an Item's details exceed this limit, the card will expand up to the maximum height, allowing you to scroll to view the remaining content.
- If you do not enter a value, the default will be 300 pixels.
- There is a minimum of 50 pixels and a maximum of 1000 pixels.
- Width: This option is only available for the Hierarchy View. Set the width of each Item card in Hierarchy View.
- If you do not enter a value, the default will be 300 pixels.
- There is a minimum of 50 pixels and a maximum of 500 pixels.
- Layout: This option is only available for the Hierarchy View. Pick a layout for your Item List. The layout determines which direction your List will expand in Hierarchy View.
- Horizontal - Top: The list will expand from left to right, and the parent Items will be placed at the top right of their child Items.
- Horizontal - Center: The list will expand from left to right, and parent Items will be centered between their child Items.
- Vertical: The list will expand from top to bottom.
- Item Count: This option is only available for Item List Cards. Choose whether you want to Show or Hide the number of Items included in the List on the Card's header.
The Additional Column Options
This section is only available when the list is in the List, Tree, or Gantt view. Click the Additional Column Options section to expand it.
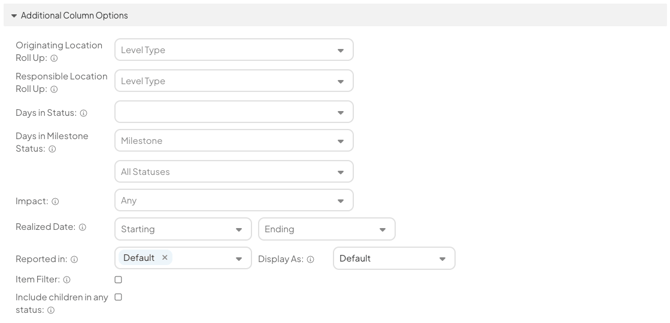
- Originating Location Roll Up: Use the field to select one or more Level Types. If added to your List, the Originating Location Roll Up Column will display the name of the Location(s) on the first matching Level Type when moving up the Network from the Item's Originating Location.
- Responsible Location Roll Up: Use the field to select one or more Level Types. If added to your List, the Responsible Location Roll Up column will display the Location(s) on the first matching Level Type when moving up the Network from the Item's Responsible Location.
- Days in Status: Use this field to choose which Statuses are included in the Days in Status column.
- Impact: Use this field to search for and select the types of impacts that should be referenced in any impact columns.
- Realized Date: If the Starting field is populated, impact columns will only include data realized after that date. If the Ending field is populated, impact columns will only include data realized before that date.
- Reported in (appears only if your organization uses multiple currencies): Select one or more currencies. Any Impact initially logged in these currencies will be included in the List's Impact columns.
- Select Any Currency to include all Impacts, regardless of which currency they were logged in.
- Select Default to include Impact initially logged in the List viewer's default currency.
- Display as (appears only if your organization uses currency conversion): Select which currency the List's Impact columns should display. Any currencies selected in the "Reported in" field will be converted to this currency and summated in the column's value.
- Select Default to display the column's value in the List viewer's default currency
Pro Tip: A user’s default currency is determined by their user profile setting, the currency assigned to their Location, or the organization’s primary currency if neither of the previous options is set.
If you want columns to include Impacts logged in any currency and convert them to the List viewer’s local currency, select Any Currency for Reported in and Default for Display as.

- Currency: This option will only appear if your organization is using multiple currencies. Expand the drop-down to select the currency that should be referenced by this list.
- The Item Filter checkbox: When enabled, a filter icon will appear beside the checkbox. Click that filter icon to create a set of filters that will govern which Item's data is displayed within any impact columns or the Nested Item column.
- The Include children in any status checkbox: When enabled, any Impact and Nested Item columns will reference nested Items of any status. When disabled, those columns will only reference completed nested Items.
Pro Tip: An advantage of using Impact Columns on Tree View Lists is that you can see the Impacts of nested Items included in the Impact of a Parent Item. To see Impacts roll-up into Parent Items, select the Include children in any status checkbox. If unselected, Impact columns won't add nested Item Impacts into the Parent Item.
The Sort options
Click the Sort section to expand it. This is where you'll decide how the list should be ordered.
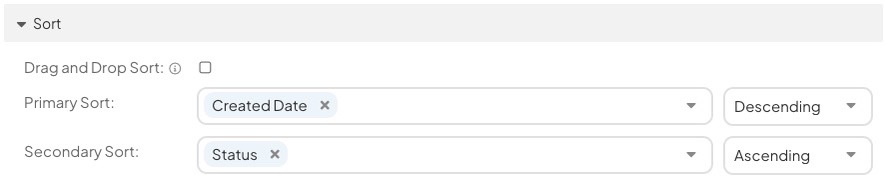
- The Drag and Drop Sort checkbox: When enabled, you'll be able to manually sort the first 50 Items on the list by dragging and dropping them into the right position. This functionality is only available on lists using the Detail, List, and Kanban Views.
- Primary Sort: Use the drop-down to select the primary criteria by which the list should be sorted.
Use the next drop-down to select whether Items should be sorted in ascending or descending order. - Secondary Sort: Use the drop-down to select the secondary criteria by which the list should be sorted.
Use the next drop-down to select whether Items should be sorted in ascending or descending order.
Save the filter
When you're done configuring the list's filters, click Save.