KaiNexus uses Statuses to track improvement work through its lifecycle. Each Status marks a key stage of an Item’s progress from the initial submission to close out.
Tagging Items with Statuses allows you to:
- Communicate with teammates and interested parties about what stage your improvement work is in, and
- Sort Items based on their progression through the Item lifecycle.
You can easily see what Status an Item is in by viewing the Status drop-down beneath the Item's title.

Example of an Item in New Status.
Keep reading to learn about the following topics:
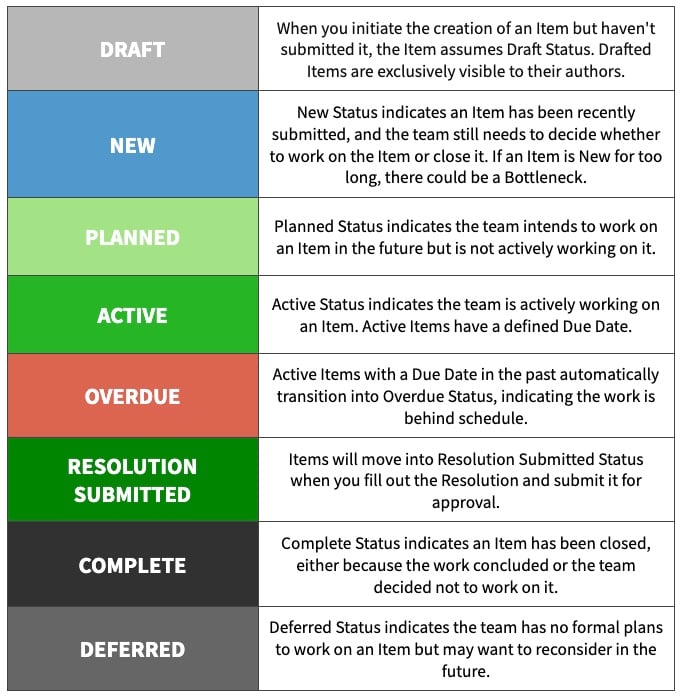
The Statuses
Item Statuses indicate what phase of work is occurring on an Item. There are 8 Item Statuses, each representing a unique phase in an Item's lifecycle.
/Ofie/Ofie%20Profile%20Pic.png?width=50&height=50&name=Ofie%20Profile%20Pic.png) Pro Tip: Organizations with the Branding Module can customize the color representing each Status. KaiNexus Champions should reach out to their Customer Success Manager to enable this feature.
Pro Tip: Organizations with the Branding Module can customize the color representing each Status. KaiNexus Champions should reach out to their Customer Success Manager to enable this feature.
Changing an Item's Status
As you work on an Item, you will move it through various Statuses until the work is Complete. An Item's current Status should always reflect what stage of work is currently being done.
In general, Items begin in New Status, move to Planned Status as the team prepares, and then Activate when everyone is ready to work on it. Assuming Resolution is enabled, a team member will submit the Resolution for approval and then the Item will be Completed.

Example of one path an Item can take through its lifecycle.
However, not every Item needs to follow this exact order. Depending on your organization's workflows, Items might begin in Active Status instead of New. Similarly, Items might not need their Resolution to be submitted for approval or they might be Deferred for a period of time before their Completion.

Example of two alternative paths an Item can take through its lifecycle.
In summary, Items don't need to follow the typical order of Statuses. You can skip over Statuses, revert Items to prior Statuses, and more.
This section will discuss information on changing Statuses, including automatic and manual Status changes.
Pro Tip: The ability to pick which Status an Item enters after it is created can be turned on and off. If you want to allow Users to pick a Status on the Create Screen or have Items default to a Status other than New, reach out to your Customer Success Manager.
Automatic Status Changes
Some Status changes occur automatically, meaning you don't need to manually update the Item for it to change Status. There are two scenarios where automatic Status changes can occur.
- Items always enter Overdue Status automatically. When an Active Item has a Due Date in the past, it becomes Overdue.
- Planned Items can activate automatically based on setting Start Dates and dependencies when you are planning an Item.
Pro Tip: You can set Due Dates for Items in Planned Status; however Planned Items will not automatically transition to Overdue Status. Only Active Items can show as Overdue.
Who can change an Item's Status?
All other Status changes (besides Active Items turning Overdue and Planned Items activating automatically) must be initiated manually.
Who can change an Item's Status depends on which Status they are moving the Item to. We recommend reading our articles about each type of Status change to learn who can initiate each one:
- Revert an Item to New Status
- Plan an item
- Activate an Item
- Submit a Resolution for Approval
- Complete an Item
- Defer an Item
Pro Tip: If your organization utilizes Milestones, a Template might have a Milestone blocking certain Statuses until the Milestone is Completed.
How to manually change an Item's Status
There are a few different ways you can change an Item's Status:
- You can change the Status using the Status drop-down on the Item.

- The Status drop-down is located beneath the Item's title. Select it, and choose an available Status.
- If needed, an additional window will appear where you can enter the information necessary to change the Item's Status.
- Resolution Submitted will not appear in the Status drop-down. Instead, select Complete. If Resolution is enabled on the Item and you have the necessary permissions, you can submit the Resolution.
- If your Item has a Dates Panel, you can use it to initiate Status changes.
- New and Planned Items with a defined Start Date will have an Activate Button in the Dates Panel.

- Active and Overdue Items will have a Complete Button in the Dates Panel.

- New and Planned Items with a defined Start Date will have an Activate Button in the Dates Panel.
- When you are viewing an Item List, you can quickly change the Status without needing to open the Item first. Visit our Editing Items within a List support article to learn more.
- When you are viewing a List in Kanban View, you can click and drag Items from one column to another to change their Status.
Pro Tip: You can also move an Item to Resolution Submitted Status using the Submit Resolution button in an Item's Resolution Panel.
No Status Items
Organizations have the option to create Templates without Statuses. Items created from these Templates are called No Status Items. They do not move through any Statuses and typically represent work that has no end date or doesn't fall beneath any of the existing Statuses.
For example, some organizations choose to make their Meeting Notes Templates No Status.

Example of a No Status Item. You cannot move a No Status Item to any of the 8 Item Statuses.
Custom Statuses
In specific scenarios, your organization may require additional customization beyond the standard Item Statuses. In such cases, Custom Statuses can be utilized to ensure that the Statuses present on a Template accurately reflect the intended workflow.
Custom Statuses offer the flexibility to:
- Rename Item Statuses
- Introduce new Statuses
- Customize which Statuses appear on specific Templates
- Exclude Statuses from Templates
If you encounter a Status different from the Standard Item Statuses outlined in this article, it's probable that your organization is utilizing Custom Statuses.
Pro Tip: Learn more about Custom Statuses and how they work on our Custom Statuses support page.
Recommended Reading
Learn more about each Status by checking out the following support articles:
- Revert an Item to New Status
- Plan an Item
- Activate or Assign an Item
- Defer an Item
- Complete an Item
- Submit a Resolution for Approval
- Reopen an Item
Do you want to view data on how long your Items remain in each Status? Check out our Cycle Time Reports to learn how:
Lastly, download the following PDF for a sharable resource describing the Item lifecycle: