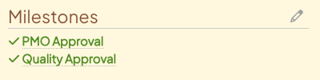
With the Milestones Module, you can create a configurable workflow of checkpoints, validations, or approvals overlaid on any of your Templates. Each step in the workflow is called a Milestone.

Example of Milestones and Stage Gates on a Template.
/Ofie/Ofie%20Profile%20Pic.png?width=50&height=50&name=Ofie%20Profile%20Pic.png) Important: Reach out to your Customer Success Manager for more information on enabling this module.
Important: Reach out to your Customer Success Manager for more information on enabling this module.
Milestones are highly configurable. You have a lot of freedom and flexibility to create Milestones that accurately reflect your organization's improvement process. For example, you might want to add Milestones such as:
- Finance Approval
- Leadership Approval
- Committee Approval
The Milestones Module also allows you to add Stage Gates to your Templates. Stage Gates are a way to group Milestones in the same process phase, helping you visualize complex approval sequences and track projects holistically rather than relying on individual Milestones.

Example of Stage Gates on a Template. Stage Gates make it easy to visualize which step of the process you are in.
Overall, Milestones give extra structure, guidance, and accountability to your Templates. Keep reading this article to learn more about:
Benefits of Milestones
- Milestones give you a way to place checkpoints that prevent improvement work from proceeding before certain requirements are met.
- Milestones provide a method to verify and quality assure your improvement work. Many organizations benefit from setting up financial validation Milestones to confirm financial Impact data.
- Milestones help you break down complex processes into smaller steps or stages, making large projects and initiatives more manageable.
- Milestones provide guidance to improvement teams so that everyone knows what stage of a process they are in and what to do next.
Milestone Configuration
Milestones are configured individually for each Template. There are many ways you can configure Milestones; in this section, we will discuss all the ways you can customize them.
Important: If you'd like to create new Milestones or make adjustments to existing Milestones, reach out to your Customer Success Manager.
Decide the order of Milestones
When a Template includes multiple Milestones, you can choose in what order the Milestones are listed. This will determine the order of completion.

If you don't require the Milestones to be completed in any particular order, you can list multiple Milestones in the same step. Doing this allows the Item Team more freedom with which Milestones they complete first.
If you have a more complex, multi-stage process, then you can sub-order multiple Milestones within the same step. Sub-ordering Milestones can be helpful to visually organize a complex process into stages while maintaining a specific order of completion within each stage.

Separate Milestones into different Panels
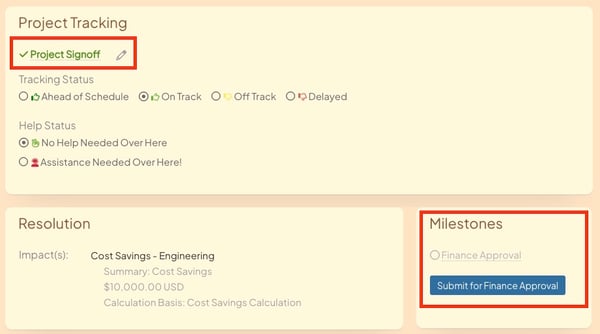
By default, all Milestones on a Template are listed in order on the Milestones Panel. However, you also have the option to separate Milestones into different Panels and tabs of the Template. Placing Milestones in strategic locations throughout the Template is a great way to make Templates more intuitive and group together information related to the same step of a process.
For example, you can display a Financial Approval Milestone near the Resolution so that the Approver can easily reference the financial Impact logged on an Item. Similarly, if different tabs of a Template are dedicated to distinct stages of a process, then you can place Milestones on different tabs depending on which stage they correspond to.
Your Customer Success Manager will help you configure a Template where all Milestones are placed in the most optimal spot for a smooth user experience.
Example of a Template where Milestones are separated on two different Panels.
Add descriptions to each Milestone
To better communicate the purpose and requirements of each milestone, you can add a description. The description will appear when anyone hovers over the milestone name on an Item
Decide who can approve a Milestone
Specify which Team Roles, System Roles, or individuals are eligible to approve the Milestone. You can use the full power of the User Filter to determine exactly which people in your organization should be approving each Milestone.
In addition to setting criteria for eligible Approvers, you can also use Milestone Assignment to increase visibility into who should approve specific Milestones and ensure those individuals are notified of their responsibility.
Pro Tip: Check out our Milestone Approvers article to learn more about who can approve Milestones and how to assign Milestone approvals to individual Users.
Specify the default status of a Milestone
Milestones have multiple different statuses that represent where it is in the approval process.
Milestones begin in "Not Ready for Approval" status. They have not yet met the necessary requirements to move to the next status. For example, earlier Milestones in the flow might need to be approved before you can act on a later Milestone.
When all prerequisites for a Milestone have been met, a Milestone can move to the next status. For each Milestone, you can pick whether it defaults to "Ready for Approval" or "Approved" status.
- If a Milestone defaults to "Ready for Approval" status after all prerequisites have been met, an eligible Approver must approve the Milestone manually.
- If a Milestone defaults to "Approved" status after all prerequisites have been met, the Milestone is automatically approved. It can be unapproved by someone with the appropriate Role if necessary.
Choose how a Milestone is submitted for approval
There are multiple ways to submit a Milestone for approval. When the submit action(s) are fulfilled, the Milestone will be "Ready for Approval," and the appropriate Milestone Approver can approve or deny the Milestone.
Pro Tip: If a Milestone's default status is "Approved," then these actions represent the ways a Milestone can be Approved without needing an Approver to manually approve the Milestone.
Here are all the ways a Milestone can be submitted:
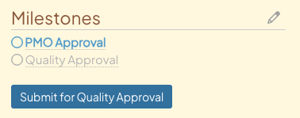
- Person: When you choose to have a Milestone submitted manually by a person, there will be a "Submit for Milestone Name" button beneath the Milestone in the Item. Only people who can edit the Item can see and click this button.
- You can specify if you want the "Submit for Milestone Name" button displayed in the Resolution. The approval button will be listed in the Resolution section as well as the Milestone section.
- You can also decide if you want to allow the Milestone to be submitted and approved any time. The "Submit for Milestone Name" button will appear and the Milestone can be approved even if earlier Milestone have not been approved.
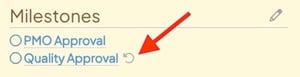
- If you change your mind after you manually submit a Milestone for approval, you can select the undo icon beside the Milestone name. If the Milestone is approved before you unsubmit it, then the Milestone must be unapproved before the undo icon will reappear.
- Status change: The Milestone will be "Ready for Approval" when the Item transitions to a specific Status.
- Previous Milestone approval: The Milestone will be "Ready for Approval" when all previous Milestones have been approved.
- Attribute Value: The Milestone will be "Ready for Approval" when an Item's Attribute is updated to one or more specific Attribute Values. If enabled, selecting certain Attribute value(s) of a single Attribute can cause a Milestone to be submitted.
- If the Attribute value is changed before the Milestone has been acted on, then the Milestone will be changed back to “Not Ready for Approval.”
- If the Attribute value is changed after the Milestone has been acted on, then the Milestone will not be affected.
Pro Tip: You can configure a Milestone so that there is more than one way to submit it. For example, you can design a Milestone to be submitted manually or when an Item reaches a certain Status. When a Milestone has more than one submit action, any of the actions will submit the Milestone.
Require Notes when a Milestone is Approved or Not Approved
During Milestone configuration, you can decide whether the Approver is required to enter a Note when they approve or deny a Milestone.
This is a great way to ensure your Milestone Approvers are providing appropriate context surrounding their decision on a Milestone.
Add Optional Milestones
Optional Milestones are not visible by default. They are added to the Item's existing Milestones when certain criteria are met. Optional Milestones can become required after they are added to an Item.
Pro Tip: Learn more about Optional Milestones and how to add them to Items by checking out our Optional Milestones support article.
Optional Milestones are helpful when a Template only requires a certain approval under unique circumstances. When you don't need the Milestone, the team won't see it and can skip over it. When you need the Milestone, you can easily add it.
There are several ways to trigger an Optional Milestone's appearance on an Item. During Milestone configuration, you can decide between the following options:
- People: KaiNexus Users can manually add Optional Milestones to Items.
- You can decide whether the Optional Milestone can be added by everyone who can edit the Item or only by people with specific Team or System Roles.
- Impacts and Investments: You can trigger Optional Milestones to automatically appear when specific Impacts or Investments are entered into the Resolution.
- You can use all Impact Types to trigger Optional Milestones, including financial, unit-based, and qualitative Impacts.
-
- You can pick whether the Impact or Investment must be logged in the Target, Forecast, or Actual Resolution to trigger the Optional Milestone.
- You can assign threshold values for the Impacts so that the Optional Milestone is only triggered if the logged Impact exceeds a certain value. These thresholds can be unique to each Location in your Network, meaning that there will be a different threshold depending on the Item's Impact Location (or the Item's Responsible Location, if there is no Impact Location).
- If the Impact or Investment is changed before the Milestone has been acted on, then the Milestone will be inactivated and removed from the Item.
- If the Impact or Investment is changed after the Milestone has been acted on, the Milestone will not be affected.
- Attributes: You can trigger Optional Milestones to appear when an Item's Attributes are changed to specific values. For example, you can have an additional Milestone triggered when a "Priority" Attribute is marked as "High."
- You can even use combinations of multiple Attributes to determine when the Optional Milestone should trigger. For example, you could configure an Optional Milestone that triggers when a "Priority" Attribute is marked as High and a Progress Attribute is marked as "Off Track."
- If the Attribute value is changed before the Milestone has been acted on it will be inactivated and removed from the Template.
- If the Attribute value is changed after the Milestone has been acted on, then the Milestone will not be affected.
- Locations: You can trigger Optional Milestones to appear when an Item's Originating or Responsible Location matches one or more of your defined Network Locations. This allows you to have particular Milestones activated for specific departments or teams in your organization.
You can also use a combination of Impacts, Attributes, and Locations to trigger the same Optional Milestone. When using both methods to trigger an Optional Milestone, you can decide whether multiple requirements must be met or whether meeting any requirement is sufficient to add the Milestone to the Item.
NOTE: Your organization will need the Advanced ROI module to trigger Optional Milestones based on Financial Impact.
Specify actions that revert an Approved Milestone to its unapproved status
If there are scenarios where you would want a Milestone that has already been approved to revert to the "Ready for Approval" status, then you can add "Unset Actions" to the Milestone. Unset Actions will unapprove a Milestone.
Ofie Warning: When a Milestone is unapproved, all of the Milestones that come after are unapproved as well.
Unset actions include:
- Result/Impact Change: With this setting, any changes to the Resolution will result in the Milestone being unapproved.
- Detail Change: With this setting, any changes to a Field or Attribute (from the edit window or from the Resolution window) will result in the Milestone being unapproved.
- Reopen: With this setting, reopening a closed Improvement will result in the Milestone being unapproved.
Pro Tip: An Item with Milestones cannot be reopened unless all Milestones were approved prior to the Item being Completed. If a Completed Item has unapproved Milestones, it cannot be reopened.
Block Item Statuses with Milestone Approvals
For each Milestone, you can specify whether any Item Status should be blocked until that Milestone is approved. When a Milestone is blocking a Status, that Status will not be available in the Status drop-down on an Item, and an exclamation point icon will appear next to the Milestone name.
Hovering over the icon will inform you which Status the Milestone is blocking.

Example of a Milestone blocking Active Status. The "Committee 1 Approval" must be completed before the Item can be Activated.
Prompt actions after a Milestone Approval or Denial
Integrate Milestones with your workflows by prompting Users to take specific actions after they approve or deny a Milestone.
For example, you might want to Plan an Item after a Milestone is approved. By setting an Approved Action, you can trigger the Plan window to appear immediately after someone approves a Milestone. They can easily Plan the Item without needing to remember themselves.
Here are the actions you can prompt after a Milestone is Approved or Not Approved:
- Plan: When the Milestone is approved or denied, the Plan window will appear, allowing you to Plan the Item.
- Activate/Assign: When the Milestone is approved or denied, the Activate or Assign window (depending on the Team Type) will appear, allowing you to Activate the Item.
- Review: When the Milestone is approved or denied, the Review window will appear, allowing you to set a Review By date for the Item.
- Remind: When the Milestone is approved or denied, the Remind window will appear, allowing you to set a personal reminder about the Item.
- Defer: When the Milestone is approved or denied, the Defer window will appear, allowing you to Defer the Item.
- Archive: When the Milestone is approved or denied, the Archived window will appear, allowing you to Archive the Item.
Warning: If the person approving or denying the Milestone does not have permission to take any of the above actions, the window prompting the action will not appear.
Enable Save & Complete Button on Milestone Approval
If you would like to complete an Item at the same time as approving a Milestone, ask to enable the Save & Complete button on a certain milestone. Selecting the Save & Complete button after approving a Milestone will take you to the Resolution screen or Complete screen, depending on whether Resolution is enabled on the Item.
We recommend only enabling this on the final Milestone of an Item.
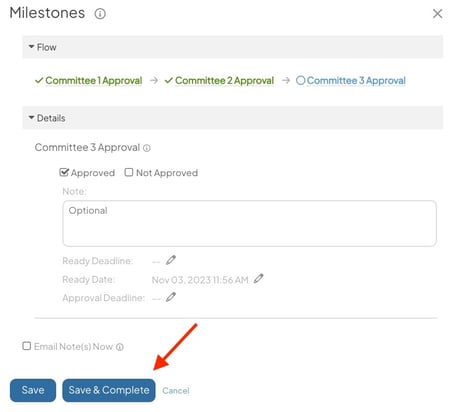
Example of what it looks like to approve a Milestone with the Save & Complete button enabled.
Add Deadlines to Milestone submissions and approvals
Milestone Deadlines function as due dates for Milestones, informing Users when Milestones should be submitted and approved.
Adding Deadlines to Milestones allows you to schedule projects and approve Milestones in a timely manner. They are great tools for team communication about when each step in a process should be completed.
There are two types of Milestone Deadlines:
- A Ready Deadline gives a timeframe for a Milestone to be submitted and made "Ready for Approval.
- An Approval Deadline gives a timeframe for a Milestone to be approved.
Each Milestone can have both a Ready Deadline and an Approval Deadline. If the Milestone has not been submitted or approved before the deadline, then the Milestone will change to a "Past Due" status.
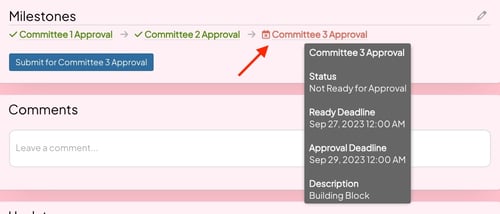
Example of a Milestone in Past Due status.
Pro Tip: Learn more about configuring and setting Milestone Deadlines by visiting this support article.
Group Milestones into Stage Gates
Stage Gates are a group of Milestones in the same process phase. They help you visualize complex approval sequences and track projects holistically rather than relying on individual Milestones.

Example of an Item with Stage Gates. Stage Gates make it easy to visualize which step of the process you are in.
When you have a Template utilizing Stage Gates, you can filter for Items based on whether a certain Stage Gate is Active, Not Started, or Complete, helping you monitor progress based on a group of Milestones rather than individual approvals.
Pro Tip: Visit our Stage Gates support page to find more information on configuring Stage Gates, filtering based on Stage Gate, and adding Stage Gate columns to Item Lists.
Reporting on Milestones
The Milestones Module grants you access to three Reports that display data on your Milestones.
Activity by Milestone Report
The Activity by Milestone Report helps you track statuses and Item counts for your Milestones. It is a great way to see which Milestones are underutilized, where bottlenecks occur in your approval processes, and which Milestones might need more attention.

Example of an Activity by Milestone Report.
Pro Tip: Check out our Activity by Milestone Report support page to learn more.
Impact by Milestone Report
The Impact by Milestone Report displays the amount of Impact currently dependent on each of your Milestones. Use it to see which Impacts depend on various approvals and take action on Milestones associated with significant Impacts.

Example of an Impact by Milestone Report.
Pro Tip: Check out our Impact by Milestone Report support page to learn more.
Cycle Time by Milestone Report
The Cycle Time by Milestone Report shows you how long Milestones spend in each Milestone Status, helping you identify bottlenecks in your approval and checkpoint processes.

Example of a Cycle Time by Milestone Report.
Pro Tip: Check out our Cycle Time by Milestone Report support page to learn more.
Recommended Reading
This article only scratches the surface of everything that is possible with Milestones. We recommended checking out the following articles to learn more: