![]() Important: This page is referring to System Roles, not Team Roles. Team Roles have their own set of permissions specific to individual Items.
Important: This page is referring to System Roles, not Team Roles. Team Roles have their own set of permissions specific to individual Items.
What is a System Role?
System Roles work in conjunction with User Types and Network Locations to determine an individual's access within the system. Most KaiNexus users will have at least one System Role, though a User can be assigned as many System Roles as appropriate.
System Roles can determine a User's:
- Default notification settings
- Default Board, access to Boards, subscriptions to Boards
- Ability to create, view, edit, assign, or participate in certain Items
- Ability to approve Milestones
- Administrative permissions and responsibilities within KaiNexus
![]() Pro Tip: If a User has multiple System Roles, their default notification settings will be the superset of the associated permissions and notification preferences of all those System Roles. These settings can be customized for individual Users.
Pro Tip: If a User has multiple System Roles, their default notification settings will be the superset of the associated permissions and notification preferences of all those System Roles. These settings can be customized for individual Users.
What permissions can System Roles grant?
There are two main categories of System Role permissions:
Item Permissions
Item Permissions are a set of permissions granted for specific Templates and Workflows. These permissions allow users to view and work with Items, even if they are not on the Item’s Team.
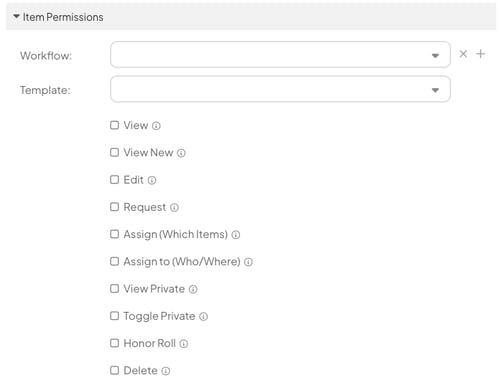
When building Item Permissions for a System Role, you must first decide which Templates and Workflows the set of abilities should apply to.
- If you select a Workflow, the Permissions will apply to all Templates within that Workflow.
- If you select a Template, the Permissions will apply to only Items created from that Template. Building out Permissions on the Template level is a way to be very granular while designing System Roles.
All Item Permissions except for "Participate" also specify where in the Network the Permission is valid. For example, a User might have Edit Permission for Improvements, but that doesn't necessarily mean they can Edit all Improvements in the system. The scope of their Permission depends on to which Locations their Permission is applied.
The Network Locations options are:
- Everywhere: The Permission is applied to all Items within the specified Template or Workflow, regardless of what Network Location the Item has.
- Location and Below: The Permission is applied to all Items within the specified Template or Workflow that are in the User's Network Location and the Network Locations nested beneath it.
- Only Location: The Permission is applied to only Items within the specified Template or Workflow that are in the User's Network Location.
- Only User's: The Permission is applied to only Items that belong to the User within the specified Template or Workflow.
- If the Template is an Advanced Team, the User must be the Facilitator of the Item for the Permission to apply.
- If the Template is a Simple or Standard Team, the User must be the Author or Responsible for the Permission to apply.
- If the Template is an Author-Only Team, the User must be the Author for the Permission to apply.
/Ofie/Ofie%20Profile%20Pic.png?width=50&height=50&name=Ofie%20Profile%20Pic.png) Pro Tip: KaiNexus will reference an Item's Responsible Location when determining whether a User with a certain System Role has Permission to work with it. If the Item does not have a Responsible Location, it will reference the Originating Location instead.
Pro Tip: KaiNexus will reference an Item's Responsible Location when determining whether a User with a certain System Role has Permission to work with it. If the Item does not have a Responsible Location, it will reference the Originating Location instead.
Pro Tip: Learn about each Item Permission in more detail by visiting this article.
Platform and Admin Permissions
Platform and admin permissions control access to general areas of the platform and provide administrative capabilities.
When creating or editing a System Role, these permissions are grouped under the Additional, Pro+, and Admin sections. These groupings indicate which License Type the permissions are associated with and help you more easily manage Roles.
The Additional section include permissions such as:

- Access to the Items section
- Visibility into Impact and Report data
- Ability to manage other users
The Pro+ section includes permissions such as:
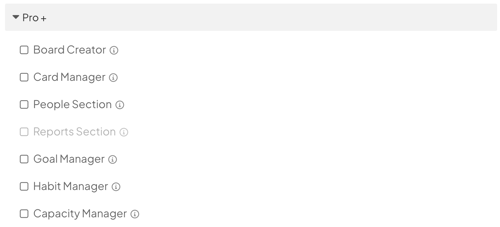
- Ability to create Boards
- Access to the People and Reports sections
- Ability to manage Goals
The Admin section includes permissions such as:
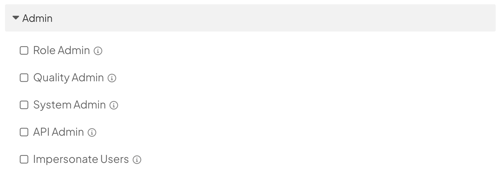
- Ability to edit general system settings
- Ability to manage Network Locations and Attribute Values
- Ability to impersonate user accounts
Pro Tip: For a full description of all platform and admin permissions, visit this support page.