There are seven Item List View Types. Each View provides a unique way to display and organize the Items in your List.
Most Views can be customized. For example, you can change which columns appear in List, Tree, Kanban, and Gantt View, and you can change which Item Details are displayed in Kanban, Detail, and Hierarchy View.
Keeping reading this support page to learn how to:
- Switch between Views
- Edit the columns on your Item List
- Edit which Item List Details are displayed
- If the List is in Capacity View, change which category is applied by default
Switch between Views
To change an Item List's View, open the List with which you want to work, then:
- Select View at the top of the List. When the List is in the Detail View, this button will be located near the top-left corner (above the quick filters). In all other Views, it will be located near the top-right corner.

- In the resulting drop-down select the name of the View you'd like to use.
/Ofie/Ofie%20Profile%20Pic.png?width=50&height=50&name=Ofie%20Profile%20Pic.png) Pro Tip: If you are working with an Item List Card, change the View by selecting the ellipsis icon and picking a View in the resulting dropdown.
Pro Tip: If you are working with an Item List Card, change the View by selecting the ellipsis icon and picking a View in the resulting dropdown.
Edit the View's columns
Pro Tip: System Administrators can choose which columns appear by default on all new Item Lists in the system. Customizing default columns is a great way to display the most relevant information to your users. Learn more by checking out this support page.
If your Item List is in the List, Tree, Kanban, or Gantt View, you can control which columns are included. To edit the columns in your Item List:
- Select View at the top of the List.
- Select the pencil icon that appears to the right of the View currently in use, and the Edit Columns window will open. Each column currently displayed on the List will be listed in this window.

- In the Edit Columns window:
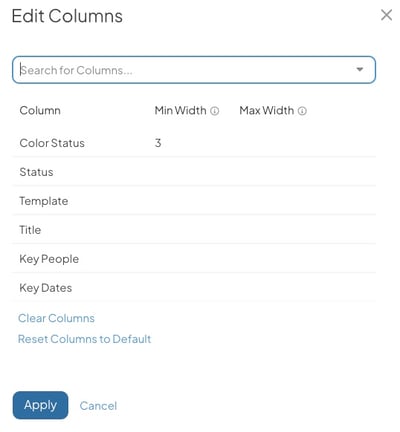
- Search for Columns: Use this field to search for and select any additional columns that should be shown on the List.
- To remove an existing column, hover over it so that it's highlighted blue and click the x button that appears to its right.
- To remove all existing columns, click Clear Columns.
- To use only the View's default columns, click Reset Columns to Default. This option will not appear if the List is in the Kanban View.
- To change the order of the included columns, drag and drop them into the desired positions.
- To change a column's minimum width, enter the desired number of pixels in the column's Min Width field. This option will not appear if the List is in the Kanban View.
- To change a column's maximum width, enter the desired number of pixels in the column's Max Width field. This option will not appear if the List is in the Kanban View.
- Click Apply to finalize your changes.
Pro Tip: If you are working with an Item List Card, we recommend visiting this support page to learn about editing columns on Cards.
Customize which Item Details are displayed
If your Item List is in Kanban, Detail, or Hierarchy View, you can control which Item Details are displayed for each Item.
Pro Tip: If you are working with an Item List Card, customize Item Details by selecting the ellipsis icon on the Card. In the resulting drop-down, select the pencil icon beside Kanban, Detail, or Hierarchy View.
- Select View at the top of the List.
- Select the pencil icon that appears to the right of the View currently in use. The Edit Columns window will open.

- In the Item Details section of the Edit Columns window:
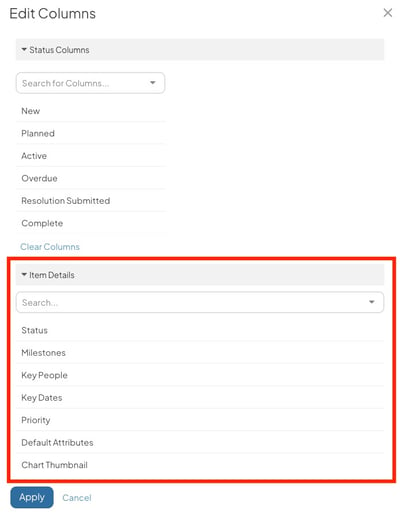
- Search: Use this field to search for and select additional Item Details to include. The following Item Details are available for you to add:
- Basic Item information such as ID, Parent, Originating Location, and Responsible Location.
- Team Roles
- Item Dates
- Attributes, Fields, and Weighted Scores
- Search: Use this field to search for and select additional Item Details to include. The following Item Details are available for you to add:
-
-
- Stage Gate (if the Milestone Module is enabled for your organization)
-
Pro Tip: The order in which you add Item Details does not matter. When you save your changes, the Item Details will automatically be rearranged into the default order of information.
-
- To remove an Item Detail, hover over it so that it's highlighted blue and select the x icon that appears to its right.
- To remove all Item Details, select Clear.
- Select Apply to finalize your changes.
Pro Tip: Making a change to the Detail View will result in a change to the Kanban and Hierarchy View. The same rule applies when you edit Item Details for Hierarchy and Kanban View. This helps you easily switch between these Views without needing to make the same Item Details.
Warning: If you're working with a Custom List and autosave is not enabled, your changes will be temporary unless you re-save the List.
Change the default Capacity Category
If your Item List is in Capacity View, you can change which Capacity Category is applied by default.
Pro Tip: If you are working with an Item List Card, change the default category by selecting the ellipsis icon on the Card. In the resulting drop-down, select the pencil icon beside Capacity.
- Ensure the List is in Capacity View.
- Select View at the top of the List.
- Select the pencil icon that appears to the right of Capacity. The Edit View - Capacity window will open.
- Select a Default Category.
- Select Apply.