Users on an Item's Team will automatically get updates about the Item in their Notifications Window and their digest email. Some updates that are more time sensitive will generate an additional email. These automatically-generated notifications are not customizable.
However, users can be "opted-in" to additional notifications about Items for which they are not on the Team. This is a great way for Continuous Improvement Coaches and leaders to keep up-to-date on Items throughout their department or organization. Each of a user's Roles may have default notification preferences already configured by your organization, but their notification preferences can be further customized to make sure they get the right notifications at the right time.
The days on which they receive their Digest or Subscription emails, and the time at which they should receive them, can also be configured.
![]() Although a User Administrator can configure a user's notification preferences on their behalf, that user will be able to alter those preferences whenever they want.
Although a User Administrator can configure a user's notification preferences on their behalf, that user will be able to alter those preferences whenever they want.
Who can change a user's notification preferences?
- Anyone with the User Manager (Everywhere) permission can change the notification preferences of users anywhere in the organization.
- Anyone with the User Manager (Location and Below) permission can change the notification preferences of users in the Location specified by that permission's configuration.
Change a user's notification preferences
You can change a user's notification preferences from:
-
Their profile picture anywhere in the platform
-
The User Management or People page
![]() If you want to change the days or times at which Subscription or Digest emails should be sent or disable or enable emails for a bunch of different users at once, you can bulk change them instead of editing them one by one.
If you want to change the days or times at which Subscription or Digest emails should be sent or disable or enable emails for a bunch of different users at once, you can bulk change them instead of editing them one by one.
Changing notification preferences from a user's profile
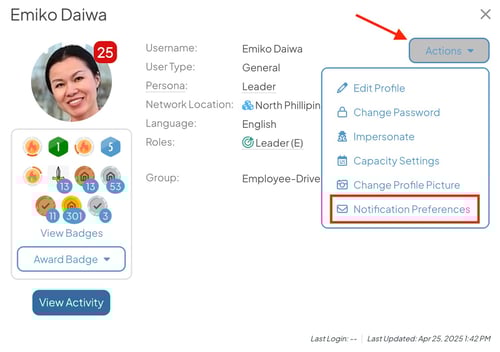
To impersonate a user from their profile picture:
- Click the user's profile picture anywhere it appears in the platform, such as the Team Panel of an Item or a People List. This will open their User Profile.
- Select the Actions button. In the resulting drop-down menu, select Notification Preferences.
- The user's Notification Preferences window will open:
- Use the Opt-In tab to add, edit, or remove the user's current notification preferences. These are the additional notifications that they've "opted-in" to receive.
- Use the Email Settings tab to update their Digest and Subscription email preferences or turn email on or off for their account.
Changing notification preferences from the User Management or People page
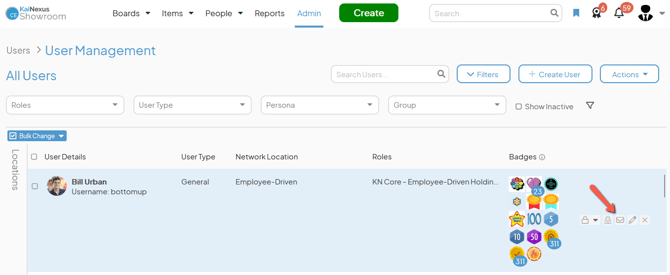
To change a user's notification preferences, navigate to the User Management administration page or the People page, then:
- Hover over the user you want to edit so that it is highlighted blue and click the envelope icon that appears to its right.
- The user's Notification Preferences window will open:
- Use the Opt-In tab to add, edit, or remove the user's current notification preferences. These are the additional notifications that they've "opted-in" to receive.
- Use the Email Settings tab to update their Digest and Subscription email preferences or turn email on or off for their account.
The Opt-In tab
When the Notification Preferences window opens, you will be taken to the Opt-In tab directly. If you're not on the Opt-In tab, click it in the Notification Preferences window's header to open it.
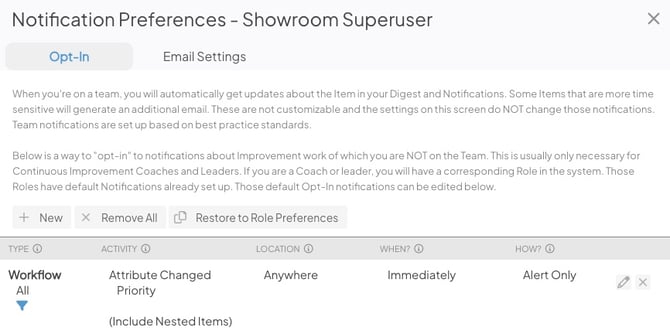
Any existing notification preferences will be listed.
- Click Restore to Role Preferences to return the user's notification preferences to the default as defined by their Roles' configuration. Any personal opt-in notification preferences the user has configured for themselves will be replaced. If their notification preferences already match the default state, this option will not be available.
- In the resulting confirmation window, click Restore.
- If the user has more than one System Role, they will receive the superset of all notification preferences for each of their System Roles.
- Click Remove All to clear their list of preferences. If there are no preferences configured, this option will not be available.
- In the resulting confirmation window, click Delete.
- If a Preference has an Item Filter applied, a blue filter icon will appear. Select the icon to view the applied filter in read-only mode.

- Click the pencil icon next to any existing notification preference to edit it.
- In the resulting Edit Notification Preference window, update the preference as necessary and then click Save.
- Click the x icon next to any existing notification preference to delete it.
- In the resulting confirmation window, click Delete.
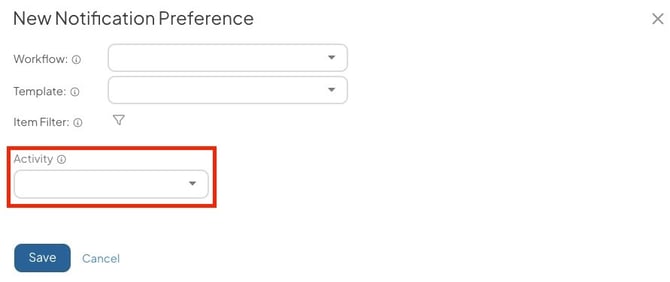
Click New to create a new notification preference.

- The New Notification Preference window will open.
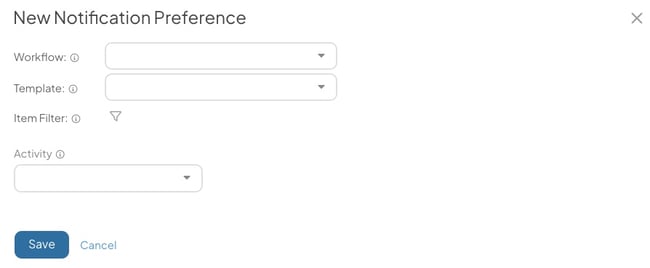
- You must specify either the Workflow or the Template about which the user should be notified. If you want them to be notified about all Items, regardless of Workflow or Template, select All from the Workflow drop-down.
- Workflow: Expand this drop-down to select the Workflow(s) about which they should be notified.
- Template: Expand this drop-down to select the Template(s) about which they should be notified.
- You must specify either the Workflow or the Template about which the user should be notified. If you want them to be notified about all Items, regardless of Workflow or Template, select All from the Workflow drop-down.
-
- Item Filter: Select the filter icon to open the Item Filter. Use the Item Filter to set additional criteria for the types of Items the user should be notified about.
- Items must meet the Template, Workflow, Item Filter, and Activity criteria to trigger notifications. The user won’t receive notifications about an Item that meets the criteria in the Item Filter unless it also matches the Template/Workflow and Activity settings.
- Item Filter: Select the filter icon to open the Item Filter. Use the Item Filter to set additional criteria for the types of Items the user should be notified about.
- Activity: Expand this drop-down to select the type of activity about which the user should be notified. Your options are:
-
- Item Submitted: The user will be notified when an Item meeting your criteria is submitted, regardless of its initial Status.
- Status Changed: The user will be notified when an Item meeting your criteria transitions to a specific Status. When you select this activity, two additional drop-downs will appear:
- Statuses: Use this drop-down to select one or multiple Statuses. When an Item meeting your criteria transitions to one of these Statuses, the user will receive a notification.
- Outcomes: Use this drop-down to specify which outcomes must be logged on the Item to trigger this notification.
- All Outcomes: The user will be notified for all Items meeting your criteria regardless of which Impacts or No Change Reasons are logged in the Resolution.
- Specific Outcomes: The user will be notified only for Items meeting your criteria that also have your specified Impacts or No Change Reasons. When you select Specific Outcomes, you'll see a list of your organization's Impacts and No Change Reasons. Use the checkboxes to determine whether or not Complete Items with that outcome will trigger the notification.
-
-
-
- Due Date Approaching: The user will be notified when Items meeting your criteria have a Due Date within 5 days of the current date.
- Attribute Changed: The user will be notified when an Attribute on an Item meeting your criteria is updated. Use the additional drop-down to pick which Attribute(s) will trigger a notification when it is updated.
- Transferred: The user will be notified when an Item meeting your criteria is transferred.
- Deleted: The user will be notified when an Item meeting your criteria is deleted.
- Escalated to, Escalated from, Deescalated to, and Deescalated from: An additional drop-down will appear beneath the Activity drop-down from which you can choose whether the user should be notified about all Escalation Tiers or only specific Tiers.
- Milestone Ready, Milestone Approve, Milestone Un-Approve, Milestone Added, Milestone Removed, Milestone Ready Deadline Passed, and Milestone Approval Deadline Passed: An additional drop-down will appear beneath the Activity drop-down from which you can choose whether the user should be notified about all Milestones or only specific Milestones.
-
/Ofie/Ofie%20Profile%20Pic.png?width=50&height=50&name=Ofie%20Profile%20Pic.png) Pro Tip: Do you someone to be notified when an Attribute changes to a specific Value? Select Attribute Changed as the Activity and use the Item Filter to specify which Attribute Value the Item must have to trigger an alert.
Pro Tip: Do you someone to be notified when an Attribute changes to a specific Value? Select Attribute Changed as the Activity and use the Item Filter to specify which Attribute Value the Item must have to trigger an alert.
-
- Depending on which Activity you select, additional options will appear that help you modify the new notification preference.
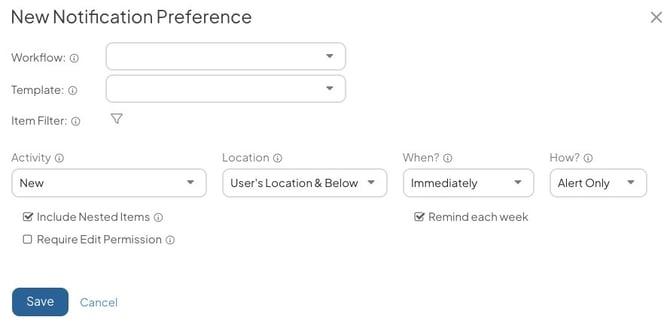
- Location: Expand this drop-down to select the Location parameters for this notification preference:
- Anywhere: They will be notified about Items in every Location in the organization. This is best for Continuous Improvement coaches and other leaders who need to hear about all work being done in the organization, not just work in certain Locations.
- User's Location Only: They will be notified about Items in their Locations only.
- User's Location & Below: They will be notified about Items in their Locations and in any Locations nested under them.
- Specific Location: You can choose for them to be notified about Items in any Location. When this option is selected, additional fields will appear beneath it
- The Location search field: Use this field to search for and select the Location about which they should be notified.
- The Location parameters field: Use this field to select whether they should be notified about This Location & Below or This Location Only
- When: Expand this drop-down to select when they will receive this notification. This option will only appear if "New," "Overdue," or "Resolution Submitted" were selected in the Activity field.
- Select Immediately if they should receive the notification as soon as the selected activity is performed; select Delayed for them to receive the notification some number of days later. If Delayed is selected, a number field will appear beneath this drop-down. Enter the number of days (1-90) that this notification should be delayed.
- The Remind each week checkbox: When enabled, they will receive a weekly notification about this event until it is addressed. This helps keep time-sensitive work from falling through the cracks. This option is available for the following activity types:
- Item Submitted: The user will receive a weekly notification until the submitted Item is no longer in New Status.
- Status Changed to Overdue or Resolution Submitted: The user will receive a weekly notification until the Item is no longer in Overdue or Resolution Submitted Status.
- Milestone Ready and Approval Deadline Passed: The user will receive a weekly notification until the Milestone Deadline is no longer past due.
- Location: Expand this drop-down to select the Location parameters for this notification preference:
- Depending on which Activity you select, additional options will appear that help you modify the new notification preference.
-
-
- How: Expand this drop-down to select how they should be notified.
- Select Alert Only if they should receive only an in-app notification. This option will not be available if "Deleted" was selected in the Activity field.
- Select Alert + Email if they should receive an in-app notification and a separate email.
- The Include Nested Items checkbox: When unchecked, they will only be notified about Items that aren't nested under another Item. When checked, they will also be notified about Items that are nested under another Item.
- The Require Edit Permission checkbox: When checked, they will only be notified about Items that they have permission to edit.
- How: Expand this drop-down to select how they should be notified.
-
-
- Click Save.
- When you're done configuring the opt-in notification preferences, either click the x button in the top right corner of the Notification Preferences window to close it or proceed to the Email Settings tab.
Caution: If a user is part of an Item's Team, their opt-in notification preference won't trigger for that Item, even if all other conditions are met. This is because team members automatically receive notifications based on their specific role.
The Email Settings tab
Click the Email Settings tab in the Notification Preferences window's header to open it. Your current email settings will be listed.
- Which days do you want to receive a digest?: Each day of the week will be listed alongside a checkbox. The user will receive their Digest on each of the selected days (if they have any notifications on that day). Click the checkbox next to a day to select or deselect it.
- Users who have not signed in to KaiNexus in the past 90 days will not receive the Digest.
- Which days do you want to receive your subscriptions?: Each day of the week will be listed alongside a checkbox. The user will receive their Subscription email on each of the selected days (if they have subscribed to any Lists or Boards). Click the checkbox next to a day to select or deselect it.
- What time (and time zone) do you want to receive your Digest/Subscriptions?: Using the drop-down menus, select the time at which processing should begin on the user's Digest and Subscriptions emails and select their time zone. They will typically receive these emails within an hour of their processing start time.
- Leave these fields blank to keep to your organization's default.
- Email: To turn off all notification-based emails, click Off. Account support and password reset emails will still be sent as needed.
- To turn notification-based emails back on, click On.
Pro Tip: If a User's email notifications are turned off, their email address will be crossed out when displayed in the User Details and Email columns on People Lists.
- Click Save.