Who can edit a user?
Only people with the User Manager permission can edit users:
- People with the User Manager (Everywhere) permissions can edit users anywhere in the organization, though, depending on the configuration of their permissions, they may be limited in which Roles they can grant.
- People with User Manager (Location and Below) can edit users in the Location specified by that permission's configuration. They may also be limited in which Roles they can grant.
Edit a user
Users can be edited from:
-
Their profile picture anywhere in the platform
-
The User Management or People page
/Ofie/Ofie%20Profile%20Pic.png?width=50&height=50&name=Ofie%20Profile%20Pic.png) Pro Tip: If you want to make the same change to a bunch of different users, you can bulk-change them instead of editing them one by one.
Pro Tip: If you want to make the same change to a bunch of different users, you can bulk-change them instead of editing them one by one.
From their profile
To edit a user from their profile picture:
- Click the user's profile picture anywhere it appears in the platform, such as the Team Panel of an Item or a People List. This will open their User Profile.
- Select the Actions button. In the resulting drop-down menu, select Edit Profile.
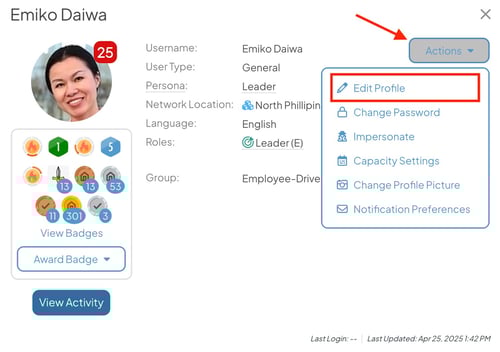
- The Edit Profile window will open.
In the User Management or People page
To edit a user, navigate to the User Management administration page or the People page, then:
- Hover over the user you want to edit so that it is highlighted blue, and select the pencil icon that appears on the right.
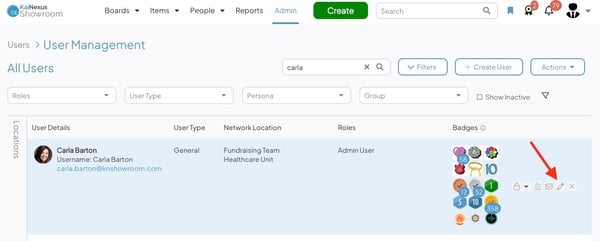
- The Edit Profile window will open.
Pro Tip: If a User's email address is crossed out, their email notifications are turned off. Check out this article to learn how to change a User's notification settings.
The Edit Profile window
In the Edit Profile window:
- User Type (required): Expand the drop-down to select the appropriate User Type for this user. This will determine the level of access the user has to KaiNexus.
- Capture and Offline User Types may not appear if they are not included in your organization’s contract.
- Depending on the selected User Type, different fields may appear while creating the user.
- First Name (required): Enter the user's first name.
- Last Name (required): Enter the user's last name.
- Username (required): Enter the user's username. This username must be unique.
Many of our customers choose usernames that match either their email, employee ID number, or their username from their work computers. - Email (recommended): Enter the user's email address. All User Types except for Wallboard and Kiosk users can have an email address associated with their account, and we recommend that, when possible, they do. This makes using KaiNexus much easier for the average person, ensuring that they receive all important notifications about their account and improvement work.
Caution: If you don't include an email address, Active and Capture users will not receive an activation email. It will be your responsibility to activate the account and inform the user about their password and how to log into KaiNexus.
- Persona: Expand the drop-down to select the appropriate Persona for this user. This is a kind of user attribute that describes a person's real-world responsibility in spreading continuous improvement and how they'll use KaiNexus.
- Language (only appears if the Multi-Language Module is enabled for your organization; not supported for Kiosk and Wallboard Users): Choose one of the configured languages to be used for this user. Expand the drop-down and select the appropriate language.
- Badges (not supported for Kiosk and Wallboard Users): Badges are emblems — typically signifying an achievement or qualification — that are displayed on a user's profile. Some Badges are automatically granted by KaiNexus when certain requirements are met, while others can be manually granted using this field. Expand the drop-down and select the appropriate Badge(s).
This field will only appear and be editable if the following conditions are all met:
- The Custom Badges Module is enabled for your organization,
- Your organization has one or more manually-grantable Badges configured, and
- You have the "Award Badges" permission.
- Network Locations (required): A user's Network Locations determine their position in the organization's structure. Use this field to search for and select the appropriate Network Location(s).
If you have the "Local User Administrator" permission, you will only be able to add or remove the Locations for which you're an administrator. - Roles: A user's Roles determine their default notification preferences as well as their powers and permissions within KaiNexus.
- This field will only be editable if you have permission to grant any Roles and you will only be able to grant those Roles specified by your User Administrator permission.
- As you assign Roles to a user, their License Type will automatically update. You can view the current License Type in the bottom right corner of the Edit Profile window.
If you are editing a Kiosk User, the following fields will also be available:
- Help Text: This option will only appear if the User Type is set to "Kiosk."
The text entered here will be shown on the Kiosk home screen above the user selection field to help people understand what the Kiosk is and how to use it. - IP Whitelist: We strongly recommend using an IP Whitelist to secure unattended devices like Boards and Kiosks. This prevents them from being used from an unauthorized network.
Enter one IPv4 or IPv6 address per line. CIDR masks are supported.
If you are editing a Wallboard User, the following fields will also be available:
- The Enable Kiosk checkbox: This option will only appear if the User Type is set to "Wallboard."
When this checkbox is enabled, a "Create" button will appear at the top of the screen when this Wallboard user logs in, allowing users to submit Items directly from the Wallboard view. - IP Whitelist: We strongly recommend using an IP Whitelist to secure unattended devices like Boards and Kiosks. This prevents them from being used from an unauthorized network.
Enter one IPv4 or IPv6 address per line. CIDR masks are supported.
If you are editing an Active, Capture, Offline, Setup, or Inactive User, there will be an Additional header. Expand it to enter the following fields:
- Employee ID, Hire Date, Physical Location, Work Phone, Mobile Phone, and Pager: These are options fields that help you provide more information about a user, if desired.
- Title: A user's Titles, or degrees, are attributes that label and identify them so that other people in the system have a better understanding of who they are.
- The available Titles have been configured by your organization.
- Your organization may have given this attribute a different name.
- Positions: A user's Positions, or job functions, are attributes that label and identify them so that other people in the system have a better understanding of who they are. The available Positions have been configured by your organization.
- The available Positions have been configured by your organization.
- Your organization may have given this attribute a different name.
- Employment Statuses: A user's Employment Statuses, or descriptions of the terms of their employment, are attributes that label and identify them so that other people in the system have a better understanding of who they are. The available Employment Statuses have been configured by your organization.
- The available Employment Statuses have been configured by your organization.
- Your organization may have given this attribute a different name.
- Certifications: A user's Certifications, or confirmation of their qualifications or education, are attributes that label and identify them so that other people in the system have a better understanding of who they are. The available Certifications have been configured by your organization.
- The available Certifications have been configured by your organization.
- Your organization may have given this attribute a different name.
Click Save to apply your changes.