![]() Reach out to your Customer Success Manager to make any adjustments to your organization's Templates.
Reach out to your Customer Success Manager to make any adjustments to your organization's Templates.
Templates are the building blocks of your Workflow. Each Template is a custom framework that governs what information people capture and track when working on improvement. Some common Templates are Tasks, Just Do Its, Charts, Projects, and OIs.
When working with your Items in KaiNexus, you have a lot of flexibility and customization options when it comes to designing the layout of your Templates. Changing your Templates’ layout allows you to better organize and visualize how the information is displayed when a user views an Item of that Template Type.
Key elements of a Template
To help understand a bit more about Templates within KaiNexus, let’s identify the components that make up a Template.
The Work Panel / Detail View
A Template’s Work Panel or Detail View is what you see when opening up an Item of that Template Type.

Panels
Panels are the rectangular boxes that contain the information on your Templates. These can display and organize any information that should be captured within the Item.

Panels come in various sizes and can be collapsed on an Item to save space.
If you have permission to edit an Item, you can edit any of the Fields and/or Attributes contained in a Details panel. To do so, hover over the Details panel with which you want to work and click on the pencil icon that appears in its top right corner. The Edit window that opens will only contain the Fields and Attributes included on that particular Panel.
You can also edit an individual Field or Attribute using the Single Field Editing functionality or edit the Item as a whole to see all the available Fields and Attributes.
![]() To expand an Item's Details, Nested Item List, or Comments panel to get a larger view, hover over the panel and click the expand icon that appears in its top right corner.
To expand an Item's Details, Nested Item List, or Comments panel to get a larger view, hover over the panel and click the expand icon that appears in its top right corner.
Fields and Attributes
Fields and Attributes are the building blocks of a Template. Fields are free text boxes that allow users to enter any answer, while Attributes prompt users to choose an answer from a list of preset options. displayed within your Template’s panels are where you may update an Item’s information.
There are lots of customization options available when it comes to designing the content and design of the Fields and Attributes that appear on your Templates.
![]() For more information on Fields, check out this support article.
For more information on Fields, check out this support article.
For more information on Attributes, check out this support article.
What is the difference between Standard and Custom Layout Templates?
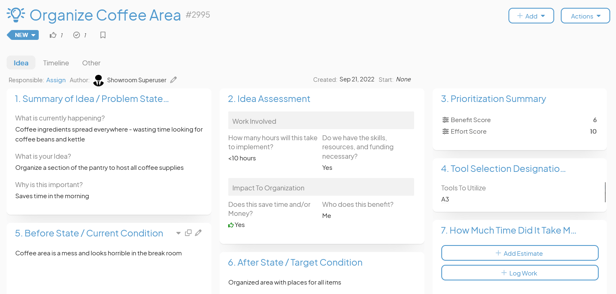
By default, a Template organizes the information in a Standard Layout. A Standard Layout Template consists of the same basic panels on the Work Panel.
Standard Layout
A Standard Layout will feature the same panels being displayed in a two-column layout. Beginning from left to right and working our way down, a Standard Layout Template design will include:
- Details panel
- This panel will be titled “Details of [Template Name]."
- This panel will include:
- All of the Fields and Attributes that have been added to this Template. The order and appearance of these Fields and Attributes are configurable, even on a Standard Layout Template.
- The Item's Location(s).
- Any Milestones.
- Any Dependencies.
- Team panel
- This will be titled “Team.”
- This panel will display all of the KaiNexus users that have been added to the Item’s Team. Depending on the Template’s Workflow Type, there will be different Team Roles available.

![]() To learn more about Teams and Team Roles, check out this support article.
To learn more about Teams and Team Roles, check out this support article.
- Communication panels
- There are three types of communication panels that may (or may not) be included with your Template:
- A "Comments" panel is the most common type of communication panel. Comments are a great way to hold conversations regarding an Item in a convenient location. Instead of scattering discussion across emails, text messages, and instant messaging apps, Comments keep team member conversations attached to a specific Item.
- An "Updates" panel is a secondary type of communication panel that is useful as a place to post updates on an Item without the information hiding in a long thread of Comments. For example, if you are part of an ongoing strategy project that will take a year to complete, you can utilize the Updates Panel to record monthly progress.
- A "Notes" panel is another secondary type of communication panel that is a good option for sharing observations, recording research, and adding additional information about an Item without disrupting a conversation or cluttering the description. You can also use Notes to log Meeting Minutes, keeping important meeting details in a specified Item instead of scattered across other applications.
- There are three types of communication panels that may (or may not) be included with your Template:

![]() For more information on Comments, Updates, and Notes panels, check out this support article.
For more information on Comments, Updates, and Notes panels, check out this support article.
- Dates panel
- This will be titled “Dates.”
- This panel will display all of the Item's key dates.

![]() For more information on Item dates, check out this support article.
For more information on Item dates, check out this support article.
- Nested Item List panels
- The title of these panels is configurable.
- There can be up to five Nested Item List panels included on the main tab of your Template, each listing different Nested Items. For example, one could be configured to list only nested Items in a certain status and another could be configured to list only those of a certain Template. You could also have one Nested Item List panel that lists all nested Items in one place.
These Nested Item List panels are highly configurable!

- Files panel
- This will be titled “Files."
- This panel will include all attachments and files that have been added to the Item.

- Timeline panel
- This will be titled “Timeline."
- This panel will include an audit trail that keeps track of how the Item has changed over time and who was responsible for each change.

- Links panel
- This will be titled “Links."
- This panel will include all links that have been added to the Item.

Optional Panels
There are additional features that can be enabled on your Templates. These features can be seen in their own Panel on your Standard Layout Templates when they are active on the Template. These include the:
- Time Tracking panel
- This will be titled "Time Tracking."
- This panel will include all the Time Tracking data that has been added to the Item.
- Images panel
- This will be titled "Images."
- This panel will display image files that have been added to the Item so that users can view the image directly on the Template’s Work Panel.
![]() Only image files that have been configured to appear in the Image area will appear in this panel. You can change this configuration by editing the attachment.
Only image files that have been configured to appear in the Image area will appear in this panel. You can change this configuration by editing the attachment.
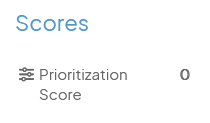
- Scores panel
- This will be titled "Scores."
- This panel will display the total value of any Weighted Scores that have been added to this Item.
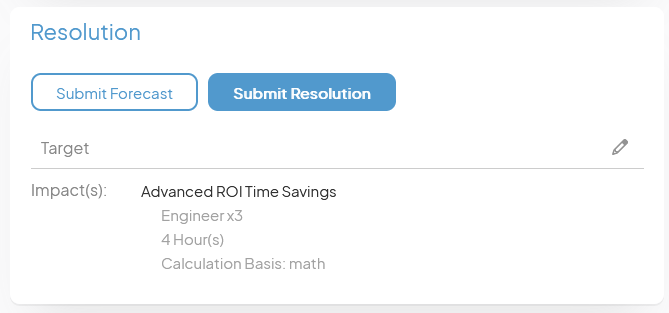
- Resolution panel
- This will be titled "Resolution."
- If Resolution has been enabled on your Template, you can view any Resolution data that has been added to this Item within this panel.
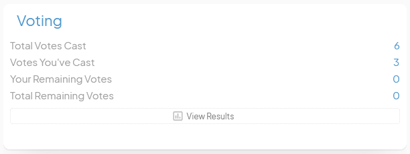
- Voting panel
- This will be titled "Voting."
- If Voting has been enabled on your Template, you can view the total number of votes cast, the number of votes you've cast, your remaining votes, and the total remaining votes within this panel.
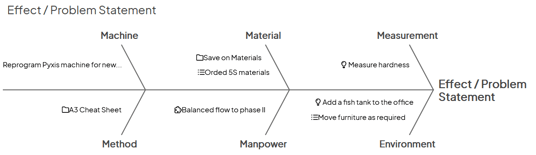
- Fishbone panel
- If Fishbone Diagrams have been enabled on your Template and added to your Item, you can view and edit the Item's Fishbone Diagram within this panel.
Custom Layout
A Custom Layout Template design can drastically differ from the Standard Layout, giving you the ability to adjust the layout to fit your unique needs.
- Every panel listed above can be reordered, resized, and renamed.
- You can include more than two columns of panels in the layout.
- There can be multiple Details panels. These panels can be titled freely and you have full control over which Fields, Attributes, and other information can appear on each panel.
- Panels can be collapsed or expanded by default.