You will see a Formatting Toolbar in areas of KaiNexus where you have room to freely type in an open space. This includes:
- Freestyle Cards
- Text Areas in Items
- Comments, Updates, and Notes
- Attribute note fields
- If you have the System Administrator Role Permission, the edit window of Login Notices
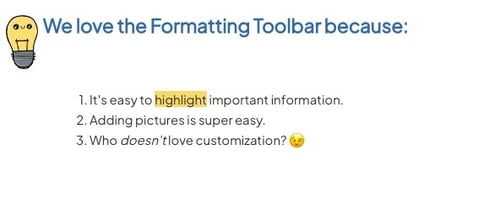
![]()
Example of the Formatting Toolbar
If you have a lot to say in a text area, then your message could be lost in a wall of plain text. This is where the Formatting Toolbar comes in handy. Use it to organize long lists of information, separate sections with headings, and draw attention to key information with colors and emphasized text.
You can also add key details such as images, Chart thumbnails, and links. This allows visuals to be included in a more prominent spot than the Links or Files Panels.
When you're done formatting, you could have a text area resembling the following:
Keep reading to learn how to:
- Add headers
- Bold, Italicize, and Underline
- Color text
- Use bullet point and number lists
- Use advanced text formatting
- Insert emoticons
- Insert images
- Insert files
- Insert Chart thumbnails
- Insert links
- Insert tables
- Use the undo and redo buttons
/Ofie/Ofie%20Profile%20Pic.png?width=50&height=50&name=Ofie%20Profile%20Pic.png) Pro Tip: The formatting toolbar in Freestyle Cards have several unique options not found in other text spaces. This includes options to insert Board, Item, and Item List links and the ability to embed videos and websites using code view. Learn more about these special features here!
Pro Tip: The formatting toolbar in Freestyle Cards have several unique options not found in other text spaces. This includes options to insert Board, Item, and Item List links and the ability to embed videos and websites using code view. Learn more about these special features here!
Add headers
Select the Paragraph icon to open a dropdown menu containing paragraph formatting options.
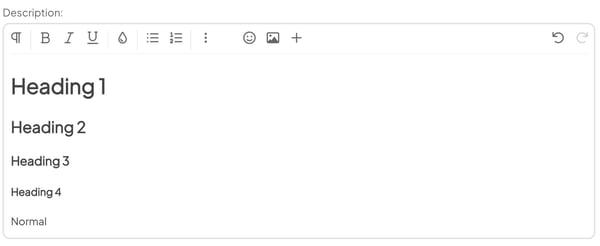
- Select Heading 1, Heading 2, Heading 3, or Heading 4 to add headers to your text area.
- By default, your text will be Normal.
Bold, Italicize, or Underline
Use the emphasis formatting options to draw attention to important parts of your text.
/Formatting%20Toolbar/Bold%2c%20Italics%2c%20Underline.jpeg?width=600&height=290&name=Bold%2c%20Italics%2c%20Underline.jpeg)
- Select the bold icon to bold your text.
- Select the italicize icon to italicize your text.
- Select the underline icon to underline your text.
Color text
Change your text to different colors to callout important notices, match organizational branding, and bring life to your message. Select the paint drop icon to open the text color menu.
/Formatting%20Toolbar/Text%20Color.jpeg?width=600&height=291&name=Text%20Color.jpeg)
- Select one of the existing color options to change your text color.
- Use the HEX Color field to choose a unique color for your text.
- Select the eraser icon to clear all changes to text color.
- Select OK to save your changes.
Use bullet point and number lists
Use bullet point and number lists to organize information, outline the steps of a process, and make large amounts of text easier to read.
/Formatting%20Toolbar/Bullet%20Point%20and%20Number%20List.jpeg?width=600&height=290&name=Bullet%20Point%20and%20Number%20List.jpeg)
- Select the bullet point list icon to make a bullet point list
- Select the numbered list icon to make a numbered list.
Use advanced text formatting
Select the vertical ellipse in the Formatting Toolbar to open an additional row of text formatting options. These are advanced options used when you want to achieve a specific form in your writing.
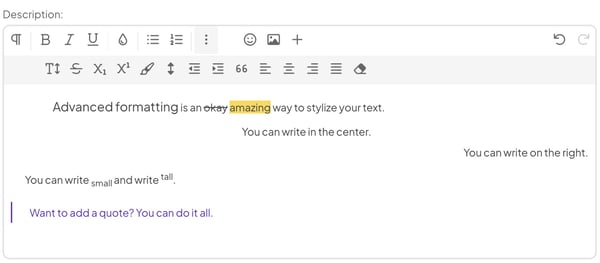
- Select the font size icon to increase or decrease your font size.
- Select the strikethrough icon to add a strikethrough to your selected text.
- Select subscript to add small characters below the normal typing line.
- Select superscript to add small characters above the normal typing line.
- Select the paintbrush icon to add a background color or highlight to your text.
- Select the line height icon to change the spacing between lines to single, 1.15, 1.5 or double. The default selection is 1.5 spacing.
- Select decrease indent to move your paragraph indent to the left.
- Select increase indent to move your paragraph indent to the right.
- Select the quote icon to callout certain parts of your text.
- Select Align Left, Align Center, Align Right, or Align Justify to change your text alignment.
- Select the eraser icon to clear all formatting from your text area.
Add emoticons
Add emoticons to your text area to bring personality and fun to any message. Select the smily face icon to open an emoticon selection window.
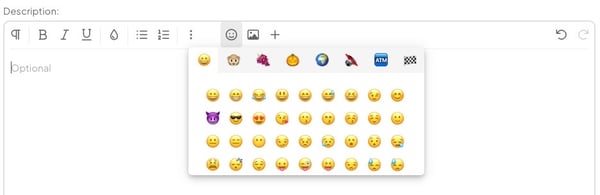
- Use the categories on the top row of the emoticon window to switch between different panels of emoticons.
Add images
To add an image to a text space, you can either paste the image directly in the text space or you can select the add image icon.
/Formatting%20Toolbar/Image.jpeg?width=600&height=272&name=Image.jpeg)
- Upload an image from your computer by clicking on the dashed box or selecting the upload image icon.
- Add an online image by selecting the by URL icon.
Pro Tip: When viewers select an image, the image will expand to full size. They can then download the image to their device.
After the image has been added to the text space, click on the image for more customization options.
/Formatting%20Toolbar/Image%20Edit%20Options.jpeg?width=600&height=294&name=Image%20Edit%20Options.jpeg)
- Replace: Swap out one image for another.
- Align: Change whether the image is aligned to the right, left or center of the text area.
- Image Caption: Add a caption to the image. It will be centered directly beneath the image.
- Remove Image: Remove the image from the text area.
- Insert Link: Transform the image into a link. Selecting the image will take the viewer to your URL of choice.
- Display: Choose whether the image is displayed inline with the text or breaking the text.
- Alternative: Add text that will appear as an alternative to the image if the image cannot be loaded on viewer devices.
- Change Size: Adjust the width and height of your image in pixels. You can also click and drag the image corners to change its size.
Pro Tip: When changing the size of an image, we recommend setting either the width or the height to your desired amount of pixels and then setting the other option to "auto". This will ensure the image is proportional to the original.
Insert files, chart thumbnails, links and tables
To see more options for inserting useful aides into text spaces, select the + icon. An additional row of insert options will appear.
/Formatting%20Toolbar/Other%20Insert%20options.jpeg?width=600&height=157&name=Other%20Insert%20options.jpeg)
Pro Tip: The Formatting Toolbar of Freestyle Cards have three additional link insert options: Board links, Item links, and Item List links.
Insert an Existing File
Select the magnifying glass icon to add a file to your text space. In the resulting window, you will see a list of documents already uploaded to the Files Panel of the Item.
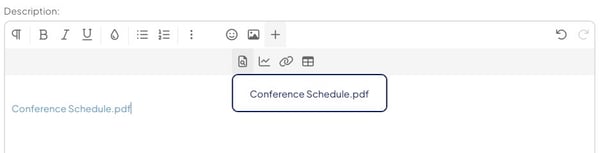
- Select the file you would like to add. A link to download the file will appear in the text space.
If you are working with a Freestyle Card, you must first add the file to the files section of the Freestyle Card edit window. Then you can add the link.
Warning: Inserting files with the Formatting Toolbar is not available when posting a comment on a Comment Card.
Insert a Chart thumbnail
Warning: Chart thumbnails can only be inserted in Text Areas on Items. They are not available in Freestyle Cards, Login Notices, Attribute note fields, Comments, Updates, or Notes.
This option will only appear if Charts are enabled for your organization.
Each Chart in KaiNexus has an automatically generated thumbnail that reflects real-time Chart data. The thumbnail will update any time Chart data is changed through editing the Item, API, imports, or the Multi Chart Importer, ensuring the thumbnails reflect the most up-to-date information.
Chart thumbnails are presented in the Detail view of Lists with Charts, and they can also be added to text areas within Items.
Pro Tip: When a viewer selects a Chart thumbnail, they will be taken to the Chart. This makes Chart thumbnails a more visually exciting way to link to a Chart. If the user does not have permission to view the Chart, they won't be able to see the thumbnail.
Select the chart icon to open the Add Chart Thumbnail window.
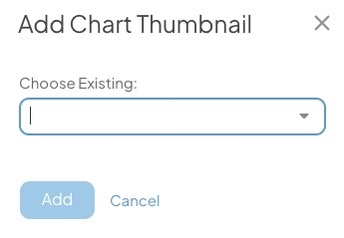
- Use the dropdown to search the Charts you have permission to view.
- Select Add.
After the Chart thumbnail has been added, select the image to see additional customization options.
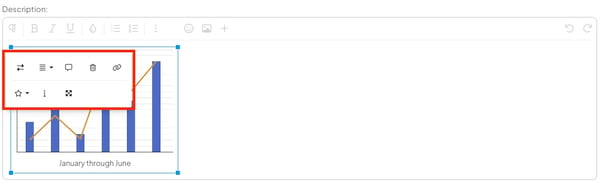
- Replace: Swap out the thumbnail for a different image uploaded from your device.
- Align: Change whether the image is aligned to the right, left or center of the text area.
- Image Caption: Add a caption to the image. It will be centered directly beneath the image.
- Remove Image: Remove the image from the text area.
- Insert Link: Transform the image into a link. Selecting the image will take the viewer to your URL of choice.
- Display: Choose whether the image is displayed inline with the text or breaking the text.
- Alternative: Add text that will appear as an alternative to the image if the image cannot be loaded on viewer devices.
- Change Size: Adjust the width and height of your image in pixels. You can also click and drag the image corners to change its size.
Insert a link
Select the link icon to add a link to another web address. In the resulting menu:
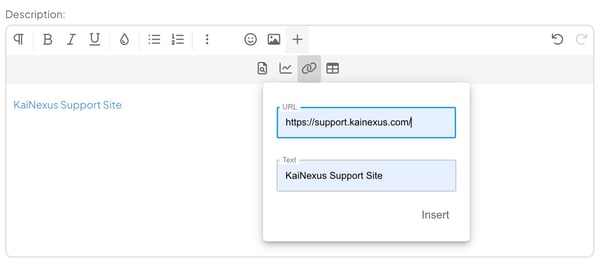
- Enter the desired URL.
- Enter the text the link should display.
- Select Insert.
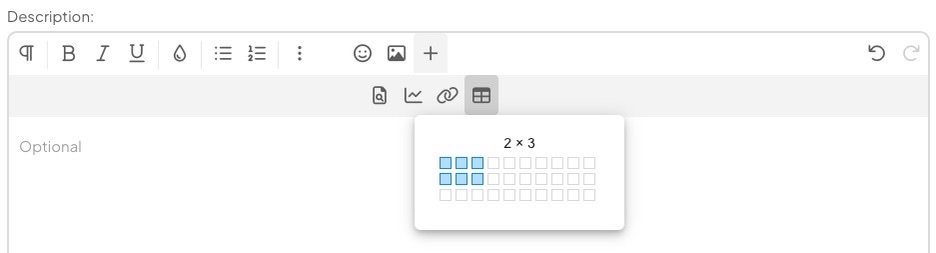
Insert a table
Select the table icon to add a table to your text area. Use the grid to pick how many rows and columns your table will have.
After the table has been added, select any cell to write inside it. When you select a cell, you will see a window with additional table formatting options:
/Formatting%20Toolbar/Table%20Edit%20Options.jpeg?width=600&height=295&name=Table%20Edit%20Options.jpeg)
- Table Header: Add an additional row to the top of your table to serve as a heading. Cells in the header will default to bold text and grey background.
- Table Footer: Add an additional row to the bottom of your table to serve as a footer. Cells in the footer will default to bold text and grey background.
- Remove Table: Delete the table from the text area. Any text, links, or images within the table will not be saved.
- Row: Select between the three following row options.
- Insert row above the currently selected cell
- Insert row below the currently selected cell
- Delete the row containing the currently selected cell
- Column: Select between the three following column options.
- Insert a column before the currently selected cell
- Insert a column after the currently selected cell
- Delete the column containing the currently selected cell
- Table Style: Select between the two following style options.
- Add dashed borders to the entire table
- Add shading to alternate rows. When selected, every other row on the table will be shaded a light gray.
- Cell: Select between the following cell formatting options.
- Merge cells: Combine multiple cells into one. You must have multiple cells selected to use this tool. After the cells are merged, the existing text in the old cells will be combined in the new cell.
- Vertical split: Divide the currently selected cell into two columns. This will only affect the cells you have selected.
- Horizontal split: Divide the currently selected cell into two rows. This will only affect the cells you have selected.
- Cell Background: Change the background of cells to a different color.
- Vertical Align: Align text to the top, middle, or bottom of the cell.
- Horizontal Align: Align the text to the left, middle, right, or justify of the cell.
- Cell Style: Select between the following cell style options.
- Highlighted: Color the border of the selected cell in red to draw attention to it.
- Thick: Increase the thickness of the selected cell border.
Pro Tip: Select multiple cells simultaneously by holding down the shift key and selecting the cells you want to work with.
Undo and Redo actions
Did you make a mistake? No problem. Use the undo and redo buttons on the far right of the Formatting Toolbar to reverse previous actions.
/Formatting%20Toolbar/Undo.jpeg?width=600&height=100&name=Undo.jpeg)
Congratulations! You are now a master at using the formatting toolbar.

Recommended Reading