Login Notices are popup notifications that appear when users log in to KaiNexus. They might be one-time events used to notify your employees about events that might interest them or they might be configured to appear each time a user logs in.
Who can create a new Login Notice?
Anyone with the "System Admin" permission can create Login Notices.
Create a new Login Notice
To create a new Login Notice, navigate to the Login Notice administration page, then:
- Click Create Login Notice at the top of the list of Login Notices.

- The Create Login Notice window will open. Enter the following information:

- Title (required): The title will appear at the top of the popup notification.
- Body (required): Enter the main text of the Login Notice in this field. This field supports up to 10,000 characters.
- Use the formatting toolbar to stylize your text and add emoticons, images, tables, and links. Check out this article to learn more about all the ways you can use the Formatting Toolbar.
-
-
- Check out this article to learn about adding videos to your Login Notices.
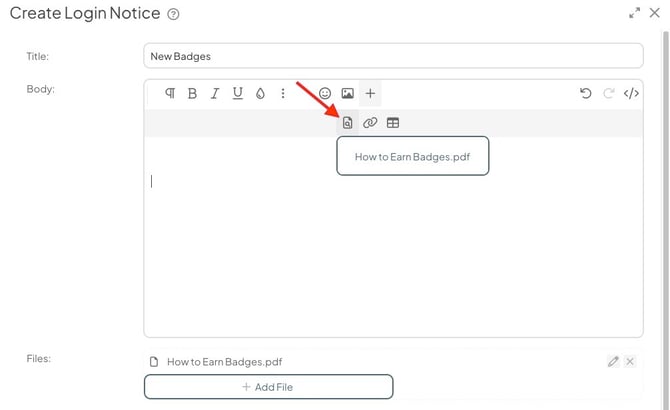
- Files: Use the + Add File button to attach files to your Login Notice. You can also drag the file from your computer and drop it into Files area.
- After a file is attached, you can use the Insert Existing File option in the formatting toolbar to add a hyperlink to the file in your Login Notice.
- After a file is attached, you can use the Insert Existing File option in the formatting toolbar to add a hyperlink to the file in your Login Notice.
-
-
- The Dismissible checkbox: When enabled, the Login Notice will include a "Don't show me this again" checkbox. If a user checks this checkbox before clicking "Continue" and closing the Notice, they will not see the Login Notice again. This is best for Login Notices about one-time events that might interest your users, such as classes, conferences, or meetings involving Lean or continuous improvement.
When disabled, the Login Notice will be displayed every time a user logs into the system. This is best for Login Notices containing quick reminders about standard practices and guidelines for working in KaiNexus. - Start Date: Enter the date and time at which the Login Notice should start to appear for users. If left blank, the Login Notice will begin appearing as soon as the Status is set to Active.
- End Date: Enter the date and time at which the Login Notice should stop appearing for users. If left blank, the Login Notice will continue appearing until the Status is set to Inactive.
- Restrict Viewing To: By default, this Login Notice will appear for all users in the organization. You can restrict it so that it only appears to users who are in certain Locations, who are certain User Types, or who have been assigned certain Roles or Personas. Use this field to search for and select the Locations, User Types, Roles, and/or Personas who should see this Login Notice.
- Note that if you set multiple restrictions here, any user who meets one or more of those restrictions will see the Login Notice.
- Regardless of the viewing restrictions, Wallboard Users will never receive Login Notices.
- Status: Expand this drop-down to select the Login Notice's current status. If "Active," the Login Notice will begin appearing for users immediately (or as soon as the configured Start Date is reached). If "Inactive," the Login Notice will not appear for users.
- Click Preview to see a preview of how the Login Notice will look when it becomes active. Click Continue to close the preview.
- Click Save.
- The Dismissible checkbox: When enabled, the Login Notice will include a "Don't show me this again" checkbox. If a user checks this checkbox before clicking "Continue" and closing the Notice, they will not see the Login Notice again. This is best for Login Notices about one-time events that might interest your users, such as classes, conferences, or meetings involving Lean or continuous improvement.