Who can activate an Item?
- Anyone with the "Edit" permission for Items in this Location(s).
- For Items using the Simple or Standard Team Type, anyone with the "Assign" permission for Items in this Location(s) can directly assign them; anyone with the "Request" permission can request people to become the Responsible Person.
- Anyone with the appropriate Team Roles:
- For Items using the Simple Team Type, anyone on the Team except for Followers.
-
- For Items using the Author-Only Team Type, anyone on the Team except for Followers.
- For Items using the Advanced Team Type, anyone on the Team except for Participants and Followers.
![]() For more information on Team Roles (like Authors, Facilitators, Participants, and more!) check out this article.
For more information on Team Roles (like Authors, Facilitators, Participants, and more!) check out this article.
Activate an Item
To activate an Item, open the Item with which you want to work, then:
- Click the Item's Status indicator.
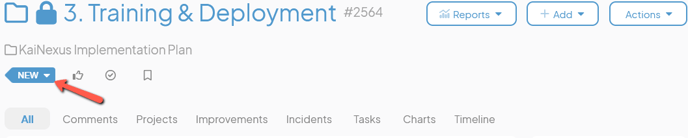
- Click Active in the resulting drop-down menu.
- If your organization utilizes Custom Statuses, "Active" may be renamed to match your organization's unique terminology. Furthermore, there might be multiple Active Statuses that you can choose between.
Standard Team Type
On the "Assign" window:

- Responsible: Use this field to search for and select the user who will be responsible for working on the Item.
- Start Date: This field will be populated with the current date by default. Enter the date on which work on this Item should begin. If you select a future start date, the Item will enter the Planned status instead of the Active status.
- Due Date: Enter the date by which this Item should be completed.
- Any fields or Attributes that are configured to appear during the activation process will also be present. Update their values as appropriate.
- Comment: Enter a comment with any additional information for the Responsible Person. The information will be added to the Item as a comment.
- Under the Additional header:

/Ofie/Ofie%20Profile%20Pic.png?width=50&height=50&name=Ofie%20Profile%20Pic.png) Pro Tip: The Additional section may be expanded or collapsed by default, depending on the Template's configuration. If collapsed, select the arrow to the left of "Additional" to expand it.
Pro Tip: The Additional section may be expanded or collapsed by default, depending on the Template's configuration. If collapsed, select the arrow to the left of "Additional" to expand it.
The Team Roles displayed in this section also may vary based on the Template's configuration.
-
- Assigned by: Your name will be listed here by default but if you're planning and assigning this Item on behalf of someone else, use this field to search for and select that user.
-
- The Require Resolution Approval checkbox: When this box is checked, the Item's Assigner will need to review a submitted Resolution and approve it before the Item will transition into the Complete status.
- Both the presence and default state of this checkbox are determined by the Item's template's configuration.
- Collaborators: Use this field to search for and select the user(s) who will contribute to the success of the Item.
- Followers: Use this field to search for and select the user(s) who should be kept in the loop but not have any formal responsibility for the Item.
- Responsible Location(s): The default Responsible Location(s) will appear here. Use this field to search for and select the Location(s) in which the work on this Item will be done.
- The Require Resolution Approval checkbox: When this box is checked, the Item's Assigner will need to review a submitted Resolution and approve it before the Item will transition into the Complete status.
-
- Files: Select Add File to attach a new file to this Item. Your computer's File Upload window will open.
- Choose the files you want to add.
- Files: Select Add File to attach a new file to this Item. Your computer's File Upload window will open.
- Select the Assign button to directly assign this Item to the selected Responsible Person.
- You will only see this button if you are assigning the Item to yourself or have the "Assign" permission in this Item's Location.
- Select the Request button to request that that person take responsibility for it instead.
- You will only see this button if you have the "Request" permission in this Item's Location.
- If you don't have permission to directly assign this Item to the selected person, "Request" will be the only option available.
Simple Team Type
On the "Assign" window:

- Responsible: Use this field to search for and select the user who will be responsible for working on the Item.
- Start Date: This field will be populated with the current date by default. Enter the date on which work on this Item should begin. If you select a future start date, the Item will enter the Planned status instead of the Active status.
- Due Date: Enter the date by which this Item should be completed.
- Any fields or Attributes that are configured to appear during the activation process will also be present. Update their values as appropriate.
- Comment: Enter a comment with any additional information for the Responsible Person. The information will be added to the Item as a comment.
- Under the Additional header:

Pro Tip: The Additional section may be expanded or collapsed by default, depending on the Template's configuration. If collapsed, select the arrow to the left of "Additional" to expand it.
The Team Roles displayed in this section also may vary based on the Template's configuration.
- Assigned by: Your name will be listed here by default but if you're planning and assigning this Item on behalf of someone else, use this field to search for and select that user.
- Collaborators: Use this field to search for and select the user(s) who will contribute to the success of the Item.
- Followers: Use this field to search for and select the user(s) who should be kept in the loop but not have any formal responsibility for the Item.
- Responsible Location(s): The default Responsible Location(s) will appear here. Use this field to search for and select the Location(s) in which the work on this Item will be done.
- Files: Select Add File to attach a new file to this Item. Your computer's File Upload window will open.
- Choose the files you want to add.
- Links: Select Add Link to add new links to the Item. The "New Link" window will open.
- Stay on the Web Link tab if you want to add an external link:
- Name: The name will be used to identify this link.
- Address: Enter the URL of the link.
- Select the Item tab if you want to add a link to another Item in KaiNexus.
- Item: Use this field to search for and select the Item to which you want to link.
- Relationship: Expand the drop-down to choose in which way this Item is associated with the linked Item.
- Select Save.
- Stay on the Web Link tab if you want to add an external link:
- Select the Assign button to directly assign this Item to the selected Responsible Person.
- You will only see this button if you are assigning the Item to yourself or have the "Assign" permission in this Item's Location.
- Select the Request button to request that that person take responsibility for it instead.
- The Request button will always be present on Simple Team Items, regardless of your System Role permissions, unless you are assigning the Item to yourself.
- If you don't have the "Assign" permission, "Request" will be the only option available.
Advanced Team Type
On the "Activate" window:

- Facilitator(s): The Item's current Facilitators will be listed here by default. Use this field to search for and select any other user(s) who will be in charge of leading and executing the Item.
- Due Date: If a Due Date is required for this Template, the Due Date field will appear in the Activate window. Use it to enter the date by which this Item should be completed. If Due Dates are not required, this field will be absent.
- Under the Additional header:
Pro Tip: The Additional section may be expanded or collapsed by default, depending on the Template's configuration. If collapsed, select the arrow to the left of "Additional" to expand it.
The Team Roles displayed in this section also may vary based on the Template's configuration.
-
- Author(s): If the Author Team Role is enabled on the Template, the Item's Author will be listed here by default.
- Sponsor(s): The Item's current Sponsors will be listed here by default. Use this field to search for and select any other user(s), typically senior leaders, who will provide guidance, support, and direction, and champion the Item.
- Leader(s): The Item's current Leaders will be listed here by default. Use this field to search for and select any other user(s) who will be in charge of leading small teams within the Item.
- Participant(s): The Item's current Participants will be listed here by default. Use this field to search for and select any other user(s) who will be contributing to the overall Item objectives and deliverables.
- If the Item already has Participating Location(s), the "Participating Location(s)" field will be visible. If there are none but you would like to add some, click the Participating Location(s) button and the field will appear.

- If the Item already has Participating Location(s), the "Participating Location(s)" field will be visible. If there are none but you would like to add some, click the Participating Location(s) button and the field will appear.
- Participating Location(s): The Item's current Participating Location(s) will be listed here by default. Use this field to search for and select any other Location(s) in which every user should take part in the Item.
- Follower(s): The Item's current Followers will be listed here by default. Use this field to search for and select any other user(s) who should be kept in the loop but not have any formal responsibility for the Item.
- Click Activate.
Author-Only Team Type
On the "Activate" window:

- Authors: The Item's current Authors will be listed here by default. Use this field to search for and select any other user(s) who will contribute to the success of the Item.
- Due Date: If a Due Date is required for this Template, the Due Date field will appear in the Activate window. Use it to enter the date by which this Item should be completed. If Due Dates are not required, this field will be absent.
- Under the Additional header:
Pro Tip: The Additional section may be expanded or collapsed by default, depending on the Template's configuration. If collapsed, select the arrow to the left of "Additional" to expand it.
The Team Roles displayed in this section also may vary based on the Template's configuration.
-
- Followers: The Item's current Followers will be listed here by default. Use this field to search for and select any other user(s) who should be kept in the loop but not have any formal responsibility for the Item.
- Click Activate.