
Approve a submitted Resolution to officially complete an Item or decline it if it needs more work.
Items in KaiNexus can be configured such that their Resolution must be submitted for review and approved before the Item can be completed.
Who should review an Item's Resolution?
-
For Items using the Standard Team Type, the Assigner.
-
For Items using the Simple Team Type, the Assigner or anyone who can Assign its parent.
-
For Items using the Advanced Team Type, any Facilitator or Author.
- Items using the Author-Only Team Type typically do not require approval.
![]() For more information on Team Roles (like Authors, Facilitators, Participants, and more!) check out this article.
For more information on Team Roles (like Authors, Facilitators, Participants, and more!) check out this article.
How do I know if I need to review a Resolution?
- You will receive an email from KaiNexus and an in-app notification that a Resolution was submitted.
- A flag will be added to the Item itself.
How do I review a Resolution?
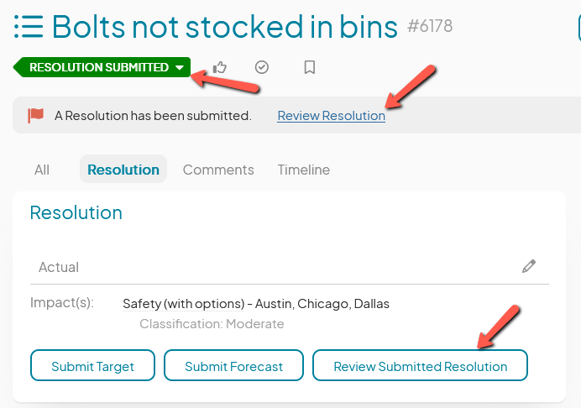
To review an Item's Resolution, open the ITem with which you want to work, then either:
- Click the status indicator then click Complete in the resulting drop-down menu,
- Click Review Resolution in the "A Resolution has been submitted" flag, or
- Click Review Submitted Resolution in the "Resolution" panel.
In the resulting window:
- Review the submitted Resolution and make any necessary changes.
- Click Save to save your changes and finish reviewing this Resolution later.
- Click Decline to indicate that more work needs to be done and the "Decline Resolution" window will open.
- Reason for Declining: Enter an explanation as to why this Resolution was declined. The explanation will be added to the Item as a comment.
- Click Decline and the Item will be transitioned back into its previous status.
- Click Approve to accept this Resolution in its current state.
- If any Milestones are blocking the completion of the Item, the "Milestone Approval" window will open. Click here for more information on dealing with these Milestones.
- Otherwise, the "Notify" window will open. On this screen, you can choose who should be notified about the completion of this Item.
Milestone approval
If one or more Milestones are blocking the Item's completion, they will need to be submitted and approved before you can proceed. The "Milestone Approval" window will appear when you try to complete the Item.
The first unapproved Milestone will be listed on this window:
- If the Milestone has not yet been submitted for approval, click Submit for [Milestone name] and the "Milestone Approval" window will refresh. This option will only appear if the Milestone has not yet been submitted and you have permission to submit it.
- If the Milestone has been submitted but still needs to be approved, the Milestone's name will be displayed in blue. Click the Milestone's name and the "Milestones" window will open.
- To approve the Milestone, check the Approved checkbox, then click Save.
- If there is another Milestone blocking the Item's completion, that Milestone will now appear on the "Milestone Approval" window.
- Repeat the above steps until the final Milestone has been approved and appears in green on the "Milestone Approval" window.
- Click Done and the "Notify" window will open.
Choose who should be notified
-
- Under the "People" header:
- The Team checkbox: When this box is checked, everyone on the Item's Team will be notified.
- In the drop-down to the right of the checkbox (set to "Digest" by default), select Digest if you want the Team to receive this notification as part of their usual daily digest email or Email Now if you want them to receive a separate, immediate email about this notification.
- Use the Search for Other People field to search for and select any other people who should be notified.
- Each person you select will be listed below this search field. In the drop-down to the right of their name, select Digest or Email Now as described above.
- The Team checkbox: When this box is checked, everyone on the Item's Team will be notified.
- Under the "Locations" header:
- Each of the Item's Locations will be listed. Click the Select All checkbox to select every Location or click the checkbox next to a Location to select it individually.
- In the first drop-down to the right of each Location (set to "Digest" by default), select Digest if you want everyone in this Location to receive this notification as part of their usual daily digest email or Email Now if you want them to receive a separate, immediate email about this notification.
- In the second drop-down (set to "Location and Below") by default, select Location and Below if you want everyone in this Location and any Locations nested below it to be notified or Only at this Location if you only want people in this Location to be notified.
- All Roles: Optionally, expand the drop-down to choose which Roles people in this Location must have in order to receive this notification. If you want everyone in the Location to be notified, leave this field blank.
- Use the Search for Other Locations field to search for and select any other Locations in which people should be notified.
- Each Location you select will be listed below this search field. Use the drop-downs to the right of each one to further detail how and to whom the notification should be sent, as described above.
- Each of the Item's Locations will be listed. Click the Select All checkbox to select every Location or click the checkbox next to a Location to select it individually.
- Click Save. The notification will be sent to everyone you chose and the comment, if you added one, will be added to this Item.
- Under the "People" header:
![]() If a person you've selected — or a person in a Location you selected — does not have permission to see this Item, they will not receive a notification.
If a person you've selected — or a person in a Location you selected — does not have permission to see this Item, they will not receive a notification.