Editing Goals is how you change a Goal's criteria and assign Goal Values to Locations within your organization. Keep reading to learn about:
- Who can edit a Goal?
- View current Goals
- Edit a Goal, including
Who can edit a Goal?
Anyone with the Goal Manager System Role Permission can edit Goals.
People with other admin permissions may be able to access the Goals Administration page, but cannot make changes to it.
View current Goals
To view the Goals for your organization, navigate to Admin > Organization > Goals.
/Goals/Goals%20Admin%20Page.jpeg?width=670&height=168&name=Goals%20Admin%20Page.jpeg)
- Each Goal in your organization will be listed. By default, columns displaying each Goal's Type, Start Date, and End Date will be visible.
- Use the Goal Type Quick Filter to filter the list for Goals of a certain Type: Impact, Items Submitted, Items Completed, People Count, or People Percentage.
- Edit columns on the list by hovering over one of the existing column headers, and selecting the dropdown arrow.

- Select Sort Ascending to arrange the list of Goals by increasing values in your column of choice.
- Select Sort Descending to arrange the list of Goals by decreasing values in your column of choice.
- Select Columns to change which columns appear in the list. These changes will be temporary.
Edit a Goal
To edit a Goal, navigate to Admin > Organization > Goals.
/Goals/Edit%20Goal.jpeg?width=670&height=164&name=Edit%20Goal.jpeg)
- Hover over the Goal you would like to edit. It will highlight blue.
- Select the pencil icon to the right of the Goal.
- Use the two tabs in the Edit Goal window: Criteria and Assign Values.
/Goals/Edit%20Goal%20-%20Tabs.jpeg?width=400&height=332&name=Edit%20Goal%20-%20Tabs.jpeg)
Edit a Goal's Criteria
In the Criteria tab, you can edit the parameters an Item or Impact must meet to be counted toward the Goal.
- Name: Edit the name of the Goal.
- Goal Type: Goal Type cannot be edited. Whether a Goal is Items Submitted, Items Completed, or Impact must be dictated when creating a new Goal.
- If the Goal Type is Items Submitted or Items Completed, you can edit:
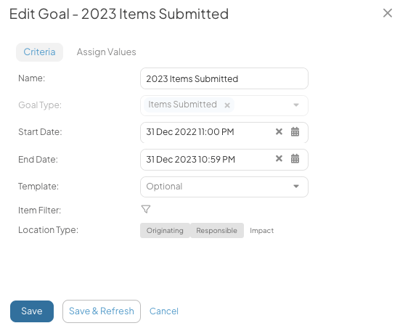
- Start Date: Enter the date you want Goal tracking to begin.
- Item Submitted Goals will only count Items that have been Submitted after this date.
- Item Completed Goals will only count Items that have been Completed after this date.
- End Date: Enter the date you want Goal tracking to end.
- Item Submitted Goals will only count Items that have been Submitted before this date.
- Item Completed Goals will only count Items that have been Completed before this date.
- Start Date: Enter the date you want Goal tracking to begin.
-
- Template: If desired, select one or more Templates . Only Items created from Templates listed in this field will be counted toward the Goal. If no Template is specified, Items of any Template can be counted toward the Goal.
- Item Filter: Select the filter icon to enter the Item Filter. Use the Item Filter when you want to provide more specific criteria as to which Items should be counted toward the Goal.
- Location Type: Use the toggles to select one or more Location Types. This selection will determine which Location on an Item receives credit toward its Goal.
- For example, if you select Responsible as the Location Type, then only an Item's Responsible Location will receive credit when the Item meets the Goal criteria. The Originating and Impact Locations on the Item will not have the Item counted toward their Goals.
- If the Goal Type is Impact, then you can edit:

- Start Date: Enter the date you want Goal tracking to begin. Only Impacts on Items with a Date Reference after this date will be counted toward the Goal.
- End Date: Enter the date you want Goal tracking to end. Only Impacts on Items with a Date Reference before this date will be counted toward the Goal.
- Date Reference: Select your Date Reference. The Date Reference determines which Item date the system references when determining whether Impacts fall into your Goal's Date Range.
-
-
- For example, if you select "Completed in", an Item's Impact will only be counted toward the Goal if that Item has a Complete Date between the Goal's Start Date and End Date. If the Item has not been Completed in the date range, the Impact won't be counted.
-
-
- Impact: Select which Impact Types should be counted toward the Goal. You can select multiple Impacts in this field, if desired.
- If you select a Quantitative Impact that supports Impact Values, then an additional Impact Value field will appear. Use this field to narrow down which variations within the Impact should be counted toward the Goal.
- Impact: Select which Impact Types should be counted toward the Goal. You can select multiple Impacts in this field, if desired.
-
- UOM: Select whether the Goal will be tracked in Currency or Units. This will determine which unit of measurement you will use when assigning Goal Values. When the Goal is displayed on a Report or Widget, the Goal will appear in the unit of measurement you select.
- This is important when your Goal tracks Impacts that can be reported in currency or units such as Waste, Product, Resources, Environmental Impact, Time Savings, Takt Time, Cycle Time, and Lead Time.
- If the selected Impact is only reported in currency, then this field will automatically default to Currency and cannot be edited.
- Impact Attribute: Expand this drop-down to select one of your organization's Impact Attributes. When you select an Impact Attribute, an additional drop-down will appear.
- Attribute Value: Select which Attribute Values an Impact must be tagged with to be counted toward your Goal.
- If you enter multiple values, Impacts only need to have one of the listed values to be counted toward the Goal.
- If you leave this field blank, Impacts tagged with any of the Impact Attribute's values will be counted toward the Goal.
- Attribute Value: Select which Attribute Values an Impact must be tagged with to be counted toward your Goal.
- Item Filter: Select the filter icon to enter the Item Filter. Use the Item Filter when you want to provide more specific criteria as to which Item's Impacts can be counted toward the Goal.
- Location Type: Use the toggles to select one or more Location Types that should receive credit for Impacts matching your Goal criteria.
- For example, if you select Responsible as the Location Type, then only an Item's Responsible Location will receive credit when its Impact meets Goal criteria. The Originating and Impact Locations on the Item will not have the Impact counted toward their Goals.
- UOM: Select whether the Goal will be tracked in Currency or Units. This will determine which unit of measurement you will use when assigning Goal Values. When the Goal is displayed on a Report or Widget, the Goal will appear in the unit of measurement you select.
- If the Goal Type is People Count, you can edit:

- Goal User Filter: Select the person icon to open the User Filter and set the criteria a user must meet to count toward the Goal.
- If the Goal Type is People Percentage, you can edit:

- Goal User Filter: Select the person icon to open the User Filter and set the criteria a user must meet to count toward the Goal. The number of users meeting this criteria will be the numerator in the Goal calculation.
- Total User Filter: Select the person icon to open the User Filter and set the criteria users must meet to be included in the Goal total. The number of users meeting this criteria will be the denominator in the Goal calculation.
- Customizing which users are included in the denominator of the calculation allows you to create more precise Goals. For example, your objective might be to have all leaders in your organization earn a certain Badge. In this example, you'd want to apply the Leader Persona criterion in the Total User Filter so that only leaders are considered while calculating the percentage.
- If you don't enter any criteria for the Goal's total, all user accounts, including Inactive Users, will be used in the calculation. For this reason, we recommend you at least specify a User Type in the total.
/Ofie/Ofie%20Profile%20Pic.png?width=50&height=50&name=Ofie%20Profile%20Pic.png) Pro Tip: People Percentage Goal values are calculated as follows:
Pro Tip: People Percentage Goal values are calculated as follows:
People Percentage Goal value = (Goal User Filter count / Total User Filter count) x 100
- Select Save or Save & Refresh when you are finished editing.
- Save will save your work and return you to the Goals Administration page.
- Save & Refresh will save your work and keep you in the Edit Goal window. Use this option when you also want to assign Goal Values for Locations.
Assign Goal Values for Locations
The Assign Values tab of the Edit Goal window gives you a hub where you can view and edit the Goal Values assigned for every Location in your organization.
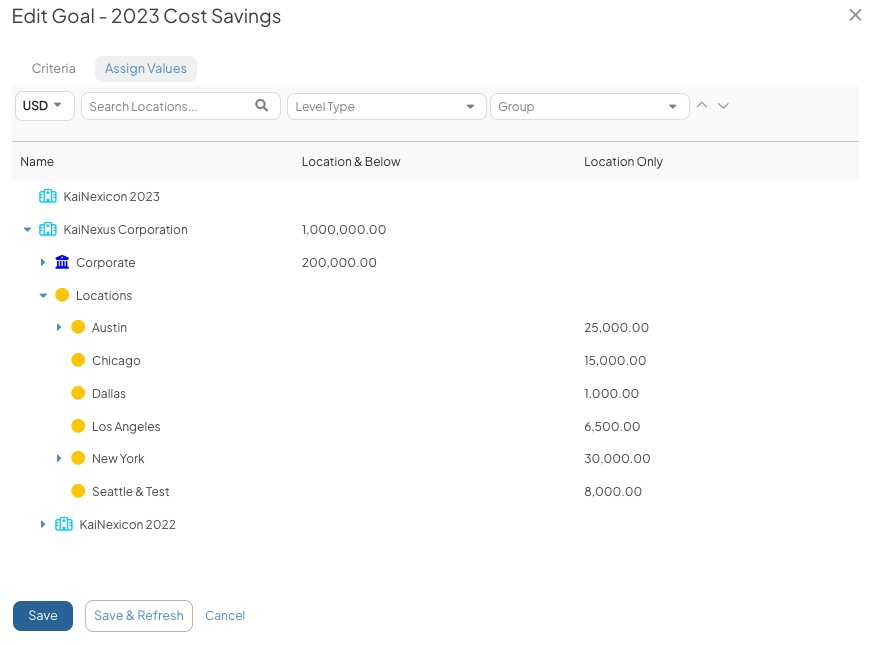
- The Network will be displayed on the left. Select the arrows beside each Location to expand it and view Locations nested beneath it. At the top of the Assign Values tab, you can:
- Use the Location Search to search for a specific Location within your organization.
- Use the Level Type Quick Filter to show all Locations with your selected Level Type in the Network.
- There are two columns where you can view and edit Goal Values: Location & Below and Location Only. These two types of Goal Values are independent and do not affect each other.
- Location & Below: When you enter a Value in this column, it is a Goal for the Location and all Locations nested beneath it, meaning each nested Location's contributions will be counted toward this Goal. To view progress toward this Goal, select Location & Below on the Location Filter for your Widgets and Reports.
- Location Only: When you enter a Value in this column, it is a Goal for one Location, meaning only this Location's contributions will be counted toward the Goal. To view progress toward this Goal, select Location Only on the Location Filter for your Widgets and Reports.
Pro Tip: Check out this article for more information on how Location & Below and Location Only Goal Values affect your experience viewing Goal progress on Widgets and Reports.
To assign values to a Location:
- Hover over a Location in the Network. The row will highlight blue.
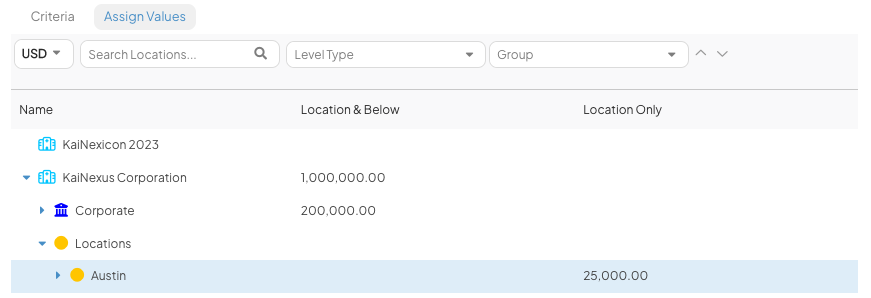
- Select the existing Value or empty space in the Location & Below or Location Only column. A number field will appear.
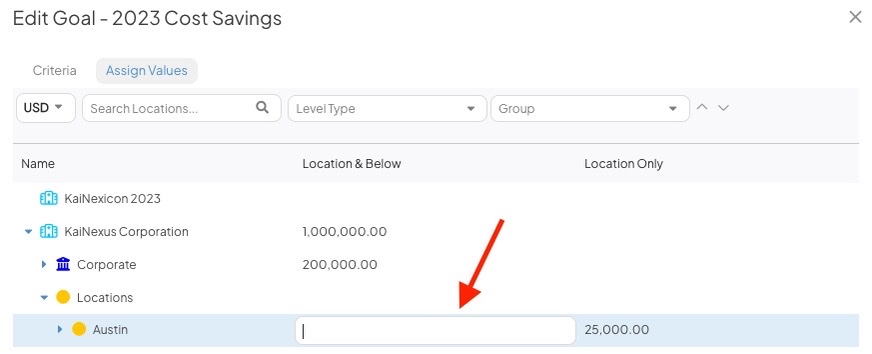
- If you are in the Location & Below column, enter a Goal Value you want this Location and all Locations nested beneath it to achieve. Use this column when you want a segment of your Network to work collectively toward a Goal.
- If you are in the Location Only column, enter a Goal Value you want this Location alone to achieve. Use this column when you want to set a Goal for each Location individually.
Warning: Goal Values assigned to nested Locations do not summate into the top-level Location. Each Location must have a Goal Value entered individually regardless of its place in the Network structure.
- Select Save or Save & Refresh when you are finished editing.
- Save will save your work and return you to the Goals Administration page.
- Save & Refresh will save your work and keep you in the Edit Goal window. We recommend saving your work often as you Assign Values.
What's Next
Now that you have edited Goals and assigned Goal Values, we recommend you check out the article below for a holistic explanation of how Goals work and your options for visualizing a Location's progress toward their Goal.
Recommended Reading