There are several ways you can create an Item in KaiNexus. You can:
- Click the Create button in the Navigation Bar at the top of the page. This is the most common method and is what will be discussed throughout the rest of this support article.
- Click on the Create button inside of a Widget Card on a Board.
- Create a new Item via email.
- Create a new Item via the mobile app.
- Create a new Item via a kiosk with the Kiosk Module.
- Utilize JSON to import new Items with the API Module.
Create a new Item with the Create button
To create a new Item, first log in to KaiNexus, then:
- Click Create in the Navigation Bar at the top of the screen.
![]()
- If you can only create one type of Item — one Template — that Template's Create screen will open.
If you can create more than one Template, a drop-down menu listing every Template you can create will open. Click the Template with which you want to work and its Create screen will open.- Templates may be nested under folders, indicated by an arrow to the right of the folder's name. Hover over the folder's name to expand the drop-down and see the Templates it contains.
- If you do not see a certain Template in the drop-down menu, you may not have permission to create that Template based on your Location or System Roles.
- In the resulting Create window, you'll be able to fill in information to create your Item as described below.
The Create window
After clicking on the Create button in the Navigation Bar (or on a Widget Card), a Create window will appear. Depending on the Template's configuration, different optional and required components will be available.
- Summary: In the first field on the Create screen, enter a short summary of the Item. This field is often called the "Title," but your organization may have configured it differently.
- The character limit for an Item’s title can vary by Template, but it’s typically capped at 150 characters.
- Once you've entered the title and clicked outside of the Summary field, a red badge with a number will appear next to the magnifying glass icon to the right of the Summary field if there are any Items with a similar name. The number displayed on that badge correlates to the number of similar Items.
- Hover over the magnifying glass icon and a tooltip containing the list of similarly titled Items will appear.
- Click the magnfiying glass icon to open a more detailed list of similarly titled Items. Clicking any of the Items in that list will open the Item so that you can view it in its entirety.
- Fields and Attributes: Different Templates will have different required and optional Fields and Attributes. Add the necessary information to any Fields and Attributes.
- Parent: Use this field to search for the Item (if any) under which this Item should be nested.
- This field may be required, optional, or hidden completely, depending on your organization's configuration.
- Your organization may have limited the Items available in this field.
![]() To search for and select a particular Item as the parent, you must have permission to view and edit that Item.
To search for and select a particular Item as the parent, you must have permission to view and edit that Item.
- The Make Private checkbox: When this box is checked, the Item will become private and only its Team members and people with the "View Private" permission for Items in its Location will be able to see it.
Both the presence and default state of this checkbox are determined by the Item's template's configuration. Additionally, only someone with the "Toggle Private" permission will be able to see this checkbox.
For a full guide to private Items, check out this support article. - The Allow Team to see nested private Items checkbox: When this box is checked, the Team members will be able to see private Items that are nested under this Item, even if they lack the "View Private" permission for Items in their Locations. This checkbox will only be available for Templates using the Advanced Team Type.
- This Template may have been configured such that you can (or may even be required to) add a Target and/or Forecast Resolution. If this is the case, the Resolution header will be present and there will be a "Submit Target" button, a "Submit Forecast" button, or both.
- Click Submit Target to open the Resolution - Target window. Enter the appropriate Target impact(s) and/or investment(s), then click Save.
- Click Submit Forecast to open the Resolution - Forecast window. Enter the appropriate Forecast impact(s) and/or investment(s), then click Save.
- To edit a Target or Forecast Resolution, click the same button again.
- Status & Team: Depending on this Template's configuration, you may be able to choose the Item's status and/or assign its Team under this header. If you do not see this section, or only see parts of it, your organization has restricted access to it on this Template.
- To switch between statuses, click the corresponding status button. If necessary, the dates and team roles available beneath the status buttons will update to reflect the change. Fill out the required or optional information for the selected status.
- If all but one status button is grayed out, your organization has configurated this Template so that it must be submitted in that status.
- Use each Team Role's field to search for the people you want to add or delete existing people as necessary. Some Team Roles are single-select and some are multi-select.
- To switch between statuses, click the corresponding status button. If necessary, the dates and team roles available beneath the status buttons will update to reflect the change. Fill out the required or optional information for the selected status.
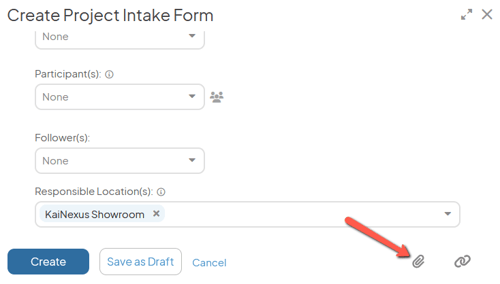
- Add attachments to the Item: Click the paperclip icon in the bottom right corner of the window and select the file(s) you want to attach in the resulting screen.
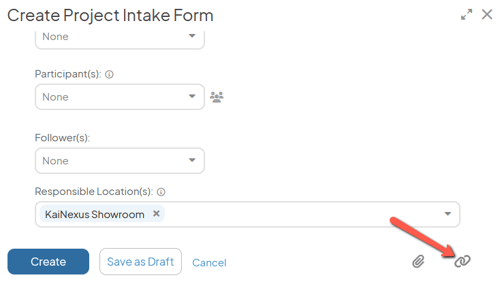
- Add links to the Item: Click the link icon in the bottom right corner of the window.
-
- In the resulting window:
- Leave Web Link selected to add an external link.
- Name (required): The name will be used to identify this link.
- Address: The URL to which you are linking.
- Select Item to add a link to another Item in KaiNexus.
- Item (required): Use this field to search for the Item to which you are linking.
- Relationship (required): Expand the drop-down to select the manner in which these two Items are connected. Links given the same relationship will be grouped together in the Item's Links panel.
- Click Save. The new link will appear in the Links panel
- Leave Web Link selected to add an external link.
- In the resulting window:
- Click Create to create your new Item. Alternatively, you can:
- Click Save as Draft to save the Item in the Draft status. You will be the only person able to see the Item while it is a Draft and you will need to submit it for work on it to officially begin.
Depending on how your organization has configured this Template, this option may not be available. - Click Cancel to exit out of the Create window. Your work will be lost!
- Click Save as Draft to save the Item in the Draft status. You will be the only person able to see the Item while it is a Draft and you will need to submit it for work on it to officially begin.
- Once the Item has been created, you will see a success message. From this confirmation, you can:

- View Item: Navigate to the Item you just created.
- Create Another: Submit another Item of the same Template type.
- Select the link icon to copy the Item's URL to your clipboard.
- Hover over People notified to see who will be notified on your submission. These users have opted into receiving alerts for this type of submission.
- If there are no users who have chosen to receive notifications for this type of submission, then this option will not be visible.
What happens when I fail to complete submission when creating an Item in KaiNexus?
If you fail to complete submission when creating an Item in KaiNexus, the Item will auto-save as a Draft for you to revisit later.
- The next time you log in to KaiNexus, a pop-up window will remind you that you were in the process of submitting an Item.
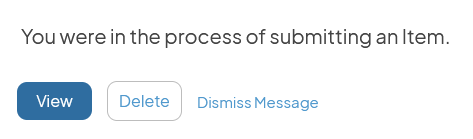
- Click View to resume working on the Item you were in the process of creating. The Create window will reopen where you left off.
- Click Delete to delete the Item you were in the process of creating.
- Click Dismiss Message to continue using KaiNexus. You will be prompted again to take action on this Item later.
![]() NOTE: An Item will be saved this way for 14 days from when it was last updated, after that it will be automatically deleted.
NOTE: An Item will be saved this way for 14 days from when it was last updated, after that it will be automatically deleted.