If you find that the level of effort on certain Items would be best executed by breaking them down into smaller units of work, create a new Item for each of those units and nest them under the original Item.
By utilizing this nesting structure, you can:
- Create Teams for each nested Item so that everyone can know exactly what they should be working on.
- Set due dates and dependencies for each nested Item so that it's clear when Items need to be finished before work on another Item can or should begin.
- Make it clear to anyone accessing the parent or a nested Item to which Items it is directly tied.
![]() Each Item can be nested under one parent only, and an Item can not be the parent of its own parent. However, an Item can be nested under an Item that is nested under a different Item! The nesting hierarchy can have as many tiers as needed.
Each Item can be nested under one parent only, and an Item can not be the parent of its own parent. However, an Item can be nested under an Item that is nested under a different Item! The nesting hierarchy can have as many tiers as needed.
Which Items can be nested under a parent Item?
If you're creating a new Item, you can create and nest any Item that you have permission to create; if you're nesting an existing Item, you must have permission to edit it and it must not already have a parent.
![]() Depending on how your organization has configured your Item, you may only be able to nest certain Items (or no Items at all) under it. Reach out to your Customer Success Manager for help with this configuration.
Depending on how your organization has configured your Item, you may only be able to nest certain Items (or no Items at all) under it. Reach out to your Customer Success Manager for help with this configuration.
Only the following people can view an Item:
- Anyone on the Item's Team.
- Potentially anyone on the parent's Team.
- If the Item is not private and not in the New status, anyone with the "View" permission for Items in its Location(s).
- If the Item is private, anyone with the "View Private" permission for Items in its Location(s).
- If the Item is in the New status and is not private, anyone with the "View New" permission for Items in its Location(s).
Only the following people can edit an Item:
- Anyone on the Item's Team except for Followers or Participants.
- Anyone with the "Edit" permission for Items in the Item's Location(s).
- Anyone with the "Assign (Which Items)" permission for Standard Team Items in the Item's Location(s).
![]() For more information on Team Roles (like Authors, Facilitators, Participants, and more!) check out this article.
For more information on Team Roles (like Authors, Facilitators, Participants, and more!) check out this article.
Add a nested Item
There are a few different ways you can add a Nested Item to a Parent Item. You can either use the + Add button at the top of the Parent Item, add an Item on the Nested Item Panel, or use Quick Create.
/Ofie/Ofie%20Profile%20Pic.png?width=50&height=50&name=Ofie%20Profile%20Pic.png) Pro Tip: You can also add a nested Item while viewing an Item List. Visit this support page to learn how to edit Items in a List.
Pro Tip: You can also add a nested Item while viewing an Item List. Visit this support page to learn how to edit Items in a List.
At the top of the Parent Item
Open the Item under which you want to nest an Item, then:
- Click Add in the top right corner of the page.

- Click Item in the resulting drop-down menu, and the Add Item window will open. Then either:
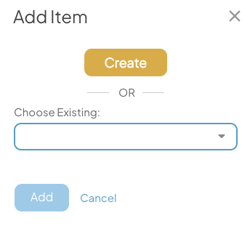
- Click Create if you want to create a new Item. In the resulting drop-down menu, click the type of Item you want to create and the Create window will open.
- The Parent field will already be filled in with the name of the parent Item with which you're working. Do not change this field.
- Enter the rest of the Item's information as you would normally do when creating an Item.
- Click Create. The new Item will be created and nested under this parent.
- Choose Existing: Use this field to search for and select the Item(s) you want to nest under this parent. You can pick as many Items as necessary. If a particular Item does not appear in the list, you either don't have permission to edit it, it already has a parent, or it cannot be nested under this parent due to how your organization has configured these Templates.
- Click Add. The selected Item(s) will be nested under this parent.
- Click Create if you want to create a new Item. In the resulting drop-down menu, click the type of Item you want to create and the Create window will open.
On the Nested Item List Panel
If the Parent Item has multiple Nested Item List Panels, then you may want to add the new Nested Item directly on the Panel where you want it to appear.
Navigate to the Parent Item's Nested Item List Panel, and select the Create Button.

Pro Tip: Templates created before April 12th, 2025, may not have the Create Button on nested Item Lists. In this case, hover over the Panel to reveal the + icon, which you can select to add a nested Item.

- In the resulting menu, you can either create a new Item or add an existing Item.

- The Templates you can use to make a new Item may be restricted so that only certain Templates can be created for certain Panels. Your options for the type of Item you can create will be listed. In the example pictured above, the only type of Item that can be created is a "Task".
- The new Nested Item you create will automatically adopt the correct Parent and Attributes necessary to appear on the Panel.
- Use the Existing Item search to find an existing Item to add to the List. You will only be able to add Items that meet the Panel's requirements. In the example pictured above, because "Task" is the only type of Item you can create, you will only be able to search for existing Tasks. Items of other Templates would not appear in the search.
- The Templates you can use to make a new Item may be restricted so that only certain Templates can be created for certain Panels. Your options for the type of Item you can create will be listed. In the example pictured above, the only type of Item that can be created is a "Task".
Pro Tip: Do you want to change which Items can be nested beneath a Parent Item? Reach out to your Customer Success Manager for assistance.
Quick Create on the Nested Item List Panel
Warning: Quick Create must be enabled on the Nested Item List Panel to see this option. Reach out to your Customer Success Manager if you want to add Quick Create to a Nested Item List.
Quick Creating Nested Items is an easy way to bypass the Create screen of a new Item and add many Items in quick succession.
Navigate to the Nested Item List where you want to add a Nested Item. Select + Quick Create.

- A Title field will appear. Use it to enter the name of the new Nested Item.

- Select Create.
The new Item will immediately appear in the Nested Item List. It will automatically inherit the Parent and Attribute fields necessary to appear in the Panel.
Pro Tip: You can also use Quick Create in the expanded view of a Nested Item List Panel. To expand a Panel, hover over it and select the expand icon.