/Ofie/Ofie%20Profile%20Pic.png?width=50&height=50&name=Ofie%20Profile%20Pic.png) Important: The features described on this support page require the Capacity Planning Module.
Important: The features described on this support page require the Capacity Planning Module.
When a Template includes at least one Capacity Category and an Item of that Template Type has Capacity Tracking enabled, team members can commit portions of their capacity to the Item.
This support page will discuss:
- The Capacity Panel
- Enabling Capacity Tracking on Items
- Schedule the Team's commitments
- Who can schedule the Team's commitments?
- How to access the Capacity Schedule
- How to use the Capacity Schedule
- Add new users to the team in the Capacity Schedule
- Remove users from the team in the Capacity Schedule
- View a user's other commitments in the Capacity Schedule
- Add a new commitment
- Copy a commitment
- Move a commitment to another team member
- Edit a commitment
- Delete a commitment
- When do Commitments affect Current Capacity?
- Who receives notifications when an Item's Capacity Schedule is updated?
- Export an Item's capacity data
The Capacity Panel
The Capacity Panel is where you find information related to Capacity Planning for an Item. The location of the Capacity Panel will change depending on your Template design.
Important: Users must have the Capacity or Capacity Manager permission to see any information in this panel.
While viewing the Item Work Panel, locate the Capacity Panel for an overview of the team's Capacity Commitments.

- This Item: Represents the user'c current commitment to the Item.
- If Hours Per Week: Show the number of hours for the current commitment.
- If Number of Items: Shows whether or not the user is currently committed to the Item.
- Active: Represents the user's current commitment across all their Items.
- Available or Overcommitted: Represents the user's remaining availability for the Capacity Category.
- If the user does not have a Max Capacity set for the Capacity Category tracked on this Item, no bar will appear.
Pro Tip: You cannot adjust the Team's commitments through the Capacity Panel when the Item is in Complete or Deferred Status.

Turning on Capacity Tracking on an Item
Who can turn on Capacity Tracking on an Item?
To enable Capacity Tracking on an Item, you must:
- Have the Capacity or Capacity Manager Permission included in your System Role Permissions, and
- Be able to edit the Item
Turn on Capacity Tracking on an Item
Whether Capacity Planning is automatically enabled for an Item depends on its Template. If a Template does not enable Capacity Planning by default, you must manually turn it on for each Item where you want to track capacity.
Navigate to the Capacity Panel of an Item, then:
- Select the Enable Capacity Tracking button. The Edit Capacity window will open.

- If Capacity Tracking is already enabled on the Item, this button will not appear. Instead, the Capacity Panel will display the Team Roles that allow for Capacity Tracking.
- If Capacity Tracking can be turned on or off for this Item, you will see the Enable Capacity Tracking checkbox in the Edit Capacity window. If it does not appear, Capacity Tracking will always be on for this Item, and you can start scheduling the Team's commitments.

- Select the checkbox to start tracking capacity for this Item.
- Unselect the checkbox to stop tracking capacity for this Item.
- Select Save to apply your changes.
Pro Tip: There are several different ways you can access the Edit Capacity window for an Item. Skip ahead in this support page to learn how.
Pick the Capacity Category tracked on an Item
Depending on the Template, you may need to pick which Capacity Category will be tracked on this Item.
After Enable Capacity Tracking is selected, a dropdown selection will appear:

- Use the dropdown to select which Capacity Category you want to track
- If the Template for your Item only has one Capacity Category, you will not see the dropdown.
Pro Tip: You can only track one Capacity Category per Item at a time. You can change which Capacity Category is tracked on the Item, but only the current selection will count toward users’ Current Capacity.
When you change the Capacity Category on an Item:
-
All active commitments in the current Capacity Category will end as of today.
-
All planned commitments in the current Capacity Category will be removed.
Schedule the Team's commitments
Who can schedule the Team's commitments?
To enable Capacity Planning or adjust Commitments for any Team member on an Item, you must:
- Have the Capacity or Capacity Manager Permission included in your System Role Permissions, and
- Be able to edit the Item
Accessing the Capacity Schedule
There a few different ways to access the Capacity Schedule. You can:
- Locate the Item's Capacity Panel, and select the pencil icon.

- Select the Actions button at the top of the Item, and select Edit Capacity in the drop-down menu.

- If enabled on the Template, select the Edit Capacity Quick Action at the top right of the Item.

- If you are working from an Item List, you can select Edit Capacity from the Quick Edit menu or you can click directly on the Capacity column.
Pro Tip: If you don’t see the option to edit an Item’s capacity, it may be because you don’t have permission, capacity isn’t enabled on the Template, or the Item is in a Status that doesn’t allow capacity updates (Draft, Resolution Submitted, Complete, Deferred, or Archived).
Using the Capacity Schedule
When you edit an Item's capacity through any method described previously, you will see the Capacity Schedule, which is where you can schedule commitments for the Item Team.
Caution: If you have the Capacity Administrator permission but not the Assign or Request permission, you won’t see the Responsible or Assigner Team Roles in the panel, since you don’t have permission to modify them.
The Team Roles you can track capacity for will appear on the left side of the Capacity Schedule. On the right, you’ll see a calendar where you can set commitments for users assigned to those roles.

- The dark green bars represent active commitments.
- The light green bars represent planned commitments.
- The black bars represent completed commitments.
- If the commitment belongs to a placeholder, the bar will be blue.
- Hover over a bar to view commitment details. For hour-based commitments that span multiple weeks, this includes the total number of hours committed across the entire duration of the commitment.
- Use the Week, Month, Quarter, Year, and Zoom to Fit toggles to change the time interval displayed on the Capacity Schedule.
- Selecting Zoom to Fit automatically adjusts the date range to display all commitments logged on the Item.
- Use the search bar to filter the Capacity Schedule and display only users who match your search.
- Use the arrows to navigate to the past or future. Select Today to focus the calendar on today.
- The vertical blue line represents today's date.
- The Show Capacity checkbox: When selected, each team member in the Capacity Schedule will display an additional thin bar showing whether they are below, at, or above capacity week by week. This makes it easier to see when someone has room for more work and when they are over capacity, helping you manage their commitments more effectively.

- The bar will be green on weeks when the user's total commitments are below their Max Capacity.
- The bar will be red on weeks when the users's total commitments are above their Max Capacity.
- The bar will be yellow on weeks when the users's total commitments equal their Max Capacity.
- Hover any week's segment in a capacity bar to see the number of hours or Items the user is below or above capacity that week.
- Placeholders and users who don't have their Max Capacity set will not have a capacity bar.
Pro Tip: If you add a commitment that changes whether a user is below, at, or above capacity, their capacity bar will not change color until you save your changes and reopen the Capacity Schedule.
Add users to the team in the Capacity Schedule
Any users already on the Item Team will automatically be included in the Capacity Schedule. However, you can also add new people to the team directly in the Capacity Schedule. To add a new team member:
- Select the + icon beside the Team Role the user will have. This will add a placeholder line beneath the Team Role's header.

Pro Tip: Placeholders are useful when you want to schedule a future commitment on an Item without assigning a specific team member yet. This allows you to plan capacity in advance while staying flexible in choosing the person who’s available when the time comes.
- Click the placeholder line to select a user.

- If you need help finding the right person, select the user icon. This will open the User Search.

- In the User Search window:

- If you need help finding the right person, select the user icon. This will open the User Search.
-
-
- By default, the People List will display a column showing each User’s Current Capacity.
- Click the dark green or red portion of the bar to see a list of other Items the user is currently committed to.
- The light green portion of the bar represents the user's commitment to the current Item.
- Use the Location and User Filters to find the best person to add to the Team. The Capacity quick filter is especially useful for identifying individuals who are over or under capacity in any Capacity Category.
- Select the checkbox beside the person you want to add.
- Select Save.
- By default, the People List will display a column showing each User’s Current Capacity.
-
Important: You cannot add users to the Responsible or Assigner Team Roles in the Capacity Schedule.
Remove users from the Team in the Capacity Schedule
To remove a person from the Team in the Capacity Schedule:
- Select the ellipsis icon beside the person you want to remove.

- Select Remove Person.
- Select Save to confirm your update.
When you remove a user from the Team:
- Any active commitments will end, and today's date will become the end date of the commitment.
- Future commitments the user has on the Item will be removed.
- Previous commitments the user completed on the Item will be maintained. If the user is added back to the Team, the completed commitments will reappear in the Capacity Schedule.
Important: You cannot remove people from the Responsible or Assigner Team Role in the Capacity Schedule. Furthermore, the Author, Facilitator, and any other required Team Roles must have at least one user assigned to them.
View a user's other commitments
While you are scheduling a user's commitments to the Item, it might be helpful to visualize their other commitments, helping you gauge their current and upcoming capacity.
To view a user's other commitments in the Capacity Schedule:
- Select the ellipsis icon beside the person for which you want to view other commitments.

- Select Show Availability.
- Gray commitment bars appear in the user’s row on the Capacity Schedule to represent their commitments to other Items.

- Hover over a bar to see more details about the commitment and reveal which Item it is associated with.
- Right-click a commitment bar and select Open Item in a New Tab to open the associated Item in a separate browser tab.
Pro Tip: Want to edit a user’s commitments across multiple Items at once? You can do this in the Capacity tab of their Activity window. Learn more on the Manage a user's Capacity Commitments support page.
Add a new commitment
Pro Tip: Capacity Categories that track the number of Items can have the Auto Commit feature enabled. When enabled, a commitment is automatically created whenever someone is added to a Team Role that tracks capacity or when Capacity Tracking is activated for a category with this feature. This eliminates the need to manually add commitments.
To add a new commitment for someone on the Item Team:
- Click and drag your mouse to highlight the time duration for the team member's commitment. You can also click anywhere in the team member's row to get started.

- After you highlight the duration of the commitment, the Add Commitment window will open. In this window:

- Hours per Week: This will only appear if your Capacity Category is Hours per Week. If it's Number of Items, this field will not appear. Use it to define the number of hours the user will commit to the Item during the set time period.
- The value entered into this field must be greater than 0 and no more than 168, which is the maximum number of hours in a week.
- Hours per Week: This will only appear if your Capacity Category is Hours per Week. If it's Number of Items, this field will not appear. Use it to define the number of hours the user will commit to the Item during the set time period.
-
- Team Role: If a person is already assigned to this Team Role, the field will be auto-populated with the user. If you are adding a commitment for a placeholder, you can use this field to assign a person to the Team Role.
- Start Date: Set the starting date of the commitment.
- The Ongoing checkbox: If enabled, the commitment will last until the Item is completed.
- End Date: Set the ending date of the commitment.
- Description: Enter a description for the commitment. This will display in the commitment bar on the Capacity Schedule to provide context, and it will also be included when you export the Item with the Capacity sheet.
Pro Tip: When you complete an Item or move it into Resolution Submitted Status, then all commitments will automatically end, even if the listed ending date is in the future. In addition, any commitments in the future will be automatically deleted.
Copy a commitment
While planning a team’s commitments, it can be helpful to copy them between members with similar responsibilities, or to speed up creating multiple commitments.
To copy a commitment:
- Right-click on an existing commitment in the Capacity Schedule, and select Copy.
- Right-click where you'd like to place the copied commitment, and select Paste.
- You can either paste it on a different date for the same team member or in a different team member's row.
- This will copy the commitment to the new placement while preserving the copied commitment.
- The start date of the newly created commitment will be the date you clicked on while pasting the commitment. The duration of the new commitment will remain the same as the copied commitment.
Move a commitment to another team member
To remove a commitment from one team member and give it to another team member:
- Right-click an existing commitment in the Capacity Schedule, and select Cut.
- This will fade the existing commitment and copy its information.
- Right-click anywhere in the team member's row you'd like to move the commitment to, and select Paste.
- This moves the commitment to the selected team member and removes it from the original.
- The start date of the newly created commitment will be the date you clicked on while pasting the commitment. The duration of the new commitment will remain the same as the copied commitment.
Edit a commitment
- Click and drag the edges of the commitment bars to adjust the start and end dates of commitments.
- Click on a commitment bar to open the Edit Commitment window. Use this window to update the commitment just like you do when adding one.
Delete a commitment
- Click the commitment bar corresponding to the commitment you want to delete.
- In the Edit Commitment window, select Delete. This will remove the commitment from the Capacity Calendar.

- Select Save in the Edit Capacity window to confirm your update.
When does a Commitment count toward a user’s Current Capacity?
A commitment begins counting toward a user’s Current Capacity % when it is considered active. This means:
-
The start date is today or in the past, and
-
The end date is today or in the future.
Only active commitments affect a user's Current Capacity %. Planned and completed commitments do not.
- Planned commitments have a start date in the future.
- Completed commitments have start and end dates in the past.
Who receives notifications when an Item's Capacity Schedule is updated?
After saving changes in the Capacity Panel, an in-app notification is sent to the relevant Team Members assigned to the Item. Which Team Roles receive the notification depends on the Template's Team Type:
-
Advanced Team: The Sponsor, Facilitator, and Leader will receive an in-app notification.
-
Standard or Simple Team: The Author will receive an in-app notification.
-
Author Only Team: The Author will receive an in-app notification.
In addition, any Custom Team Role with Primary edit access will receive the in-app notification, regardless of Team Type.
Export an Item's capacity data
Caution: You must have the Capacity Administrator permission to include capacity data in Item and Item List exports.
You can retrieve an Item's capacity data by exporting it to XLSX. The exported file will contain an additional sheet listing all commitments logged on the Item.
Pro Tip: Check out our Save an Item as an XLSX file support page to learn more about exporting Items. You can also retrieve capacity data by exporting a custom List or an Item List Card.
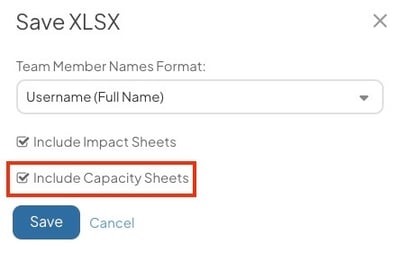
To include capacity data in your Item export:
-
Select the Include Capacity Sheets checkbox in the "Save XLSX" window.
The capacity sheet will contain the following information for each commitment:
- The Item name and ID
- If available, the parent name and ID
- The ID, name, Location, and Team Role of the User
- The Capacity Category
- If the Capacity Category tracks the number of Items, the True/False status of whether the user is committed to the Item.
- If the Capacity Category tracks hours per week, the hours committed per week and the total hours committed across the duration of the commitment
- The start and end dates of the Capacity Commitments.