/Ofie/Ofie%20Profile%20Pic.png?width=50&height=50&name=Ofie%20Profile%20Pic.png) Important: The features described on this support page require the Capacity Planning Module.
Important: The features described on this support page require the Capacity Planning Module.
A Capacity Commitment represents a user’s dedication to an Item within a defined start and end date, unless it’s an ongoing commitment. Depending on the Capacity Category tracked for the Item, this commitment can be measured in hours or simply as a yes/no status, indicating whether the user is committed to the Item.
You can manage a user’s commitments directly on the Item, or view and manage their overall capacity across all their Items using the Capacity tab in their Activity window.
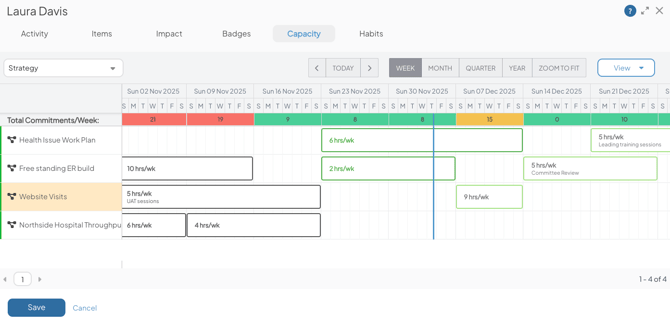
Example of the Capacity tab in a user's Activity window displaying their commitments.
This article will cover:
- Managing a user's Capacity Commitments
- Using the User Capacity Schedule
- When does a commitment count toward a user's Current Capacity?
Manage a user's Capacity Commitments
Who can manage a user's Capacity Commitments
You must have the Capacity Manager permission to see the Capacity tab in other users' profiles and manage their commitments.
Pro Tip: If you are in Capacity view, you'll also need permission to edit the Item to update someone's commitments to it. If you are in List view, you can update the commitments without also needing edit access on the Items.
How to manage a user's Capacity Commitments
You can view a user's Capacity Commitments by viewing the Capacity tab of their User Activity window. To access a user's Capacity tab:
- Select their profile picture anywhere it appears in the platform.
- Select View Activity.
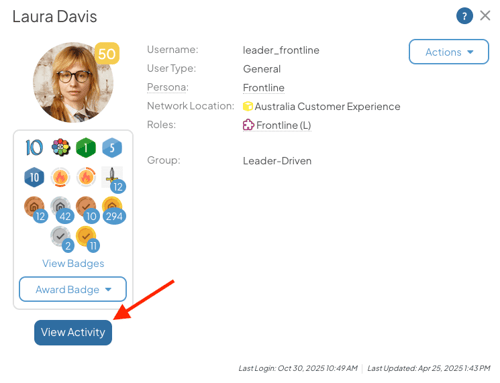
- Select the Capacity tab.
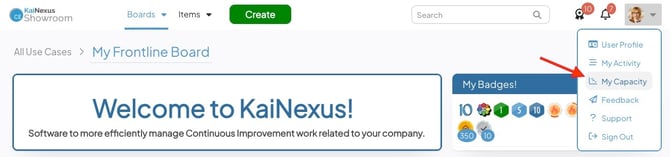
Pro Tip: To manage your own Capacity Commitments, click your profile picture at the far right of the navigation bar and select My Capacity in the drop-down menu.
The Capacity tab has two views: List and Capacity.
- List view displays all Items where the user has a Team Role that allows Capacity Tracking and where the selected Capacity Categories are actively being tracked.
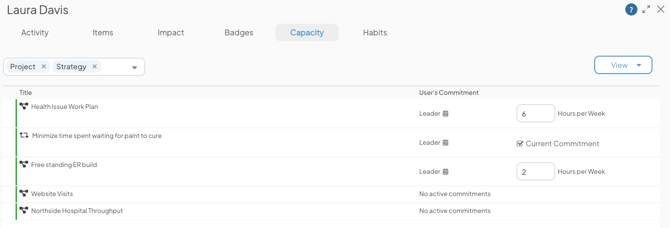
- The User's Commitment column displays the user's active commitments.
- If the user has no commitments, or if all of their commitments are either completed or planned for the future, the column will display "No active commitments."
- Use this column to edit the commitment.
- If the category is Hours per Week, you can update the number of hours.
- If the category is # of Items, you can use the Current Commitment checkbox to commit or uncommit the user from the Item.
- Select the Save button to apply your change.
- Use the Capacity Category drop-down to choose which category you'd like to view. This view allows you to view multiple categories simultaneously, if desired.
- The User's Commitment column displays the user's active commitments.
- Capacity view displays the User Capacity Schedule, which is a Gantt chart of a user's commitments over time. Skip ahead in this support page to learn about using the User Capacity Schedule.

Pro Tip: Need to edit a user's Max Capacity? Learn how on this support page.
Switch between views
To switch between views in the Capacity tab:
- Select the View button.
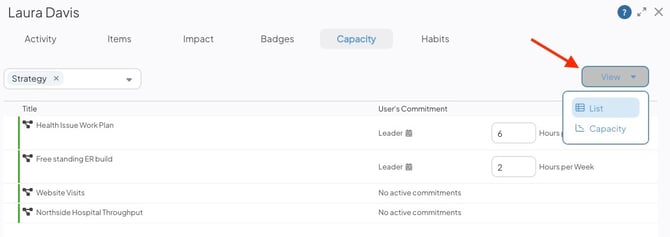
- Select the view you'd like to switch to in the resulting drop-down menu.
Pro Tip: The Capacity tab remembers which view you were using last and defaults to that view the next time you view someone's Capacity tab.
Using the User Capacity Schedule
See existing commitments
The User Capacity Schedule shows all Items where the user has a Team Role that allows Capacity Tracking and where the selected Capacity Category is actively being tracked. These Items appear on the left side of the schedule. If there are more than 50 Items, the list will be paginated.
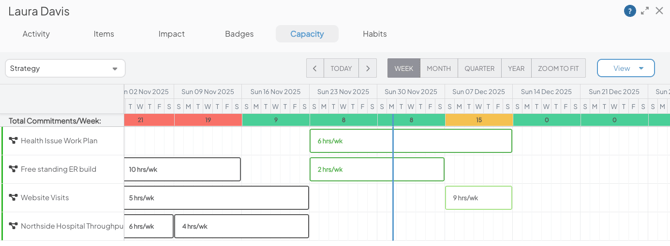
- The dark green bars represent active commitments.
- The light green bars represent planned commitments.
- The black bars represent completed commitments.
- Hover over a bar to view commitment details, including the user’s Team Role on the Item and, for hour-based commitments that span multiple weeks, the total number of hours committed across the entire commitment.
- Use the Week, Month, Quarter, Year, and Zoom to Fit toggles to change the time interval displayed on the Capacity Schedule.
- Selecting Zoom to Fit automatically adjusts the date range to display all the user's commitments.
- Use the arrows to navigate to the past or future. Select Today to focus the calendar on the current day.
- The vertical blue line represents today's date.
- Total Commitments/Week: This bar appears at the top of the schedule and is divided into weekly segments. Each segment displays the user’s total commitments for that week and is color-coded yellow, green, or red based on whether the user is at, below, or above their Max Capacity.
- Hover over any segment to view the number of hours or Items a user is over-committed or still has available.
- If you add or edit commitments, the total commitment calculations won't update until you save your changes at the bottom of the User Capacity Schedule.
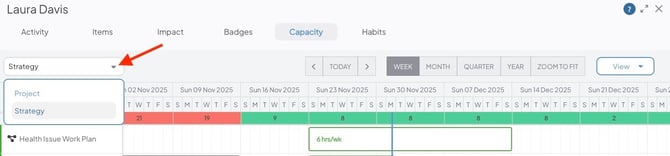
Change which Capacity Category is displayed
The User Capacity Schedule can only show data for one Capacity Category at a time. If your organization uses more than one Capacity Category, the schedule will have a drop-down field that allows you to switch between categories.
- Select the Capacity Category drop-down, and pick which category you'd like to view in the resulting menu.
Add new commitments
To add a new commitment to an Item:
- Click and drag your mouse across the row for the Item to highlight the time period you want to set as the commitment. You can also click anywhere in an Item's row to get started.
- After you highlight the duration of the commitment, the Add Commitment window will open. In this window you can specify:

- Hours per Week: This field will only appear if your Capacity Category is set to Hours per Week. If it's Number of Items, this field will not appear. Use it to define the number of hours the user will commit to the Item during the set time period.
- The value entered into this field must be greater than 0 and no more than 168, which is the maximum number of hours in a week.
- Team Role: If the user only has one assigned Team Role on the Item, this field will automatically populate with the user’s role. If the user has multiple Team Roles that allow for Capacity Tracking, you will select which Team Role to associate with the commitment.
- Hours per Week: This field will only appear if your Capacity Category is set to Hours per Week. If it's Number of Items, this field will not appear. Use it to define the number of hours the user will commit to the Item during the set time period.
-
- Start Date: Set the starting date of the commitment.
- The Ongoing checkbox: If enabled, the commitment will remain active as long as the Item is open and the user holds their Team Role. The End Date will continuously update to today’s date until the Item is moved to Resolution Submitted or Complete Status, or the user is removed from the Team Role.
- End Date: Set the ending date of the commitment.
- Description: Enter a description for the commitment. This will display in the commitment bar on the Capacity Schedule to provide context, and it will also be included when you export the Item with the Capacity sheet.
- Select Add to add the new commitment to the schedule.
- Click Save in the Capacity tab to apply your changes.
Copy a commitment
If you are adding a commitment that is similar to another, you can save time by copying the existing commitment.
To copy a commitment:
- Right-click on an existing commitment in the Capacity Schedule, and select Copy.
- Right-click where you want to place the copied commitment, and then select Paste.
- You can only paste the commitment to a different time slot on the same Item. You cannot copy commitments between Items.
- This will copy the commitment to the new placement while preserving the copied commitment.
- The start date of the newly created commitment will be the date you clicked on while pasting the commitment. The duration of the new commitment will remain the same as the copied commitment.
- Click Save in the Capacity tab to apply your changes.
Move a commitment to another time slot
To re-locate a commitment to another time slot:
- Right-click an existing commitment in the Capacity Schedule, and select Cut.
- Right-click anywhere in the row of the same Item where you'd like to move the commitment, and select Paste.
- This moves the commitment to the new time slot and removes it from the original. The start date of the moved commitment will be the date you clicked on while pasting, and the duration will remain the same.
- You cannot move a commitment to another Item.
- Click Save in the Capacity tab to apply your changes.
Pro Tip: You can also click and drag a commitment bar to a different time slot for the same Item. You cannot drag commitments between Items.
Edit a commitment
There are a few ways you can edit a commitment in the User Capacity Schedule:
- Click and drag the edges of the commitment bars to adjust the start and end dates of commitments.
- Click and drag an entire commitment bar to move it to a different time slot for the same Item. You cannot drag commitments between Items.
- Click a commitment bar to open the Edit Commitment window. You can also right-click the bar and select Edit to access the same options. Use this window to update the commitment in the same way you would when creating a new one.
- Click Save in the Capacity tab to apply your changes.
Delete a commitment
You can delete a commitment in two ways:
- Click the commitment bar you want to remove, then select Delete in the Edit Commitment window.
- Right-click the commitment bar and select Delete.
After deleting the commitment, click Save in the Capacity tab to apply your changes.
Pro Tip: Whenever you save changes to a user's commitments, notifications will be sent to the relevant Item Team members.
When does a commitment count toward a user's Current Capacity?
A commitment begins counting toward a user’s Current Capacity % when it is considered active. This means:
-
The start date is today or in the past, and
-
The end date is today or in the future.
Only active commitments affect a user's Current Capacity %. Planned and completed commitments do not.
- Planned commitments have a future start date.
- Completed commitments have start and end dates in the past.