In KaiNexus, a People List with no filters will include every user you have permission to see, though Inactive users may be hidden by default. You can:
- Use advanced filters to narrow down the List so that only people with certain attributes are included.
- Use the Location filter to narrow down the List so that only people in certain Locations are included.
Filter a List of People using the advanced filters
![]() For information on filtering a People List with the quick filters, check out this support article.
For information on filtering a People List with the quick filters, check out this support article.
To use the advanced filters to filter a List of People in the "People" section:
- Click the Filter icon at the top of the List. If you do not see this option, you may need to first click Filters to expand the List's filters.

- Add filter criteria that determine which people appear on the List
- Configure the view options
- Determine how the List is sorted
- Copy this People List to a Board
- Create a new People List using the selected filters
/Ofie/Ofie%20Profile%20Pic.png?width=50&height=50&name=Ofie%20Profile%20Pic.png) PRO TIP: You can also filter a List using the quick filters at the top of the List. Quick Filters are a great way to quickly apply the most common filters and narrow down a List without opening the User Filter window.
PRO TIP: You can also filter a List using the quick filters at the top of the List. Quick Filters are a great way to quickly apply the most common filters and narrow down a List without opening the User Filter window.
Add filter criteria
The possible filter criteria are listed at the top of the User Filter. You will need to populate the condition and/or logic fields to the right of each filter criterion you want to use. To exclude a filter criterion, leave its condition fields blank.
- The Logic field will most commonly be pre-populated with the value "Is any of." Expand this drop-down to select the condition that should be applied to this rule. Depending on the type of filter criterion, you'll be able to choose from the following:

- Is any of: With this configuration, people must match one or more of the selected options.
- Is not any of: With this configuration, people must not match one or more of the selected options.
- Has viewed: This option is only available for the "Viewed Board" criterion. With this configuration, people must have viewed one or more of the selected options in the past 90 days.
- Has not viewed: This option is only available for the "Viewed Board" criterion. With this configuration, people must not have viewed one or more of the selected options in the past 90 days.
- The Condition: The value added to this field (or fields) is used to determine the condition(s) that should be met for a person to be included in this List. The filter criterion determines which condition fields are available.

Pro Tip: The Team Role criterion helps you find users that held certain roles on specific types of Items. To use it:

- Select the Team Role you're interested in in the Role On Team drop-down.
- Select the filter icon to set criteria for the types of Items the filter references. For example, specifying a Template ensures your List only includes users who held the specified Team Role on that Template.
- Use the Min and Max fields to enter the minimum and maximum occurrences a user must have held that Team Role to be included in the List. Remember that you must enter "1" into the Min field to create a List that includes users who have held the role at least once. Otherwise, users who have held the role 0 times will be included.
- If you're finished configuring the List, click Save to finalize your changes. Otherwise, continue.
The view options
Click the View Options section to expand it. This is where you'll configure how "extra" elements, like Badges, are shown. This section may not be available or the options within it may vary based on your organization's configuration.

- Badges Shown: Expand this drop-down to select which Badges should be shown in this People List's Badges column. If none are selected, the Badges column will include all awarded Badges.
- Badges Awarded: If the Starting field is populated, only Badges awarded after that date will be shown in the Badges column. If the Ending field is populated, only Badges awarded before that date will be shown. Expand each field to select the appropriate dates.
- Badge Types Shown: Expand this drop-down to select the types of Badges that should be shown in the Badges column.
- If you're finished configuring the List, click Save to finalize your changes. Otherwise, continue.
The Sort options
Click the Sort section to expand it. This is where you'll decide how the People List should be ordered.

- Primary Sort: Use the drop-down to select the criteria by which the list should be sorted.
Use the next drop-down to select whether people should be sorted in ascending or descending order. - If you're finished configuring the List, click Save to finalize your changes. Otherwise, continue.
Copy a custom People List to a Board
Once you've finished configuring the List, you can copy it to any Board you have permission to edit.
![]() Boards can have up to 16 Cards. Once a Board has 16 Cards, you won't be able to copy a List to it.
Boards can have up to 16 Cards. Once a Board has 16 Cards, you won't be able to copy a List to it.
To do so:
- Check the Add to Board checkbox. Once enabled, the checkbox's label will be replaced with two new fields.

- Card Name: Enter the name of the new Card.
- Choose Board: Use this field to search for and select the Board to which the List should be copied. Only Boards you have permission to edit will be listed.
- Click Save.
Save this configuration as a new custom People List
If you find yourself applying the same filters and configurations every time you go to the People section in KaiNexus, you should consider creating a custom People List that will remember that configuration every time you open it. You can even create multiple custom Lists so that you can quickly and easily switch between certain filters and layouts.
To access your custom People Lists, click the People drop-down in the navigation bar, then click the name of the List you want to open in the resulting drop-down menu.
To create a custom People List from the User Filter window:
- Check the Create New List checkbox. Once enabled, the checkbox's label will be replaced with a new field.

-
- Name Your List: Enter the name of the new custom People List.
- Click Save.
Filter a People List by Location
A collapsible Location panel will appear along any People List's left-hand side and will display your organization's Network structure — the hierarchy of Locations within the organization.
The Location panel gives you the ability to quickly apply a Location filter to the List.
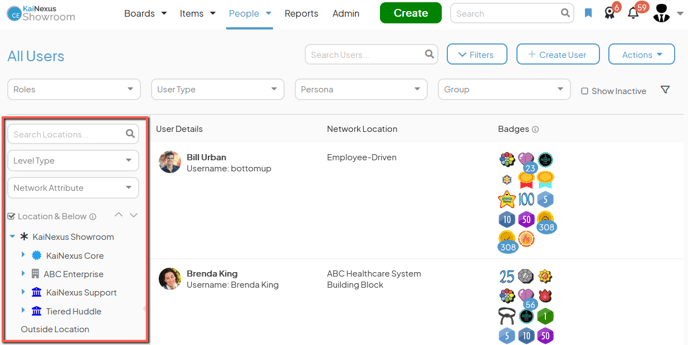
When no Locations are selected in this panel, users from the entire organization will be shown on the List. If one or more Locations are selected, only People in those Locations will be shown.
Working with the Locations panel
If the Locations panel is collapsed, click it to expand it. Your organization's Network structure will appear.
Click a Location to select it. If you want to select multiple Locations, hold down the Ctrl or Command key while clicking on each Location. To select all Locations in a range, hold down the Shift key while clicking the first Location in the range and then the last Location in the range.
Once a Location has been selected, an x icon will appear to the right of the Search Locations field. Click the x icon to clear the current selections.
If Location & Below is checked, the List will show people in the Locations you select and any Locations nested under them.
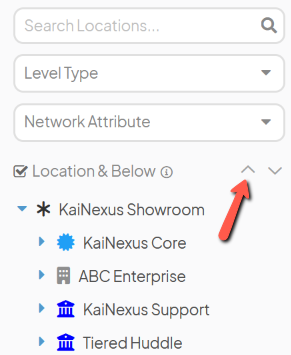
Navigating the Network structure
By default, only the top two tiers of Locations will be visible in the Network.
- If a Location has other Locations nested beneath it, there will be a right caret icon to its left. Click that icon to expand that Location by one tier.
- If a Location has been expanded to show its nested Locations, there will be a down caret icon to its left. Click that icon to collapse that Location, hiding any Locations nested beneath it.
- To expand all Locations by one tier, click the expand icon at the top of the Network structure. Each additional click will expand the Network structure by one more tier.
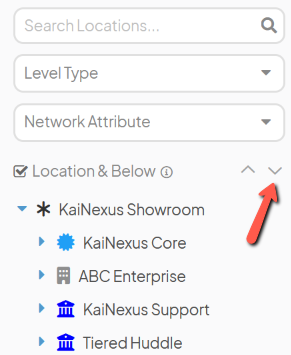
- To collapse the entire Network to the top tier, click the collapse icon at the top of the Network structure.
Search for the Location you want to select
- Enter the name of a Location into the Search Locations field and hit enter/return or click the magnifying glass icon to search for a particular Location. This will narrow down the list of Locations, but you'll still need to click the Location to select it.
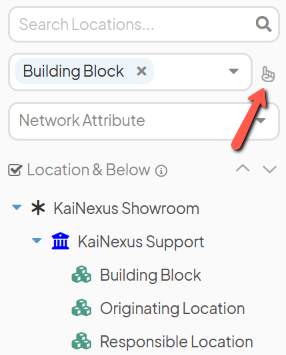
- Level Type: Expand the drop-down to choose the Level Type(s) in which you're interested. This will narrow down the list of Locations to only include Locations of that type (and the Locations they're nested under). Once the Network is filtered:
- Click the Location(s) you want to select, or
- Click the pointer icon that appears beneath the "Search Locations" field to quickly select all Locations of that type.
-
- Network Attribute: This drop-down will only appear if your organization has Network Attributes enabled. Expand this drop-down to choose the Network Attribute by which you want to filter the Network and the "Attribute Value" drop-down will appear. The Network will not be filtered until an Attribute Value is selected.
- Attribute Value: Expand this drop-down to select the Attribute Value(s) in which you're interested. This will narrow down the list of Locations to only include Locations with that Value (and the Locations they're nested under). Once the Network is filtered:
- Click the Location(s) you want to select, or
- Click the pointer icon that appears beneath the "Search Locations" field to quickly select all Locations with that Value.
- Attribute Value: Expand this drop-down to select the Attribute Value(s) in which you're interested. This will narrow down the list of Locations to only include Locations with that Value (and the Locations they're nested under). Once the Network is filtered:
- Network Attribute: This drop-down will only appear if your organization has Network Attributes enabled. Expand this drop-down to choose the Network Attribute by which you want to filter the Network and the "Attribute Value" drop-down will appear. The Network will not be filtered until an Attribute Value is selected.
The Show User Counts checkbox
The Show User Counts checkbox is located at the bottom of the Location panel and is unselected by default. When the checkbox is enabled, the number of General and Capture Users in each Location will populate beside the Location name, giving you a quick way to reference how many people are in any given Location.
The number of Users in each Location will also appear as a tooltip when you hover over the name of the Location.
![]() The sum of the number of users in every Location may not equal the total number of people in your organization since some users may be in multiple Locations.
The sum of the number of users in every Location may not equal the total number of people in your organization since some users may be in multiple Locations.