
Create and configure a new Board.
Who can create a Board?
- To create a new private Board — one only you can see — you must have the "Create Boards" permission.
- To create a new public Board — one other people can see — you must have the "Create Boards" and "Board Administrator" permissions.
Create a Board
To create a new Board:
- Click Boards in the navigation bar at the top of the platform.
- Click Create Board in the resulting drop-down menu and the New Board window will open.
General Info
- Title (required): The title will be used to identify this Board.
- Description: Enter an optional description to provide more context as to who should view this Board, what this Board contains, and/or how it should be used.
The description will appear when people hover over the Board's name.
- Rank: The number entered here determines the order in which the Board will appear in the Board menu. Boards with a lower rank will be towards the top of the list and those with higher ranks will be toward the bottom.
- Private Boards are always listed above public Boards regardless of rank.
- If multiple Boards share the same rank, they will appear in alphabetical order relative to each other.
- Nest Under: Use this field to search for and select the Board under which you want to nest this Board.
- If this field is left blank, this will be a top-level Board.
- Private Boards can only be nested under another private Board; public Boards can only be nested under another public Board.
- Owner: By default, the person creating the Board will be its Owner. If someone else should be the Owner, use this field to search for and select them.
- A Board's Owner can edit every aspect of the Board, regardless of their permissions.
- There can only be one Owner per Board.
![]() PRO TIP: If you're creating a private Board for someone else, you'll lose access as soon as you make them the Owner. Make sure you've completely finished configuring the Board and its Cards before you do so.
PRO TIP: If you're creating a private Board for someone else, you'll lose access as soon as you make them the Owner. Make sure you've completely finished configuring the Board and its Cards before you do so.
Layout
- Sections: Expand the drop-down to select the number of sections that will appear on your Board. A designated "Section Layout" drop-down will appear for each section.
- Section Layout: Expand each section's drop-down to select its layout. Choose between:
- One Column - The column will take up the full width of the Board.
- Two Columns (½, ½) - Each column will take up half of the Board.
- Two Columns (⅓, ⅔) - The left column will only take up one-third of the Board; the right column will cover the remaining two-thirds.
- Two Columns (⅔, ⅓) - The left columns will take up two-thirds of the Board; the right column will cover the remaining one-third.
- Two Columns (¼, ¾) - The left columns will take up one-fourth of the Board; the right column will cover the remaining three-fourths.
- Two Columns (¾, ¼) - The left columns will take up three-fourths of the Board; the right column will cover the remaining one-fourth.
- Three Columns (⅓, ⅓, ⅓) - Each column will take up one-third of the Board.
- Three Columns (¼, ¼, ½) - The left column will take up one-fourth of the Board, the middle column will take up one-fourth of the Board, and the right column will take up one-half of the Board.
- Three Columns (¼, ½, ¼) - The left column will take up one-fourth of the Board, the middle column will take up one-half of the Board, and the right column will take up one-fourth of the Board.
- Three Columns (½, ¼, ¼) - The left column will take up one-half of the Board, the middle column will take up one-fourth of the Board, and the right column will take up one-fourth of the Board.
- Four Columns - Each column will take up ¼ of the Board.
- Five Columns - Each column will take up ⅕ of the Board
- Six Columns - Each column will take up ⅙ of the Board.
Filters
- The Show Location Filter checkbox: When this box is checked, a Locations panel will be added to the left side of the Board. This grants the ability to filter the entire Board by Location.
- Default Locations: This option only appears when the "Show Location Filter" is checked.
Use this field to search for and select the Locations which should automatically be selected and applied to the Board each time someone views it. People will be able to choose a new Location from the Locations panel, but it will revert to the default the next time they access the Board.
If this field is left blank, no Locations will be applied by default. People will be able to choose a Location from the Locations panel, and their selection will still be applied the next time they access the Board.
- The Location & Below checkbox: This option only appears when a Location is added to the "Default Locations" field.
When enabled, the Board will show data for the selected Locations and any Locations nested under them by default. People will be able to change this setting from the Locations panel, but it will revert to the default the next time they access the Board.
- The Location & Below checkbox: This option only appears when a Location is added to the "Default Locations" field.
- Default Locations: This option only appears when the "Show Location Filter" is checked.
- The Show Quick Filters checkbox: When enabled, you'll be able to add quick filters to the Board. These filters will be displayed along the top of the Board and can be used to filter the Items included on or referenced by the Board.
When you first enable the checkbox, the Quick Filters window will open. From there:- Click Add Quick Filter and a drop-down listing the available filters will open.
- Search for and select the filter you want to add. That filter will appear in its own field on the Quick Filters window.
- To add a default criterion to the filter — one that will be applied to the Board each time it is opened — add that criterion to the filter's field. People will be able to change this criterion when viewing the Board, but the filter will revert to the default the next time they access it.
- Leave the filter's field blank if you don't want a default value to be applied.
- To delete an existing quick filter, hover over its field and click the x button that appears to its right.
- Repeat these steps for each quick filter you want to add.
- Click Save to save your changes and return to the New Board window.
- If you need to make subsequent changes to the quick filters, click Edit next to the "Show Quick Filters" checkbox to reopen the Quick Filters window.
- The Show Board Filters checkbox: When enabled, a global filter option will be added to the Board, allowing people to filter every Item-based Card on a Board at once. People will be able to apply new filters when viewing the Board, but the filters will revert to the default the next time they access the Board.
- Once enabled, add default filters by clicking the filter icon that appears to the right of the checkbox. These filters will automatically be applied to the Board each time it is accessed.
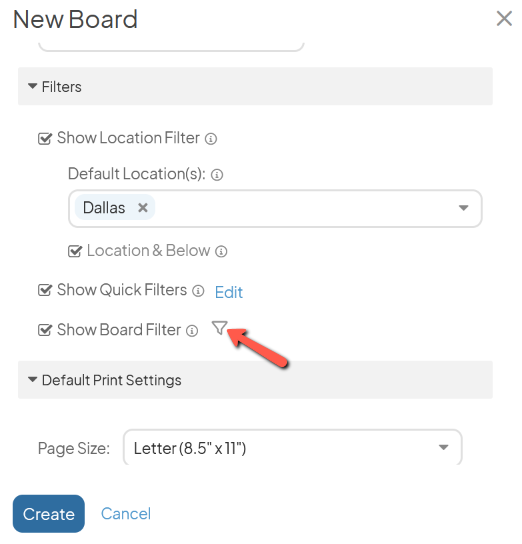
Default Print Settings
Configure the settings that will be used by default when someone saves the Board as a PDF.
- Page Size: Expand the drop-down to choose your preferred page size.
- Scale: Expand the drop-down to choose the scale percentage. This allows you to fit more content on a single page. For example, selecting 50% doubles the amount of content you can fit on one page. Make sure to select "Fit to page" in your browser's print settings.
- Click either Portrait or Landscape to choose the PDF's orientation.
- The Exclude Private Items checkbox: If enabled, any private Items within Item List Cards (excluding those in Gantt View) will not be included in the PDF.
- The Also include individual Cards checkbox: If enabled, a full copy of each Card will be appended to the PDF as necessary.
![]() PRO TIP: After you've added Cards to the Board, edit the Board and update the default print settings to specify the Cards that should be included in the PDF.
PRO TIP: After you've added Cards to the Board, edit the Board and update the default print settings to specify the Cards that should be included in the PDF.
Default Present Settings
As no Cards have been added to the Board yet, the default Present settings can't be configured and this section will be collapsed.
Once you've added Cards to the Board, edit the Board and update these settings to specify the Cards that should be included in the Present mode.
Share
![]() Only people with the "Board Administrator" permission can share a Board.
Only people with the "Board Administrator" permission can share a Board.
When you share a Board with someone in KaiNexus, you give them permission to see it and you add it to their Boards menu. Boards can be shared with individual people, everyone in a Location, or anyone with a particular Role.
- The Share checkbox: When enabled, the Board is made accessible to other users.
Once this box is checked, additional options will appear:- Viewer(s): Viewers can access the Board but cannot make changes to its configuration. Use this field to search for and select the people, Locations, or Roles that should be given access to this Board.
-
- Editor(s): Editors can access the Board and make changes to its Cards. Use this field to search for and select the people that should be given permission to edit this Board.
-
- Subscriber(s): Subscribers will receive a link to this Board in their Subscription email. Use this field to search for and select the people, Locations, or Roles that should be subscribed to this Board.
People you make Subscribers can unsubscribe themselves at any time. - Board Location(s): Use this field to search for and select the Location(s) that should be affiliated with this Board.
People with the "Board Administrator" permission in the selected Location(s) will be able to view and edit this Board even if they weren't explicitly added to the Viewers or Editors lists. - Share with Wallboard Users: When enabled, this Board will be made available to Wallboard users.
- Subscriber(s): Subscribers will receive a link to this Board in their Subscription email. Use this field to search for and select the people, Locations, or Roles that should be subscribed to this Board.