The Reports Snapshot and each individual Report have a collapsible Locations panel along the left-hand side which displays your organization's Network structure — the hierarchy of Locations within the organization.
This panel is called the Location Filter.

When no Locations are selected, data from the entire organization will be shown. If one or more Locations are selected, the Snapshot or Reports will only display data from those Locations.
![]() Pro Tip: The Location Filter on the main Reports page is "sticky." That means the Locations selected there will automatically be applied to any Reports you open and the system will remember that selection the next time you go to the Reports page.
Pro Tip: The Location Filter on the main Reports page is "sticky." That means the Locations selected there will automatically be applied to any Reports you open and the system will remember that selection the next time you go to the Reports page.
Working with the Location Filter
If the Location Filter is collapsed, click it to expand it. Your organization's Network structure will appear.
Click a Location to select it. If you want to select multiple Locations, hold down the Ctrl key while clicking on each Location. To select all Locations in a range, hold down the Shift key while clicking the first Location in the range and then the last Location in the range.
Once a Location has been selected, an x icon will appear to the right of the Search Locations field. Click the x icon to clear the current selections.
If Location & Below is checked, Reports will show data for the Locations you select and any Locations nested under them.
Navigating the Network structure
By default, only the top two tiers of Locations will be visible in the Network.
- If a Location has other Locations nested beneath it, there will be a right caret icon to its left. Click that icon to expand that Location by one tier.
- If a Location has been expanded to show its nested Locations, there will be a down caret icon to its left. Click that icon to collapse that Location, hiding any Locations nested beneath it.
- To expand all Locations by one tier, click the expand icon at the top of the Network structure. Each additional click will expand the Network structure by one more tier.
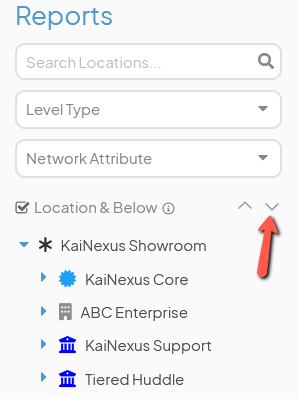
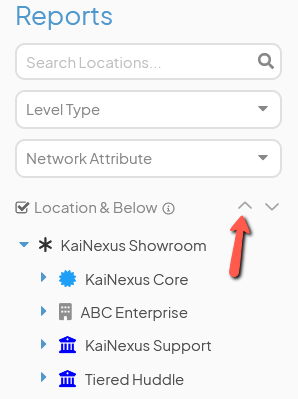
- To collapse the entire Network to the top tier, click the collapse icon at the top of the Network structure.
Search for the Location you want to select
/Ofie/Ofie%20Profile%20Pic.png?width=50&height=50&name=Ofie%20Profile%20Pic.png) Pro Tip: Is there a Location you search for often? You can star Locations to pin them to the top of the Location Filter, making them easier to access later.
Pro Tip: Is there a Location you search for often? You can star Locations to pin them to the top of the Location Filter, making them easier to access later.
- Enter the name of a Location into the Search Locations field and hit enter/return or click the magnifying glass icon to search for a particular Location. This will narrow down the list of Locations, but you'll still need to click the Location to select it.
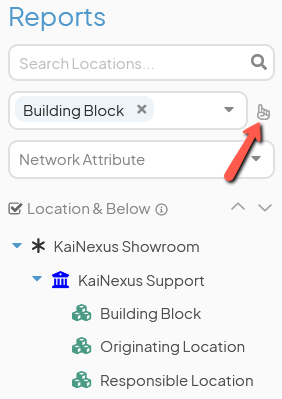
- Level Type: Expand the drop-down to choose the Level Type(s) in which you're interested. This will narrow down the list of Locations to only include Locations of that type (and the Locations they're nested under). Once the Network is filtered:
- Click the Location(s) you want to select, or
- Click the pointer icon that appears beneath the "Search Locations" field to quickly select all Locations of that type.
- Network Attribute: This drop-down will only appear if your organization has Network Attributes enabled. Expand this drop-down to choose the Network Attribute by which you want to filter the Network and the "Attribute Value" drop-down will appear. The Network will not be filtered until an Attribute Value is selected.
- Attribute Value: Expand this drop-down to select the Attribute Value(s) in which you're interested. This will narrow down the list of Locations to only include Locations with that Value (and the Locations they're nested under). Once the Network is filtered:
-
-
- Click the Location(s) you want to select, or
- Click the pointer icon that appears beneath the "Search Locations" field to quickly select all Locations with that Value.
-