Who can export an Item?
Anyone who can see the Item can export it. Only the following people can view it:
- Anyone on the Item's Team.
- Potentially anyone on the parent's Team.
- If the Item is not private and not in the New status, anyone with the "View" permission for Items in its Location(s).
- If the Item is private, anyone with the "View Private" permission for Items in its Location(s).
- If the Item is in the New status and is not private, anyone with the "View New" permission for Items in its Location(s).
![]() For more information on Team Roles (like Authors, Facilitators, Participants, and more!) check out this article.
For more information on Team Roles (like Authors, Facilitators, Participants, and more!) check out this article.
Export an Item as a PDF
To export an Item, open the Item with which you want to work, then:
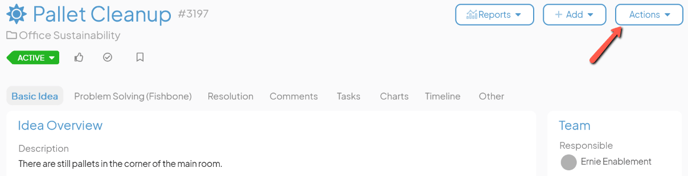
- Click Actions in the top right corner of the page.
- Hover over Export in the resulting drop-down menu and the menu will further expand.
- Select Print/Save PDF. The "Print" window will open.
If default print settings have been added for this Item's Template, you can choose whether you want to use the default or enter your own custom settings.

- Print Settings: To use the default print settings, select Default. To customize the print settings, select Custom.
- Hide Logo checkbox: When selected, your organization's logo will not appear in the top left corner of the PDF print-out.
- Select Print to export the Item.
/Ofie/Ofie%20Profile%20Pic.png?width=50&height=50&name=Ofie%20Profile%20Pic.png) Pro Tip: Check out this support page to learn how to set default print settings for a Template.
Pro Tip: Check out this support page to learn how to set default print settings for a Template.
If default print settings have not been added for this Template (or if you decided to use custom settings), you will have the following Print options:

- Hide Logo checkbox: When selected, your organization's logo will not appear in the top left corner of the PDF print-out.
- Under the Layout header:
- Page Size: Expand the drop-down to choose your preferred page size.
- Scale: Expand the drop-down to choose the scale percentage. This allows you to fit more content on a single page. For example, selecting 50% doubles the amount of content you can fit on one page. Make sure to select "Fit to page" in your browser's print settings.
- Click either Portrait or Landscape to choose the PDF's orientation.
- The Expand Item Lists checkbox: When this box is checked, each Nested Item List on the PDF will include all Items within that List. This is good for when you want to include every piece of information about the Item on the PDF.
When it's unchecked, only the Items which can currently be seen on the work panel will be included. This is good for when you want the layout of the PDF to match the layout of the Item in KaiNexus. - The Exclude Private Items checkbox: When this box is checked, private Items in a Nested Item List will not be included in the PDF.
![]() The "Exclude Private Items" checkbox does not apply to Nested Item Lists in the Gantt View.
The "Exclude Private Items" checkbox does not apply to Nested Item Lists in the Gantt View.
- Under the Included Tabs header:
- Each of the Item's tabs (and some additional sections depending on how the Item's Template has been configured) will be listed. Click the Select All checkbox to select and include every available element or click the checkbox next to an element to select it individually.
- Some elements, such as the "Comments Tab" or "Timeline Tab" may be accompanied by Start Date and End Date fields. Leave these fields blank if you want the PDF to include all comments or timeline entries, or enter a date range if you want it to include only the comments or timeline entries that occurred during that time.
- Charts have a unique checkbox — Only Header and Chart — that will be checked by default. When this option is checked, only the Chart's header and an image of the Chart will be included in the PDF and you will be unable to click to add any other elements.
Uncheck this option to enable the other checkboxes and to be able to choose which elements should be included.
- Click Print to export the Item.
Pro Tip: KaiNexus will remember your most recently used custom print settings for a Template type. The next time you print any Item of the same Template type, your same print settings will appear. Remember: other users won't see your print settings unless you add default print settings for a Template.