Standard Work Groups are groups of Standard Work Items, files, and links that can be created to help standardize your organization's improvement methodologies. By adding a Standard Work Group to their Item, users are able to quickly add all the components of that Group without having to build and add each of those components manually each time.
Who can edit a Standard Work Group?
Anyone with the "Quality Administrator" permission can edit Standard Work Groups.
People with other Administrator permissions may be able to access the Standard Work Groups Administration page, but will not be able to make changes to it.
Edit a Standard Work Group
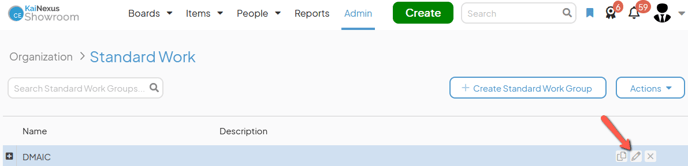
To edit a Standard Work Group, navigate to the Standard Work administration page, then:
- Hover over the Standard Work Group you want to update, then click the pencil icon that appears to its right and the Edit Standard Work Group window will open. Update any of the Standard Work Group's information as necessary.
-
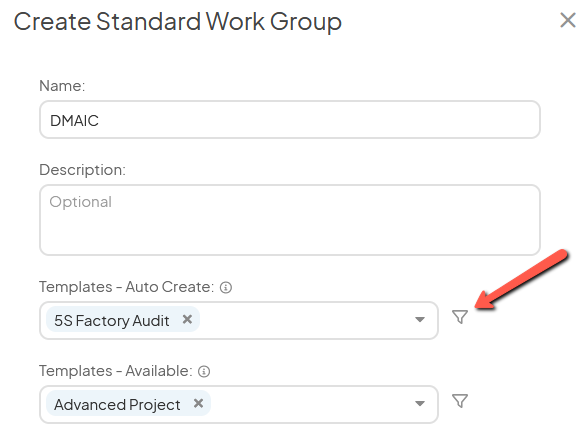
- Name (required): The name will be used to identify this Standard Work Group.
- Description: Enter an optional description in this field. The description will appear when hovering over the Standard Work Group's name in the list of Standard Work Groups.
- Templates - Auto Create: This Standard Work Group will be automatically added to new Items belonging to one of the Templates in this field. Expand this drop-down to select the appropriate templates.
- To set additional rules for when the Standard Work Group will be automatically added to new Items belonging to one of the specified Templates, click the filter icon to the right of the drop-down. Add the necessary rules, then click Save.
This Standard Work Group will only be added to new Items that belong to one of the specified Templates and meet these additional requirements.
- To set additional rules for when the Standard Work Group will be automatically added to new Items belonging to one of the specified Templates, click the filter icon to the right of the drop-down. Add the necessary rules, then click Save.
-
- Templates - Available: This Standard Work Group will be available to be added to Items belonging to one of the Templates in this field. Expand this drop-down to select the appropriate templates.
- To set additional rules for when the Standard Work Group will be available to be added to Items belonging to one of the specified Templates, click the filter icon to the right of the drop-down. Add the necessary rules, then click Save.
This Standard Work Group will only be available to be added to Items that belong to one of the specified Templates and meet these additional requirements.
- To set additional rules for when the Standard Work Group will be available to be added to Items belonging to one of the specified Templates, click the filter icon to the right of the drop-down. Add the necessary rules, then click Save.
- Templates - Available: This Standard Work Group will be available to be added to Items belonging to one of the Templates in this field. Expand this drop-down to select the appropriate templates.

![]() If this Standard Work Group contains Items that can not be nested under one of the selected Templates, as determined by the Templates' configurations, those Items will not be created when the Standard Work Group is added to an Item of that type.
If this Standard Work Group contains Items that can not be nested under one of the selected Templates, as determined by the Templates' configurations, those Items will not be created when the Standard Work Group is added to an Item of that type.
- Required Roles: By default, a Standard Work Group can be added to an Item by anyone with the "Edit" permission for Items in the relevant Locations, or the "Assign" permission for Items using the Standard Team Type, as well as anyone on the Item's Team except for Followers or Participants. However, you can restrict this Standard Work Group such that it can only be added to an Item by someone with a particular System Role.
Expand this drop-down to select the appropriate System Roles. - The Team & Locations section:
- Responsible: Expand this drop-down to choose which team member from the parent Item — the Item to which this Standard Work Group will be added — should be made the Responsible Person for any nested Standard Work Items in the Planned status.
- Location(s): Expand this drop-down to choose whether the nested Standard Work Items should respect the current user's Location(s) or the parent Item(s) Locations when the Standard Work Group is added to an Item.
- Click Save.
Edit the contents of a Standard Work Group
Add or edit Standard Work Items
When a Standard Work Group is added to an Item, any Standard Work Items that have been added to that Standard Work Group will be nested under that Item.
To add a new Standard Work Item to a Standard Work Group, navigate to the Standard Work administration page, then:
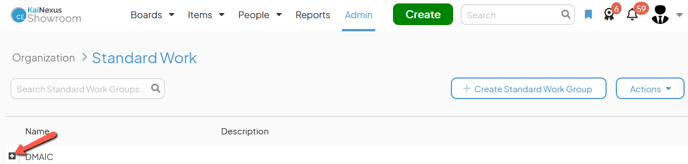
- Click the plus icon to the left of the name of the Standard Work Group to which you want to add an Item and the Group's information will expand.
- Click the plus icon in the top right corner of the Items panel.

- Click the name of the Template you want to use to create the new Standard Work Item from the resulting drop-down menu.
- In the resulting Create window, fill in the Item's information as you normally would. Any information you add to the fields or Attributes, as well as any files or links, will be included on this Standard Work Item each time the Standard Work Group is added to an Item in KaiNexus. When you're finished, click Create.
- Repeat this process as many times as necessary until all Standard Work Items have been added to the Group.
![]() For more information on creating Standard Work Items, check out this support article.
For more information on creating Standard Work Items, check out this support article.
To edit an existing Standard Work Item, click the name of the Item you want to edit in the Items panel to open its work panel and edit it as you normally would.
![]() For more information on editing Standard Work Items, check out this support article.
For more information on editing Standard Work Items, check out this support article.
Add, edit, and delete files
When a Standard Work Group is added to an Item, any files that have been added to the Standard Work Group will be added to that Item.
To add a file to a Standard Work Group, navigate to the Standard Work administration page, then:
- Click the plus icon to the left of the name of the Standard Work Group to which you want to add an Item and the Group's information will expand.
- Click Add File in the Files panel.
- Use the resulting window to select and add the correct file(s) from your computer.
- The new files will be listed in the Files panel.
![]() Pro Tip: You can also attach a file by dragging and dropping it directly onto the Files panel. The Files panel be outlined in green when it registers that a file is being dragged onto it.
Pro Tip: You can also attach a file by dragging and dropping it directly onto the Files panel. The Files panel be outlined in green when it registers that a file is being dragged onto it.
To edit a file on a Standard Work Group, expand the Standard Work Group's information as described above, then:
- Click the pencil icon to the right of the name of the file you want to edit and its Edit window will open. Edit the following information as needed.
- File name (required): The name will be used to identify this file.
- Description: Enter an optional description that will appear when hovering over the file's name in the Files panel.
- The Show in Image area checkbox: This checkbox is only shown for image files. When this box is checked, the "Column" section will appear beneath the checkbox and the image will be displayed in the Images panel and/or on the Images tab.
- Under the Column header:
- Click either the Default, Force Left, or Force Right radio button to decide whether this image file should be displayed in the next available position, in the left column, or in the right column.
This decision will only take effect when there are two or more image files displayed in the Image area.
- Click either the Default, Force Left, or Force Right radio button to decide whether this image file should be displayed in the next available position, in the left column, or in the right column.
- Under the Column header:
- Click Save.
To delete a file from a Standard Work Group, expand the Standard Work Group's information as described above, then:
- Click the x icon to the right of the name of the file you want to delete and a confirmation window will open.
- Click Delete and the file will be removed from this Item.
Add, edit, and delete links
When a Standard Work Group is added to an Item, any links that have been added to the Standard Work Group will be added to that Item.
To add a link to a Standard Work Group, navigate to the Standard Work administration page, then:
- Click the plus icon to the left of the name of the Standard Work Group to which you want to add an Item and the Group's information will expand.
- Click Add Link in the Links panel.
- In the resulting window:
- Name (required): The name will be used to identify this link.
- Address: The URL to which you are linking.
- Click Save.
To edit a link on a Standard Work Group, expand the Standard Work Group's information as described above, then:
- Click the pencil icon to the right of the name of the link you want to edit and the Edit Link window will open. Update the following information as necessary:
- Name (required): The name will be used to identify this link.
- Address: The URL to which you are linking.
To delete a link from a Standard Work Group, expand the Standard Work Group's information as described above, then:
- Click the x icon to the right of the name of the link you want to delete and a confirmation window will open.
- Click Delete and the link will be removed from this Item.