
The User Import tool allows you to bulk create or update up to 500 users at a time using an XLSX spreadsheet. This is a useful way to create large numbers of users at once or make complex updates to existing users that may be difficult to perform through Bulk Change alone.
This support page will cover:
Who can import users?
Users with both the User Manager (Everywhere) and Create Users permissions can access the User Import page and perform User Imports.
Preparing your import file
User Imports are performed using an XLSX spreadsheet. You will prepare the spreadsheet with user data, then upload it into the platform.
Download the template
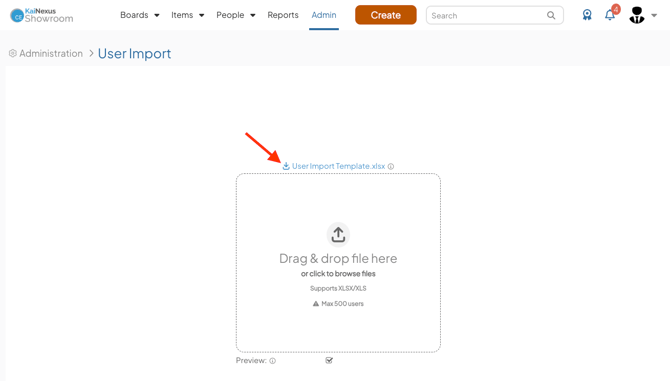
We recommend starting with the provided template. To download it:
- Navigate to the Admin section and open the User Import page.
- Select the User Import Template.xlsx download link.
Add user information to the spreadsheet
Each row in the spreadsheet represents a single user. Each column contains information that can be created or updated during the import. You can include up to 500 users in a single import file.
The Username column determines whether the import will create a new user or update an existing one:
- If the Username matches an existing user, that user will be updated.
- If the Username does not match an existing user, a new user will be created.
/Ofie/Ofie%20Profile%20Pic.png?width=50&height=50&name=Ofie%20Profile%20Pic.png) Caution: Be careful when entering usernames. If a username does not match an existing user exactly, a new user will be created. Once created, users cannot be deleted, only inactivated.
Caution: Be careful when entering usernames. If a username does not match an existing user exactly, a new user will be created. Once created, users cannot be deleted, only inactivated.
If the same username appears multiple times in the import file, the import is processed row by row, and the values in the lowest row will overwrite earlier updates.
For all other columns:
- Enter a value to update that field for the user.
- Leave the cell blank to leave the existing value unchanged.
The order of columns in the spreadsheet does not matter. However, we recommend keeping the Username column as Column A because rows with a blank value in Column A will be skipped during import.
Pro Tip: When updating existing users, it can be helpful to export the users to XLSX first, then copy and paste the usernames into your import file.
Required columns
If you are updating existing users, your import file only needs to include the Username column and any columns containing data you want to update. All other columns can be left blank or removed from the spreadsheet.
However, when creating new users, the following columns are required:
| Column Name | Description |
| Username |
Must be unique. We recommend using the user’s email address. For existing users, the Username must exactly match the username already in KaiNexus or a new user will be created. If your organization uses Single Sign-On (SSO), usernames must match the format your organization’s sign-in system sends to KaiNexus. Entering the wrong username format may prevent users from signing in, even if the account is created successfully. |
| User Type |
Set the user's User Type to determine whether they can sign in and their overall experience in the platform. Available options are: Active, Capture, Offline, Setup, Inactive, Kiosk, and Wallboard. Creating Kiosk and Wallboard Users requires the Kiosk and Wallboard Modules respectively. Users imported as Active or Capture will receive an account activation email if an email address is included. To add users without allowing sign-in or sending activation emails yet, import them as Setup users. Note: The Active User Type is labeled as General in exports. Both terms refer to the same User Type. During imports, you can enter either General or Active. |
| First Name | Enter the user’s first name. If the user has multiple first names, include them in the same cell separated by spaces. |
| Last Name | Enter the user’s last name. If the user has multiple last names, include them in the same cell separated by spaces. |
| Network Location |
Must exactly match an existing Network Location in KaiNexus. We recommend copying the Network Location directly from KaiNexus to avoid formatting or spelling issues. Example: Location1, Location2, Location3 |
Recommended columns
The following columns are technically not required for creating new users, but highly recommended to include:
| Column Name | Description |
| Role |
Must exactly match an existing Role in KaiNexus. Users can have multiple Roles. Separate each Roles with a comma, with or without a space. Example: Role1, Role2 |
| Enter the user's email. They must have an email to receive email notifications and the account activation email. |
Additional optional columns
The following columns are other fields you can update, but are optional for all imports:
| Column Name | Description |
| Mobile Phone | Free text entered into the user’s Mobile Phone field in their profile. |
| Work Phone | Free text entered into the user’s Work Phone field in their profile. |
| Pager | Free text entered in the user's Pager field in their profile. |
| Physical Location | Free text entered in the user's Physical Location field in their profile. This is separate from the user’s Network Location. |
| Titles |
Enter the user’s Titles. Values must match existing Titles in KaiNexus; otherwise, a new User Attribute value will be created. Multiple values can be separated by commas. Titles are a User Attribute. This column may be renamed, depending on your organization's terminology settings. |
| Positions |
Enter the user’s Positions. Values must match existing Positions in KaiNexus; otherwise, a new User Attribute value will be created. Multiple values can be separated by commas. Positions are a User Attribute. This column may be renamed, depending on your organization's terminology settings. |
| Employment Statuses |
Enter the user’s Employment Statuses. Values must match existing Employment Statuses in KaiNexus; otherwise, a new User Attribute value will be created. Multiple values can be separated by commas. Employment Statuses are a User Attribute. This column may be renamed, depending on your organization's terminology settings. |
| Certifications |
Enter the user’s Certifications. Values must match existing Certifications in KaiNexus; otherwise, a new User Attribute value will be created. Multiple values can be separated by commas. Certifications are a User Attribute. This column may be renamed, depending on your organization's terminology settings. |
| Default Item Locations |
Only available if your organization has Default Item Locations turned on. Must exactly match an existing Network Location in KaiNexus. We recommend copying the Network Location directly from KaiNexus to avoid formatting or spelling issues. Example: Location1, Location2, Location3 |
| Employee ID | Free text entered in the user's Employee ID field in their profile. This is separate from their KaiNexus user ID. |
| Hire Date | Date entered in the user's Hire Date field in their profile. Must be in MM/DD/YY format, regardless of how your organization formats dates. |
| Persona |
Set the user’s Persona. Enter one of the system-defined Persona codes used in the import file: FRONTLINE, LEADER, EXECUTIVE, CI_EXPERT, or CHAMPION. These codes differ from the Persona names shown in the platform. Values must be entered in all caps. For reference, CI_EXPERT appears in the platform as CI Coach, and CHAMPION appears as KaiNexus Champion. |
| Language | Set the user's language preference. Leave this field blank to have them inherit a language from their Network Location instead. |
| Default Board ID |
This column is not included on the template download, but you can add it to set a specific landing Board for users. Enter the Board's ID number. |
Special formatting rules
Follow the formatting instructions below where applicable.
| Action | Rule |
| Clearing data | Enter // in a cell to remove existing data for optional fields (e.g., Mobile Phone, Titles, Default Board ID). Required fields (Username, User Type, First Name, Last Name, Network Location) cannot be cleared. |
| Ignoring data | Leave a cell blank to keep existing data unchanged. Blank fields are skipped during import. |
| Multiple values |
Separate multiple values (e.g., Roles, Network Locations, User Attributes) with a comma. Example: Location1, Location 2 |
| Commas in value names |
If a value contains a comma, wrap the entire value in quotation marks. Example: "Health, Safety, and Culture" |
| Personas |
Must be entered in all caps (e.g., FRONTLINE). Use CI_EXPERT for "CI Coach" and CHAMPION for "KaiNexus Champion". |
How do I update an existing user's username?
User Imports normally identify users by their Username. Because of this, simply changing the Username in the import file would cause the system to treat the row as a new user and create a separate account.
To update an existing user’s Username, you must include an additional ID column in the import file. This column is not included in the standard import template and must be added manually to the spreadsheet.
When updating a Username:
- Include a ID column containing the user’s KaiNexus user ID. The user ID can be found by adding the ID column to a People List.
- Enter the new value in the Username column
The import will use the ID to identify the existing user account and update the Username correctly.
Import the users
Once your import file is complete, you can upload it into KaiNexus.
To perform a User Import:
- Navigate to the Admin section and open the User Import page.
- Upload your XLSX file by either:
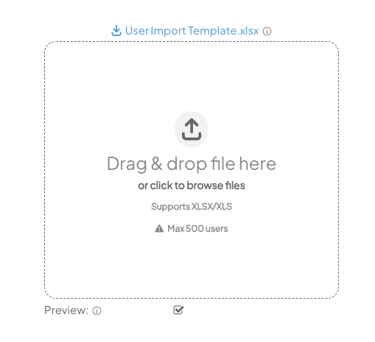
- Dragging and dropping it into the upload box, or
- Clicking the box and selecting the file from your device
- By default, the Preview checkbox is selected. This allows you to validate the import before making any changes in the platform.
- The preview will indicate whether the import is successful or if any errors were found.
- If errors appear, update the spreadsheet and try again.
- See the Troubleshooting Common Errors section of this page for more information about common error messages.
- When you are ready to perform the actual import, uncheck the Preview box and upload the file again.
- KaiNexus processes imports as a single transaction, meaning it will fail the entire import if one error is found.
- If your import is successful, you will receive a confirmation message.
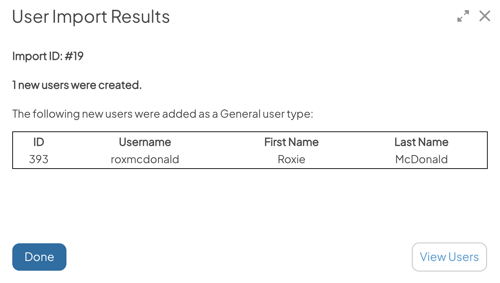
- The message includes an Import ID that can be used to filter for users included in the import in People Lists and the Admin Timeline.
- Select View Users in the confirmation message to open a list of the users that were created or updated.
After a successful import, you will also receive a confirmation email summarizing the changes you made.
Troubleshooting common errors
The following are common errors you may encounter during a User Import. Data-related errors will include the row number where the issue was found in the spreadsheet.
| Error | Description |
| All Users must have a Username, First Name, Last Name, User Type, and Network Location | One or more required fields are missing on the specified row. |
| Network Location not found | The Network Location in the import file does not exactly match an existing Network Location in KaiNexus. Check for typos, extra spaces, or formatting differences. |
| Undefined | This is a general error message. It can occur if your browser session times out during the import and you are required to sign in again. Try refreshing the browser and re-running the import. |
| Import limit exceeded | The import file contains more than 500 users. |
Review past imports
You can review previous User Imports by either:
- Filtering a People List by Import ID
- Filtering the Admin Timeline by Import ID
The Import ID drop-down includes the 20 most recent successful User Imports and displays each import’s ID, date, and time. Preview imports and failed imports are not included.
Pro Tip: A user can only be associated with one Import ID at a time. If a user is included in multiple imports, they will only appear under their most recent Import ID.
Filter a People List by Import ID
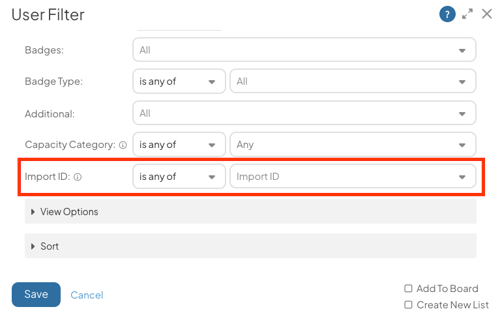
When creating a People List Card or working in the People section or User Management page, you can filter a People List to show users included in a specific import.
To do this, use the Import ID field in the User Filter and select the desired import.
Filter the Admin Timeline by Import ID
Required: You must have the Timeline Manager permission in your System Role to use the Admin Timeline.
The Admin Timeline allows you to review changes made to users during a specific import. To filter the timeline by Import ID:
- Navigate to the Admin section and open the Timeline page.
- In the Admin Type drop-down, select User. This will display the Import ID filter.
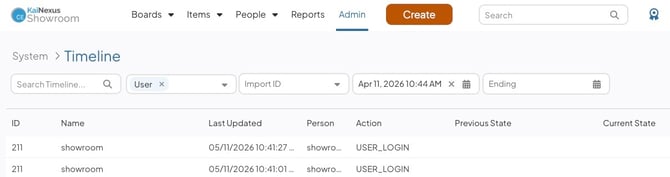
- Select the desired Import ID.
The Timeline will then display all user changes made as part of that import.