
Update an Attribute Value or Folder to keep its information up to date.
![]() This support article is about Attribute Values. If you want to edit an Attribute Type — the Attribute itself, under which the Attribute Values are listed — or convert a Value Attribute Type to a Weighted Attribute Type, reach out to your Customer Success Manager for assistance.
This support article is about Attribute Values. If you want to edit an Attribute Type — the Attribute itself, under which the Attribute Values are listed — or convert a Value Attribute Type to a Weighted Attribute Type, reach out to your Customer Success Manager for assistance.
Attribute Values can be grouped under Folders for organizational purposes. These groupings will be represented in the Attribute drop-down when filtering a List of Items or creating or editing an Item.
Who can edit an Attribute Value or Folder?
Anyone with the "Quality Administrators" permissions can edit Attribute Values and Folders.
People with other Administrator permissions may be able to access the Attribute Administration page but cannot make changes to it.
/Ofie/Ofie%20Profile%20Pic.png?width=50&height=50&name=Ofie%20Profile%20Pic.png) Pro Tip: If you have permission to manage Attribute Values but still cannot edit an Attribute Value or Folder, the Attribute may belong to a Shared Value Group, meaning the values are standardized and can only be edited by KaiNexus staff. Contact your Customer Success Manager to learn more.
Pro Tip: If you have permission to manage Attribute Values but still cannot edit an Attribute Value or Folder, the Attribute may belong to a Shared Value Group, meaning the values are standardized and can only be edited by KaiNexus staff. Contact your Customer Success Manager to learn more.
Edit an Attribute Value or Folder
To edit an Attribute Value or Folder, navigate to the Attributes administration page, then click the name of the Attribute Type with which you want to work and the Attribute's individual administration page will open. By default, the Location(s) field will be filtering the list of existing Attribute Values by your Location(s).
![]() Remember: There are four types of Attributes: Weighted, Value, Location, and People. Only Weighted and Value Attributes can have Attribute Values and Folders associated with them.
Remember: There are four types of Attributes: Weighted, Value, Location, and People. Only Weighted and Value Attributes can have Attribute Values and Folders associated with them.
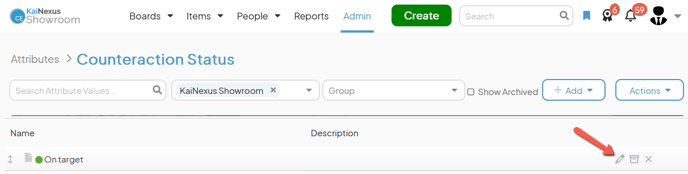
Once you've opened the Attribute's individual administration page:
- Hover over the Attribute Value or Folder you want to edit, then click the pencil icon that appears to its right.
- If you're editing a Folder, the Edit Folder window will open. Update the following information as necessary:
- Name (required): The name will be used to identify this Folder.
- The Hide Folder Name checkbox: When selected, this Folder's name will not appear in the Attribute's drop-down.
-
- Description: Enter an optional description in this field.
- Icon: Click one of the listed icons to select it, and the icon's code will automatically appear in the "Icon Code" field, or follow the link under the "Icon Code" field, select the icon you want to use, and copy and paste its icon code into the Icon Code field.
- Color: Expand this drop-down to select the color that should be used for the Folder's icon. Click Save on the drop-down to confirm your selection.
If this Folder doesn't have an icon configured, this option will have no effect.
- Color: Expand this drop-down to select the color that should be used for the Folder's icon. Click Save on the drop-down to confirm your selection.
- Click Save.
- If you're editing an Attribute Value, the Edit Attribute Value window will open. Update the following information as necessary:
- Name (required): The name will be used to identify this Attribute Value.
- Description: Enter an optional description in this field. The description will appear when hovering over the Attribute Value's name in the list of Attribute Values.
- Locations: Use this field to search for and select the Locations with which this Attribute Value should be associated. Attribute Values in a user's Locations — or in the Location(s) nested under their Locations — will be shown by default when editing this Attribute on an Item.
- Weight: This option will only appear if you are working with a Weighted Attribute Type. Enter the numerical value, or "Weight," that should be assigned to this Attribute Value. When this Attribute Value is selected as part of a Weighted Score, this Weight will be used to calculate this Attribute Value's contribution to the total Score.
- Leaving this field blank will cause this Attribute Value to be ignored when calculating the Weighted Score.
- The Include Note checkbox: When enabled, an optional text box will be displayed when this Attribute Value is selected on an Item so that the person who selected the Value can provide further details.
- The Require Note checkbox: This option will only appear if the "Include Note" checkbox is enabled. When enabled, the text box displayed when this Attribute Value is selected on an Item will be required rather than optional.
- Icon: Click one of the listed icons to select it and the icon's code will automatically appear in the "Icon Code" field, or follow the link under the "Icon Code" field, select the icon you want to use, and copy and paste its icon code into the Icon Code field.
This icon will appear next to the Attribute Value when filtering an Item List, editing or creating an Item, or on an Item's work panel.
- Color: Expand this drop-down to select the color that should be used for the Attribute Value's icon. Click Save on the drop-down to confirm your selection.
If this Attribute Value doesn't have an icon configured, this option will have no effect.
- Color: Expand this drop-down to select the color that should be used for the Attribute Value's icon. Click Save on the drop-down to confirm your selection.
- Click Save.