
Checkpoints use AI to review an Item when a user reaches a configured point in its workflow. Depending on the Checkpoint's enforcement, users may be able to continue after reviewing the AI response or may need to address the recommendations before proceeding.
This support page will cover:
- Who can configure the organization's Checkpoints?
- How to access Checkpoints
- The Checkpoints grid
- Creating Checkpoints
- Editing Checkpoints
- Copying Checkpoints
- Archiving and unarchiving Checkpoints
- Deleting Checkpoints
Who can configure the organization's Checkpoints?
Only users with the AI Admin permission and KaiNexus Internal Users can configure Checkpoint Insights. Premium KaiNexus Intelligence is required.
/Ofie/Ofie%20Profile%20Pic.png?width=50&height=50&name=Ofie%20Profile%20Pic.png) Pro Tip: For details on how Checkpoints work on Items, see the Checkpoints support page.
Pro Tip: For details on how Checkpoints work on Items, see the Checkpoints support page.
Access the organization's Checkpoints
To configure Checkpoints:
-
Navigate to KaiNexus Intelligence page in the Admin section.
-
Select the Checkpoints tab. This tab is only available to organizations with Premium KaiNexus Intelligence.
The Checkpoint Insights grid
The Checkpoint Insights grid shows all your organization's Checkpoints. As Checkpoints are added, they appear in the grid.
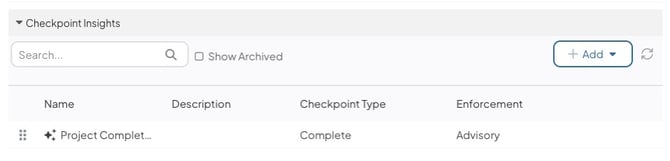
From the grid, you can:
- Use Search to find a Checkpoint Insight.
- Select Show Archived to display archived Checkpoints.
- Select Add to create a new Checkpoint.
- Select Refresh to refresh the grid.
- Use Columns to control which columns are displayed. Access, Model, Thinking Level, Context Size, and Knowledge Base (Yes or No) are hidden by default.
- Drag and drop Checkpoints to reorder them.
- Hover over a Checkpoint to Edit, Copy, Archive, or Delete it.
Create a Checkpoint
Select Add and choose the type of Checkpoint you want to create:
- Submission Checkpoint
- Resolution Submitted Checkpoint
- Complete Checkpoint
In the Create or Edit Checkpoint window, configure the following settings.
Click a section header to expand or collapse its settings.
When finished, select Save.
Basics
- Name: Enter the name of the Checkpoint.
- Description: Enter a description of the Checkpoint.
- Icon: Select an icon to represent this Checkpoint. When you select one of the listed icons, the icon's code will automatically appear in the "Icon Code" field.
- Icon Code: To use a unique icon, select the Font Awesome link to browse available icons, then copy the icon's code and paste it into this field. Leave this field blank if you do not want an icon. You can also clear an existing code and save the Checkpoint without it.
Behavior
- Checkpoint Type: Identifies the point in the workflow at which the Checkpoint runs: Submission, Resolution Submitted, or Complete. This field is locked based on the option selected from the Add dropdown.
- Trigger Action (Submission Checkpoints only, required): Select the action(s) that should trigger the Checkpoint:
- Submit as New
- Submit as Planned
- Submit as Active
- Submit as Deferred
- Enforcement: Select how the Checkpoint affects the user's ability to continue:
- Advisory: Users can continue without making changes.
- Blocking: Users must address the recommendations before proceeding.
- Bypass Criteria: Define criteria that allows the Checkpoint to be skipped.
- If an Item meets the Bypass Criteria, the Checkpoint does not run and the Checkpoint window does not appear. The user can proceed normally without seeing the review.
- If this field is left blank or the criteria are unclear, the Checkpoint always runs.
Access & Availability
- Access: Select who can access this Insight, including Locations, people, System Roles, Team Roles and/or Personas. None is selected by default.
- Selecting a Location also grants access to users in nested Locations.
- If you select a Team Role, make sure that Team Role is included on each Template where the Insight is available. To run the Insight on an Item, the user must hold the selected Team Role on that Item. Access by Team Role is not available for Item List or Notification Insights.
- Templates: Choose which Templates use the Checkpoint.
- Only one Checkpoint Insight of each type (Submitted, Resolution Submitted, Complete) can be configured per Template.
Context Sources
- Include Workflow Context: When enabled, the AI incorporates additional workflow and Template context when generating the Insight, including Team Type, Resolution and approval expectations, Milestone and Stage Gate configuration, child Item and dependency relationships, required Fields, the Item's Status and lifecycle stage, and the current user's Role and available actions.
- Include User Details: When enabled, the AI uses the current user’s name, Team Roles, System Roles, permissions, Persona, Locations, and User Attributes, including Titles, Positions, Certifications, and Employment Status, as additional context.
- Include Item Images: When enabled, the AI analyzes image attachments on the current Item.
- Include Chart Data: When enabled, the AI incorporates the current Item's Chart data into its analysis.
- Include Fishbone Data: When enabled, the AI incorporates the current Item's Fishbone data into its analysis.
Interaction
- Enable Replies: When enabled, users can reply to the Insight after the initial AI response to continue the conversation.
- Enable Suggested Follow-up Replies: When enabled, the AI displays suggested follow-up replies after its initial response.
Prompt & Model
- Model: Choose Efficient for routine tasks with the lowest AI Credit usage, Balanced for more complex analysis with moderate credit usage, or Advanced for demanding tasks with the highest reasoning capability and credit usage. Checkpoint criteria are evaluated using Efficient; the displayed Insight uses the configured Model. Changing the Model applies to new conversations; an ongoing conversation continues using its original Model.
- Thinking Level: Controls how deliberately the AI reasons before responding. The options are Automatic, Minimal, Low, Medium, High.
- Context Size: Choose Small (the default), Medium (3 times Small), or Large (6 times Small) to control how much textual source information the AI analyzes. Larger sizes can help with complex inputs but may use more AI Credits. This setting does not increase limits for the Prompt, Preamble, Knowledge Base files, selected files or images, Chart or Fishbone data, or conversation history.
- Prompt: Defines the instructions the AI uses to during the Checkpoint evaluation and while generating the Insight.
- Preamble: Optional background context or tone to shape how the AI responds.
Advanced
- Template Overrides: Template Overrides allow you to define a different Prompt and Preamble for specific Templates, overriding the default configuration for those Templates only. This is useful when the Checkpoint needs to behave differently depending on the type of Item it's being used on.
To add a template Override:- Select Add within the Template Overrides section.
- Choose one or more specific Templates to override. The Show All option is not available.
- Configure the Prompt and Preamble for those Templates.
- Repeat as needed for additional Template groupings, or select Remove to delete an override.
- Knowledge Base: The knowledge base allows you to upload reference documents the AI can draw on when generating responses for this Insight.
Select Add File to upload a file. Accepted file formats are PDF, plain text, markdown, JSON, or XML.
Edit a Checkpoint
To edit a Checkpoint, access your organization's Checkpoints, then:
- Hover over the Checkpoint you want to edit, and select the pencil icon.
- Update the Checkpoint's settings. See Create a Checkpoint for configuration options.
- Select Save.
Copy a Checkpoint
To copy a Checkpoint, access your organization's Checkpoints, then:
- Hover over the Checkpoint you want to copy, and select the copy icon.
- When prompted, confirm the copy.
The copy is a new Checkpoint with all details from the original, except for Access. Edit the copy to configure who can access it.
Archive or unarchive a Checkpoint
Archiving a Checkpoint prevents it from running and hides it from the grid's default view.
Archive a Checkpoint
To archive a Checkpoint, access your organization's Checkpoints, then:
- Locate the Checkpoint you want to archive in the grid.
- Select the Checkpoint's archive icon.
Unarchive a Checkpoint
To unarchive a Checkpoint, access your organization's Checkpoints, then:
- Select the Show Archived checkbox to display archived Checkpoints.
- Locate the Checkpoint you want to unarchive and select its unarchive icon. The Checkpoint will return to the grid's default view.
Delete a Checkpoint
To delete a Checkpoint, access your organization's Checkpoints, then:
- Locate the Checkpoint you want to delete in the grid. If it is archived, select the Show Archived checkbox to display it.
- Select the x icon.
- When prompted, confirm that you want to delete the Checkpoint.
Deleting a Checkpoint removes it from your organization's configuration.