
AI Recaps help people catch up on recent activity and identify work that may need their attention. From the Recaps administration page, you can select recipients, choose source information, and manage the Recaps available to your organization.
This support page will cover:
- Who can configure the organization's AI Recaps?
- How to access Recaps
- The Recaps grid
- Adding Recaps
- Recipients and delivery limits
- Editing Recaps
- Previewing Recaps
- Copying Recaps
- Archiving and unarchiving Recaps
- Deleting Recaps
/Ofie/Ofie%20Profile%20Pic.png?width=50&height=50&name=Ofie%20Profile%20Pic.png) Important: Your organization must have the KaiNexus Intelligence Module enabled to use AI Recaps. Stock Recaps are available with Base, Advanced, and Premium. Creating Custom Recaps, customizing Stock Recaps, and copying Recaps require Premium.
Important: Your organization must have the KaiNexus Intelligence Module enabled to use AI Recaps. Stock Recaps are available with Base, Advanced, and Premium. Creating Custom Recaps, customizing Stock Recaps, and copying Recaps require Premium.
Who can configure the organization's AI Recaps?
Anyone with the AI Admin permission in their System Role can manage the organization's AI Recaps, subject to its KaiNexus Intelligence level.
Access the organization's Recaps
To configure Recaps:
- Navigate to the Admin section, and open the KaiNexus Intelligence page.
- Select the Recaps tab.
The Recaps grid
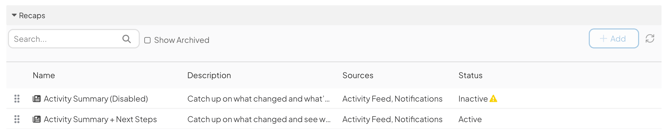
The grid displays your organization's Recaps. By default, it shows each Recap's Name, Description, Sources, and Status.
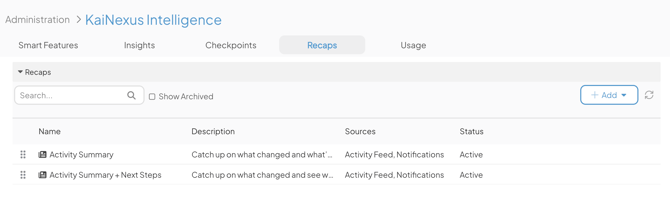
From the grid, you can:
- Use the Search field to find a Recap.
- Select Show Archived to include archived Recaps.
- Select the Refresh icon to reload the grid.
- Open a column header's dropdown menu and select Columns to show additional information, including ID, Recipients, Model, Thinking Level, Context Size, and Knowledge Base.
Pro Tip: A yellow warning triangle beside a Recap's Status indicates that its eligible recipients exceed the limit for your organization's KaiNexus Intelligence level. The tooltip shows the number of eligible recipients and the applicable limit.
Add a Recap
Select Add in the Recaps grid to choose the type of Recap you want to create: 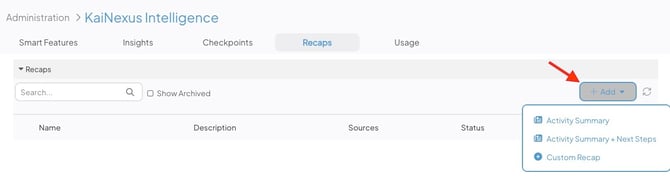
- Activity Summary: Summarizes recent activity without recommending next steps. Available at all tiers of KaiNexus Intelligence.
- Activity Summary + Next Steps: Summarizes recent activity and recommends practical next steps. Available at all tiers of KaiNexus Intelligence.
- Custom Recap: Lets you create a customized Recap. Requires Premium KaiNexus Intelligence.
Important: Your organization can have up to 10 Active Recaps. Inactivate or archive an existing Recap before activating another when this limit is reached.
Stock Recaps
If you are adding a Stock Recap, you'll configure the following settings:
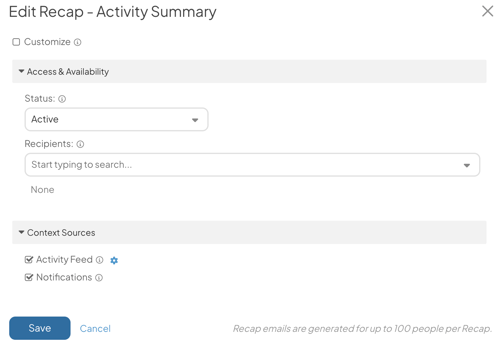
- The Customize checkbox: This checkbox will only be available if your organization has Premium KaiNexus Intelligence. Select it to customize the Stock Recap.
When you customize a Stock Recap, it will no longer receive future changes KaiNexus makes to the default Stock Recap in software updates.
- Under Access & Availability:
-
Status: Determines whether the Recap actively sends emails to applicable recipients. Select Active to enable Recap emails or Inactive to prevent future emails from being sent.
-
Recipients: Determines who receives the Recap. Select one or more Locations, people, Roles, or Personas. No recipients are selected by default, and each person receives the Recap only once, even if they match multiple selections. There is no Everyone option.
The number of recipients must be within your organization's KaiNexus Intelligence limit before you can save the Recap as Active.
-
- Under Context Sources:
- Activity Feed: When enabled, user activity serves as a source for the Recap.
Select the gear icon to open the Activity Settings window, where you can customize the activity included in the Activity Feed.
In the Activity Settings window:
- Activity: Select the activities to include in the Activity Feed. Several basic activities are included by default. Select the x icon next to an activity to remove it.
- Item Statuses: This field is only available when Item Status Change is included as an Activity. Select which Status changes to include in the Activity Feed.
-
Filters: By default, the Activity Feed includes all default activities and applies no Item or User Filters. Add filters to limit the activity included to specific Items or users.
Select the funnel icon to filter which Items should be included in the activity feed. Select the user icon to filter which users' activity will be included in the feed.
-
Notifications: When enabled, the recipient's notifications serves as a source for the Recap. These are the same notifications that typically appear in the recipient's Notifications Window in KaiNexus.
- Activity Feed: When enabled, user activity serves as a source for the Recap.
- Select Save when you are finished configuring the Recap.
Pro Tip: Make sure you review the recipient and delivery limits before activating your Recap.
Custom Recaps
If you are creating a Custom Recap, you'll configure the following settings:
- Under the Basics header:
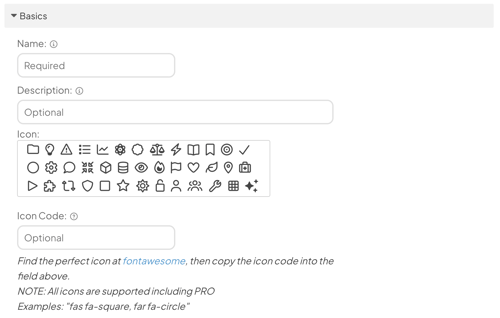
- Name: Enter a name to identify the Recap. Required; up to 100 characters.
- Description: Enter a short explanation of the Recap. Optional; up to 200 characters.
- Icon: Select an icon, or enter a Font Awesome icon code in Icon Code.
- Edit the Access & Availability as described above.
- Under the Context Sources, select what context to include in the Recap:
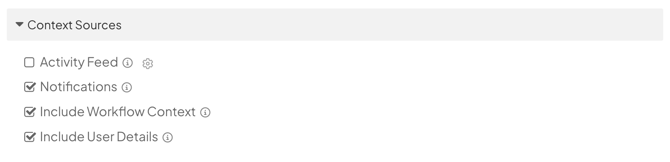
- Activity Feed: When enabled, user activity serves as a source for the Recap. Select the gear icon beside this checkbox to open Activity Settings.
- Notifications: When enabled, the recipient's notifications serves as a source for the Recap. These are the same notifications that typically appear in the recipient's Notifications Window in KaiNexus.
- Include Workflow Context: Includes additional information about the Item's workflow and Template, such as approval expectations, Milestones, Stage Gates, required Fields, dates, and child Item relationships.
- Include User Details: Includes additional user information, such as name, Team Role, System Roles, permissions, Persona, Locations, and User Attributes.
Caution: The Recap uses up to 50 combined source records, subject to its available context allowance. If source information is omitted because the configured limits are reached, the email includes a notice explaining that some context was not included.
- Under the Prompt & Model header:
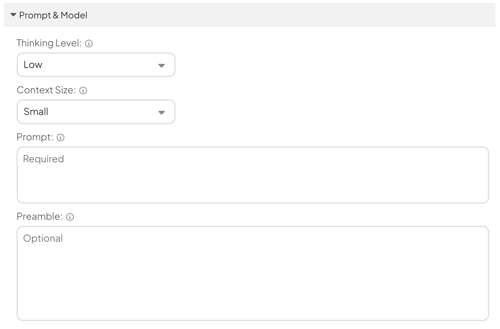
- Thinking Level: Controls how much extra reasoning the AI can use before generating a response. Choose Automatic, Minimal, Low, Medium, or High. Higher levels may improve complex analysis but can take longer and use more AI Credits. The initial selection is Low.
- Context Size: Controls how much source information the AI can analyze. Choose Small, Medium, or Large. The initial selection is Small. Larger sizes may use more AI Credits. This setting does not increase Prompt, Preamble, or Knowledge Base limits.
- Prompt: Enter the instructions for generating the Recap. Describe what it should summarize, whether it should recommend next steps, and how the response should be organized. Required; up to 10,000 characters.
- Preamble: Provide optional background information or guidance about tone. Up to 10,000 characters.
- Under the Advanced header:
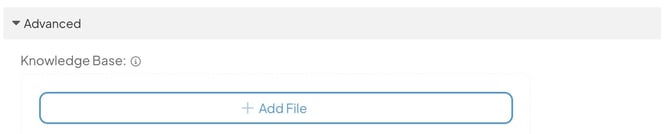
- Knowledge Base: Add optional documents the AI can reference when generating the Recap. Supported formats are PDF, plain text, Markdown, JSON, and XML. Save a new Recap before adding files.
Important: Your organization has a shared Knowledge Base token allowance that limits the total amount of reference documents uploaded across all AI features. Uploaded files count toward this allowance even if an AI feature is archived. Removing files or deleting the AI feature they belong to frees up capacity.
- Select Save when you are finished configuring the Recap.
Pro Tip: Make sure you review the recipient and delivery limits before activating your Recap.
Recipients and delivery limits
Each Recap has a recipient limit based on your organization's KaiNexus Intelligence level:
| KaiNexus Intelligence level | Maximum recipients per Recap |
|---|---|
| Base | 10 |
| Advanced | 50 |
| Premium | 100 |
You can save an Inactive Recap with more recipients than the limit. However, recipients must be within the limit when you activate a Recap, unarchive an active Recap, or change an active Recap's recipients.
If an active Recap’s recipient count later exceeds your tier’s limit, the Recap remains active, but delivery is restricted to the same first group of eligible recipients, up to the current limit.
Each person in this group receives emails on their selected Recap Days. If someone is not scheduled to receive a Recap that day—or has no Recap Days selected—their place is not given to someone outside the group.
In addition, a yellow warning triangle appears beside its Status.
Pro Tip: When a recipient receives a Recap, it depends on the Recap Days they have selected in their Email Notification Preferences. New users who have not yet customized their Recap Days will receive their organization's default Recap Days.
A recipient with no Recap Days selected will not receive Recap emails, but they still count toward the Recap's recipient limit.
Edit a Recap
To edit a Recap, access your organization's Recaps, then:
- Hover over the Recap you want to edit, and select the pencil icon.
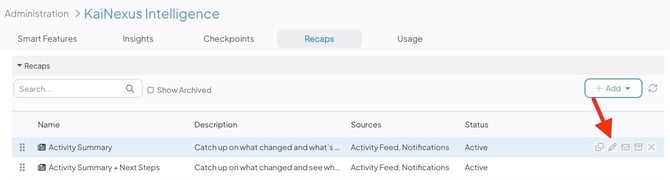
- Update the Recap's settings. The settings you can edit depend on whether you are working with a Stock Recap or a customized Recap.
- See Stock Recaps for configuration options available in Base and Advanced KaiNexus Intelligence.
- See Custom Recaps for configuration options available for Custom Recaps and customized Stock Recaps.
- Select Save.
Preview a Recap email
You can preview a Recap email to see what it will look like before it is sent, without sending an actual email.
To preview a Recap, access your organization's Recaps, then:
- Hover over the Recap you want to preview, and select the envelope icon.
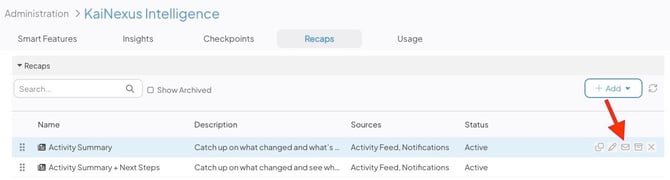
In the Preview Email Recap Window:
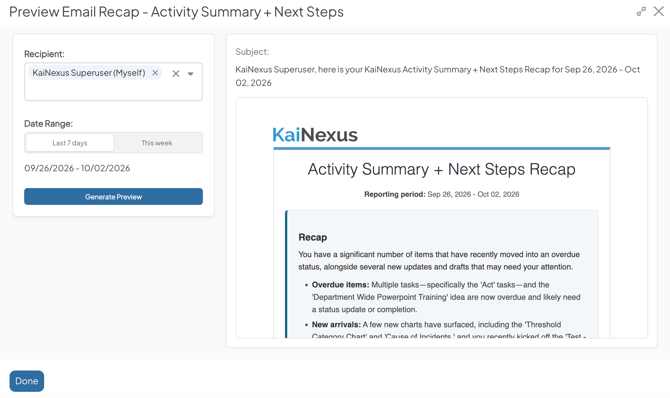
-
Recipient: Select the user you want to preview the email as. It defaults to you. To preview the Recap as another person, you must have Impersonate User permission and be allowed to impersonate that person. The preview reflects that recipient's visibility.
-
Date Range: Choose the period of activity you want the Recap to reference: Last 7 days or This week, which starts on Sunday. Both date ranges use your organization's default timezone.
- Select Generate Preview.
The preview displays the generated email content and Referenced Items, when applicable. Links in the preview are not clickable.
You can close the window while the preview is being generated and return to it later as long as you don't leave the KaiNexus Intelligence admin page or refresh your browser.
Pro Tip: If a preview cannot be generated, review the message shown in the window. Common causes include no source activity, exhausted monthly AI Credits, or an ineligible recipient.
Copy a Recap
Important: Only organizations with Premium KaiNexus Intelligence can copy Recaps.
To copy a Recap, access your organization's Recaps, then:
- Hover over the Recap you want to copy, and select the copy icon.
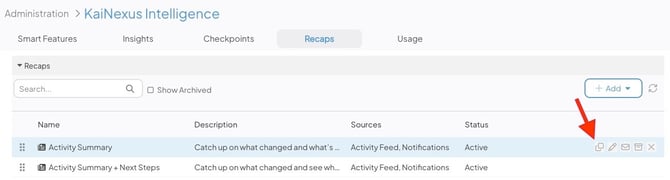
- When prompted, confirm the copy.
The copy is a new Custom Recap with the original configuration, except for Recipients. It starts Inactive with no recipients, so you can review it before enabling delivery.
Archive or unarchive a Recap
Archiving a Recap stops its delivery and hides it from the grid's default view.
Archive a Recap
To archive a Recap, access your organization's Recaps, then:
- Locate the Recap you want to archive in the grid.
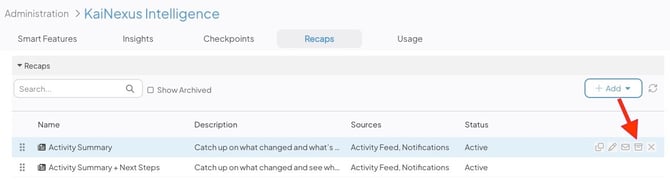
- Select the Recap's archive icon.
Unarchive a Recap
To unarchive a Recap, access your organization's Recaps, then:
- Select the Show Archived checkbox to display archived Recaps.
- Locate the Recap you want to unarchive and select its unarchive icon. The Recap will return to the grid's default view.
Unarchiving an Inactive Recap does not change its Status to Active. Unarchiving an Active Recap must satisfy the recipient and Active Recap limits, and email delivery will resume.
Delete a Recap
To delete a Recap, access your organization's Recaps, then:
- Locate the Recap you want to delete in the grid. If it is archived, select the Show Archived checkbox to display it.
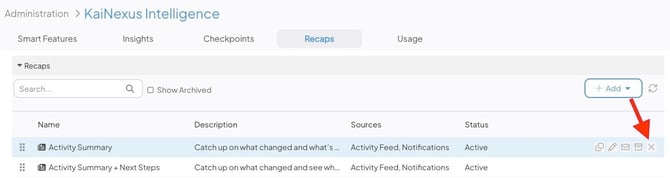
- Select the x icon.
- When prompted, confirm that you want to delete the Recap.
Deleting a Recap removes it from your organization's configuration.