/Ofie/Ofie%20Profile%20Pic.png?width=50&height=50&name=Ofie%20Profile%20Pic.png) Important: The features described on this support page require the Capacity Planning Module.
Important: The features described on this support page require the Capacity Planning Module.
Capacity View displays Items alongside their commitment schedules, making it easier to plan, track, and manage work across multiple Items.
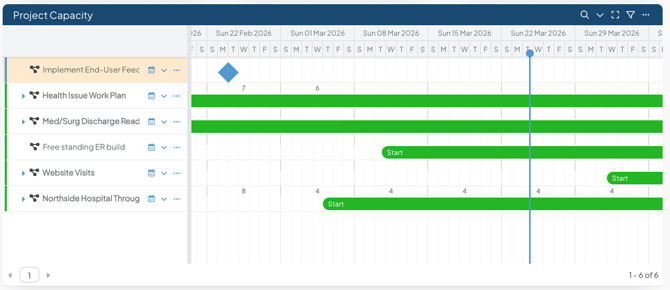
Like Gantt View, Capacity View shows the hierarchy of Items on the left and a timeline on the right side. This combination helps you understand both the structure of your work and how commitments are scheduled over time.
How it works
Capacity Category Filtering
When you switch an Item List to Capacity View, the List is automatically filtered by a Capacity Category. Only Items with Capacity Tracking enabled for the selected category will appear.
- If your organization has one Capacity Category, the List will display Items with Capacity Tracking enabled for that category.
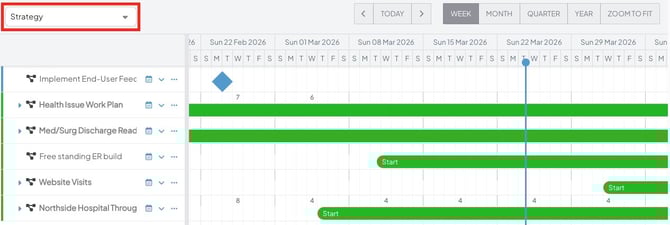
- If your organization has multiple Capacity Categories, a Capacity Category drop-down will appear. The List will default to the first category in the dropdown, and only one category can be viewed at a time.
To view a different Capacity Category, select it from the Capacity Category dropdown.
Pro Tip: In an Item List Card, you must maximize the Card to access this dropdown. Currently, there is no way to set a default Capacity Category for the Lists in Capacity View. It will always default to your first Capacity Category.
Primary Results and Child Items
Capacity View displays Items in a parent-child hierarchy.
Items that match your Item Filter are called primary results. The total number of primary results is displayed in the bottom right of the Item List or in the header of an Item List Card.
Capacity View also displays child Items nested beneath these primary results. As a result, the total number of Items shown may be greater than the number of primary results.
To view child Items, select the blue arrow icon next to a parent Item. 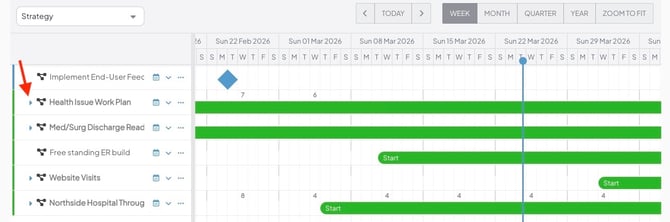
Pro Tip: By default, Capacity View shows 50 Items per page of the List. You can increase this limit up to 250 by updating the List's View Options.
If an Item is a primary result and a child of another primary result Item, it will only appear one time in your Item List. It will be counted as a primary result in your List and located in the nesting structure beneath its parent.
Capacity View Timeline
The right side of the Capacity View is a visual representation of the listed Items over time, with each Item shown as a bar or diamond.

- The color of the bar or diamond is determined by the Item's current status.
-
The position and length of each bar or diamond are based on the Item’s dates.
- If an Item has a Start Date, it begins on that date. If not, it begins at the Create Date.
- Items with a Due Date or a Complete Date are shown as bars that end at the Due Date or the Complete Date.
- Items without a Due Date or Complete Date are shown as a diamond at their Start Date or Create Date.
- Hover over a bar or diamond to view key Item Dates.
- Use the Week, Month, Quarter, Year, and Zoom to Fit toggles to change the time interval displayed on the timeline.
- Selecting Zoom to Fit automatically adjusts the date range to display the full duration of each Item. If commitment bars are shown, it will also fit all commitments logged on the Item.
- Use the left and right arrows to navigate to the past or future. Select Today to focus the calendar on today.
- The vertical line indicates the current date.
Above the timeline, each week may display a value representing the total committed hours or people, depending on the selected Capacity Category. If there are no commitments for a given week, no value will be shown. These weekly totals are only displayed when the Week or Month interval is selected.
Show an Item's Team and their Commitments
Capacity View also displays the team members available for Capacity Tracking on each Item, along with their commitments on the timeline.
- Click the caret icon to the right of an Item's title to show its team. This icon won't appear if there are no team members to show.

When expanded:
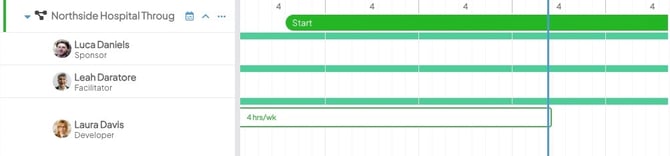
- The left side of the List displays the team members and placeholders in Team Roles that are enabled for Capacity Tracking in the currently selected Capacity Category.
- The right side of the List shows the team's commitments and capacity. This includes:
- A commitment bar showing their commitments to the Item.
-
- A capacity bar showing whether they are over, at, or under capacity each week.
Pro Tip: The commitment and capacity bars function the same as when editing an Item’s Capacity, but they cannot be edited directly from the List view. To make changes, use the Edit Capacity option from the List to update its commitments and team members. 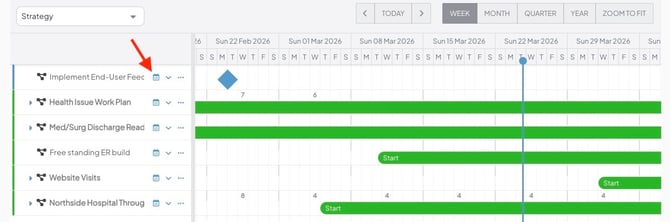
Working with the Capacity View
- Open an Item: In Capacity View, click the Item’s title or its bar/diamond on the timeline to open it.
- Edit Capacity Commitments: Click the blue calendar icon to adjust the Item’s capacity commitments, including team members. You cannot drag or click directly on the commitment bars from the List. For details on who can edit Capacity, see this support page.
- Resolution Submitted, Complete, Deferred, Draft, and Archived Items cannot have their capacity edited.
Pro Tip: If an Item is not actively tracking the selected Capacity Category, the Edit Capacity option will be replaced by an info icon. Hovering over the icon will display a tooltip indicating that Capacity Tracking is not enabled for that category.
- Quick Edit Options: You can edit Items by clicking the ellipsis icon that appears when hovering over the Item, or by right-clicking the Item. For details on editing Items from a List, see this support page.
- Open an Item in a new tab: Right-click the Item name and select Open in a new tab.
- Copy an Item's link: Right-click the Item name and select Copy Link to copy the Item's direct link to your clipboard.
Configuring the Capacity View
To configure how Items are represented in the Capacity View:
- Click the filter icon near the top of the list. If you do not see this option, you may need to first click Filters to expand the list's filters.

In the Item Filter:
- Click the View Options header to expand it.

- The Show Parents checkbox: When enabled, the parent of any Items that meet the filter requirements will be included on the list, even if that parent does not meet the filter requirements itself.
- The Show Children checkbox: When enabled, the children of any Items that meet the filter requirements will be included on the list, even if those children do not meet the filter requirements themselves.
- By default, when this checkbox is enabled, all children will be included on the list. To include only children of certain workflows, expand the Workflows drop-down to the right of the checkbox, then select the workflows you want included.
- If a child Item does not meet the primary filter criteria, it will remain collapsed beneath its parent. If it does meet the criteria, it will automatically appear expanded beneath the parent by default.
-
- The Filter Children checkbox: When enabled, a filter icon appears next to the checkbox, allowing you to control which children are included on the list.
- Click the filter icon to open a new Item Filter window from which you can filter the list of children.
- The Filter Children checkbox: When enabled, a filter icon appears next to the checkbox, allowing you to control which children are included on the list.
-
- Max: Enter the number of primary result Items to appear in each page of your list.
- By default, 50 primary result Items will appear.
- The maximum is 250.
- Any number above 50 could potentially increase the load time for your Item List.
- Max: Enter the number of primary result Items to appear in each page of your list.
-
- Show Archived: Click one of the following radio buttons to decide whether archived Items should be included on the list.
- Exclude Archived: When selected, no archived Items will be included on the list.
- Only Archived: When selected, no unarchived Items will be included on the list.
- Both: When selected, archived Items and unarchived Items will be included on the list.
- Item Count (Card-only setting): Choose whether you want to Show or Hide the number of Items included in the List on the Card's header.
- Auto Refresh: Click one of the following radio buttons to decide whether the Item List automatically refreshes when you open and close an Item in the List.
- On: When selected, the Item List will automatically refresh when you open and close an Item in the List. This ensures that any edits made to an Item are reflected in the List. We recommend keeping this functionality enabled in most cases.
- Off: When selected, the Item List will not refresh when you open and close an Item in the List. This can improve navigation if the List has a long load time. However, any edits you make to Items won't be reflected in the List until you manually refresh it.
- Show Archived: Click one of the following radio buttons to decide whether archived Items should be included on the list.
- Select Save.