/Ofie/Ofie%20Profile%20Pic.png?width=50&height=50&name=Ofie%20Profile%20Pic.png) Important: The features described on this support page require the Capacity Planning Module.
Important: The features described on this support page require the Capacity Planning Module.
When working with an Item List, you can use the following actions to view and analyze Capacity Commitment data:
- Filter the List by Capacity Category
- Display Capacity Commitments directly in the List
- Export Capacity data for the Items
Filter the List by Capacity Category
You can filter an Item List by Capacity Category by applying capacity rules in the Item Filter.
To get started, open the Item Filter, and select Capacity in the Rules section: 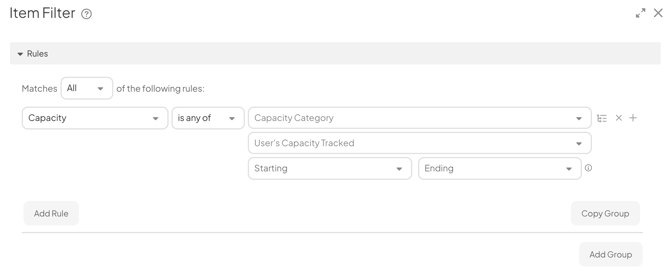
- Capacity Category: Select a Capacity Category. The filter will return Items that have Capacity Tracking enabled for the chosen category.
- User's Capacity Tracked: Select one or more users. The filter will return Items where the users have commitments logged for your specified Capacity Category.
- Starting and Ending: Use these fields to set a date range. The filter will return Items where the specified commitments have a start or end date in the defined timeframe.
Display Capacity Commitments in an Item List
To display Capacity Commitments in an Item List, you can:
Capacity View
Capacity View is a powerful Item List View that displays Items alongside their commitment schedules, making it easier to plan, track, and manage work across multiple Items.
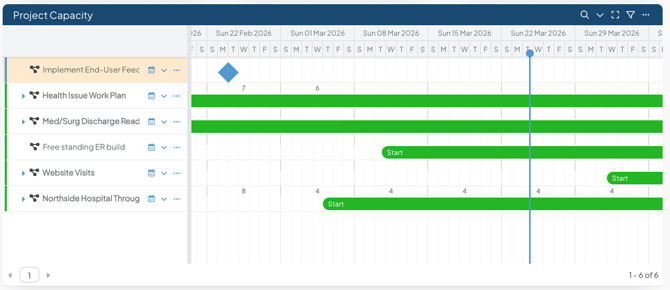
Like Gantt View, Capacity View shows the hierarchy of Items on the left and a timeline on the right side. This combination helps you understand both the structure of your work and how commitments are scheduled over time.
Learn More: Check out the Capacity View support page for more details on using it.
Add a Capacity Column
If your List is in List, Tree, or Gantt View, you can add a Capacity column to display the team's commitments to an Item. There will be a unique column for each of your organization's Capacity Categories.
Pro Tip: Need help customizing columns in an Item List? Check out our support page on editing an Item List's view. If you are working with a Card, learn how to customize columns on Cards instead.
When your Item List has a Capacity column: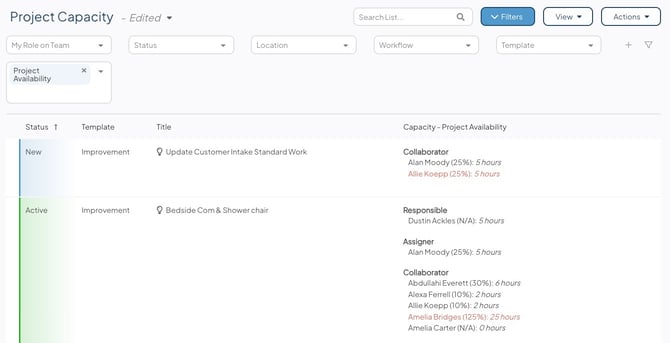
- The column will display each user with a capacity commitment on the Item, organized by Team Role. It will also show their specific commitment and what percentage of their Max Capacity that commitment represents.
- Click the capacity information for any Item in the List to open a window where you can adjust the commitments for that Item.
Caution: You must have the Capacity or Capacity Manager permission to view capacity data in an Item List. To edit commitments, you must also have permission to edit the Item.
Export Capacity data
Caution: You must have the Capacity Manager permission to include capacity data in Item and Item List exports.
You can retrieve capacity data recorded on Items by exporting an Item or Item List to XLSX. The exported file will contain an additional sheet listing all Capacity Commitments logged for the Item(s).
Pro Tip: Need help exporting an Item List? Visit our support pages for exporting Item Lists. If you're working with an Item List Card, visit our article on exporting Cards.
To include capacity data in your XLSX export:
- Select the Include Capacity Sheets checkbox in the "Save XLSX" window.

The capacity sheet will contain the following information for each Capacity Commitment:
- The Item name and ID
- If available, the parent name and ID
- The ID, name, Location, and Team Role of the User
- The Capacity Category
- If the Capacity Category tracks the number of Items, the True/False status of whether the user is committed to the Item.
- If the Capacity Category tracks hours per week, the hours committed per week and the total hours committed across the duration of the commitment
- The start and end dates of the Capacity Commitments.
Pro Tip: If there are multiple Templates in your Item List, each Template will have its own Capacity sheet.