/Ofie/Ofie%20Profile%20Pic.png?width=50&height=50&name=Ofie%20Profile%20Pic.png) REQUIRED: Download the KaiNexus mobile app onto your mobile device. Check out this support article to learn how to access the mobile app.
REQUIRED: Download the KaiNexus mobile app onto your mobile device. Check out this support article to learn how to access the mobile app.
There are several ways you can create an Item in KaiNexus. You can:
- Click the Create button in the Navigation Bar at the top of the page.
- Click the Create button inside of a Widget Card on a Board.
- Create a new Item via email.
- Create a new Item via the mobile app.
- Create a new Item via a kiosk with the Kiosk Module.
- Utilize JSON to import new Items with the API Module.
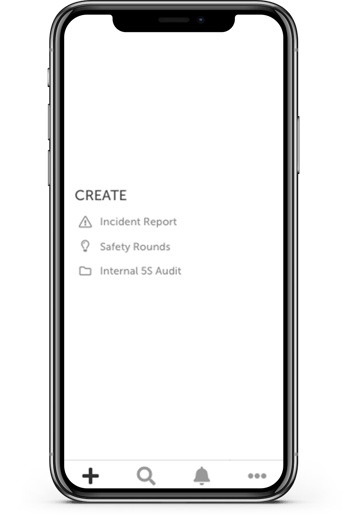
Submit a new Item via the mobile app
![]() PRO TIP: After you download the mobile app, tapping an Item link in an email will open the Item directly in the app. In addition, scanning the QR code for a Template will open the create screen for that Template directly in the app.
PRO TIP: After you download the mobile app, tapping an Item link in an email will open the Item directly in the app. In addition, scanning the QR code for a Template will open the create screen for that Template directly in the app.
To submit a new Item via the KaiNexus mobile app:
- Log in to the mobile app.
- You will automatically be taken to the Create screen, containing a list of the available Templates you can create — these options will vary depending on your organization’s settings. Tap one of these Templates to begin submitting an Item of that type. If you've navigated to another page, tap the plus icon to return to the Create screen.
Warning: A Template will only appear on this list if you have permission to create it and it has been configured for mobile submission. Reach out to your Customer Success Manager to enable mobile submission for any of your organization's Templates.
- In the resulting window, you'll be able to fill in the information to create your Item as described below. Depending on the Template's configuration, different optional and required components will be available.
- Summary: In the first field on the Create screen, enter a short summary of the Item. This field is often called the "Title," but your organization may have configured it differently.

- Tap the magnfiying glass icon to open a more detailed list of similarly titled Items. Clicking any of the Items in that list will open the Item so that you can view it in its entirety.
- Summary: In the first field on the Create screen, enter a short summary of the Item. This field is often called the "Title," but your organization may have configured it differently.
-
- Fields and Attributes: Different Templates will have different required and optional Fields and Attributes. Add the necessary information to any Fields and Attributes.
- Tap the picture icon in the bottom right corner of a text area to add an image directly to that field. You can select a photo from your phone's library or take a new one.

- Tap the picture icon in the bottom right corner of a text area to add an image directly to that field. You can select a photo from your phone's library or take a new one.
- Fields and Attributes: Different Templates will have different required and optional Fields and Attributes. Add the necessary information to any Fields and Attributes.
-
- Parent: Use this field to search for the Item (if any) under which this Item should be nested.
- This field may be required, optional, or hidden completely, depending on your organization's configuration.
- Your organization may have limited the Items available in this field.
- Parent: Use this field to search for the Item (if any) under which this Item should be nested.
![]() To search for and select a particular Item as the parent, you must have permission to view and edit that Item.
To search for and select a particular Item as the parent, you must have permission to view and edit that Item.
-
- The Make Private checkbox: When this box is checked, the Item will become private and only its Team members and people with the "View Private" permission for Items in its Location will be able to see it.
Both the presence and default state of this checkbox are determined by the Item's template's configuration. Additionally, only someone with the "Toggle Private" permission will be able to see this checkbox.
For a full guide to private Items, check out this support article. - The Allow Team to see nested private Items checkbox: When this box is checked, the Team members will be able to see private Items that are nested under this Item, even if they lack the "View Private" permission for Items in their Locations. This checkbox will only be available for Templates using the Advanced Team Type.
- This Template may have been configured such that you can (or may even be required to) add a Target and/or Forecast Resolution. If this is the case, the Resolution header will be present and there will be a "Submit Target" button, a "Submit Forecast" button, or both.
- Tap Submit Target to open the Resolution - Target window. Enter the appropriate Target impact(s) and/or investment(s), then tap Save.
- Tap Submit Forecast to open the Resolution - Forecast window. Enter the appropriate Forecast impact(s) and/or investment(s), then tap Save.
- To edit a Target or Forecast Resolution, tap the same button again.
- Status & Team: Depending on this Template's configuration, you may be able to choose the Item's status and/or assign its Team under this header. If you do not see this section, or only see parts of it, your organization has restricted access to it on this Template.
- To switch between statuses, tap the corresponding status button. If necessary, the dates and team roles available beneath the status buttons will update to reflect the change. Fill out the required or optional information for the selected status.
- If all but one status button is grayed out, your organization has configurated this Template so that it must be submitted in that status.
- Use each Team Role's field to search for the people you want to add or delete existing people as necessary. Some Team Roles are single-select and some are multi-select.
- To switch between statuses, tap the corresponding status button. If necessary, the dates and team roles available beneath the status buttons will update to reflect the change. Fill out the required or optional information for the selected status.
- Add attachments to the Item: Tap the paperclip icon in the bottom left corner of the screen. You can select a file, choose a photo or video from your device's library, or take a new photo or video.
- Tap Create to create your new Item. Alternatively, you can:
- Tap Draft to save the Item in the Draft status. You will be the only person able to see the Item while it is a Draft and you will need to submit it for work on it to officially begin.
Depending on how your organization has configured this Template, this option may not be available. - Tap Cancel to exit out of this window and return to the previous list of available Templates. Your work will be lost!
- Tap Draft to save the Item in the Draft status. You will be the only person able to see the Item while it is a Draft and you will need to submit it for work on it to officially begin.
- The Make Private checkbox: When this box is checked, the Item will become private and only its Team members and people with the "View Private" permission for Items in its Location will be able to see it.
Pro Tip: Templates may have the option to complete the Item while submitting it. If enabled, you will also see a Complete or Resolve button on the Create Screen, depending on whether Resolution is enabled. This configuration is helpful for quickly logging simple improvement work, such as Just Do Its.
After submission
After creating your Item, you will receive a success message that includes the Item’s ID number. You will also see three options:
- Tap Go to Home Screen to return to the list of Templates from which you can create a new Item.
- Tap View Item to see the Item you just created.
- Tap Create Another to create another Item of the same Template.
Recommended Reading
- Search for an Item in the KaiNexus mobile app
- View and Edit an Item in the KaiNexus mobile app
- View your Notifications in the Kainexus mobile app