
/Ofie/Ofie%20Profile%20Pic.png?width=50&height=50&name=Ofie%20Profile%20Pic.png) Important: The actions described on this support page require your organization to have the Assessments Module, which is currently in a closed Beta. Contact your Customer Success Manager for questions about the module.
Important: The actions described on this support page require your organization to have the Assessments Module, which is currently in a closed Beta. Contact your Customer Success Manager for questions about the module.
The Assessment Panel
The Assessments Panel is your central spot for managing an Item's Assessments. Its location depends on the Template configuration.
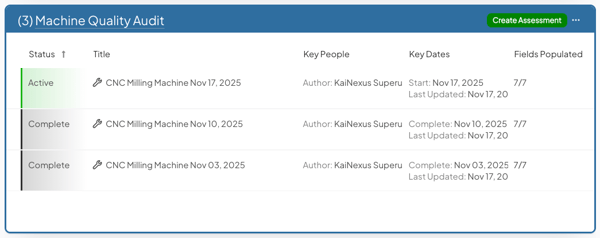
Whether the Assessments Panel appears automatically or must be added manually depends on how the Assessment is set up.
- If the Assessment is configured to auto-create on this Template, it will appear by default on new Items.
- If the Assessment is configured to be available on this Template, you must add it manually.
Pro Tip: It's possible to have multiple Assessments on the same Template. Each type of Assessment will always have its own Assessment Panel.
Who can add and remove an Item's Assessments Panel?
Who can add and remove an Assessments Panel depends on the Assessment’s configuration:
- Assessments with required System Roles or Locations: You must have the required Role(s) and/or be in the required Location.
- Assessments without specific System Role or Location requirements: You must have Edit permission on the Item.
If you can't add an Assessment, you either don't have permission to do so or the Assessment is configured to add automatically when specific conditions are met.
Pro Tip: Learn more about Assessment configuration here.
Adding an Assessments Panel
To add an Assessments Panel to an Item:
- Select the + Add button at the top of the Item.
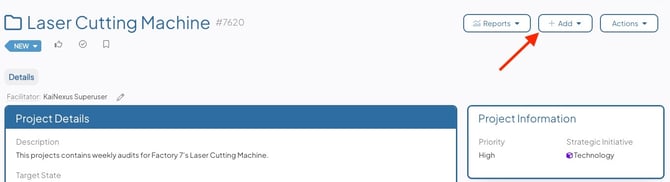
- Hover over Assessment in the resulting drop-down menu, and select the Assessment you'd like to add.
After you add the Assessment:
- The Assessment Panel will appear on the Item. Its location will depend on how the Template is configured.
- You can no longer add the Assessment to the Item (i.e., it can only be added once).
Pro Tip: If you add Assessments to a Template with a Standard Layout, the Assessment Panels will appear stacked in the order shown on the Assessments administration page. For Templates with a Custom Layout, you can customize the placement of Assessment Panels according to the Template configuration.
Delete the Assessments Panel
Assessment Panels can only be deleted when one of the following conditions is met:
-
No Assessments have been performed.
- All existing Assessments have been deleted.
When these conditions are met, users who have permission to manage an Item's Assessment Panel can delete it by following these steps:
-
Hover over the Assessment Panel, and select the ellipsis icon at the top right.
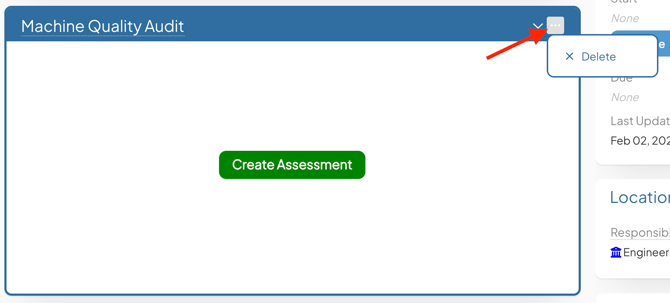
- Select Delete in the drop-down menu.
- Select I understand this cannot be undone checkbox, and select Delete.
Working with the Assessments Panel
After the Assessment Panel is added to the Item, you can:
- Perform an Assessment
- Create nested Items from an Assessment Field
- View past Assessments
- Change the Assessment Panel's view
- Open an Assessment Item
- Make the Assessment Recur
Perform an Assessment
Important: Who can perform an Assessment depends on the Assessment's configuration.
- Assessments with required System Roles or Locations: You must have the required Role(s) and/or be in the required Location.
- Assessments without specific System Role or Location requirements: You must have Edit permission on the Item.
If you can't perform an Assessment, you either don't have permission or the maximum number of Assessments has already been performed on this Item.
To perform an Assessment, locate the Assessment Panel, and:
- Select the Create Assessment button.
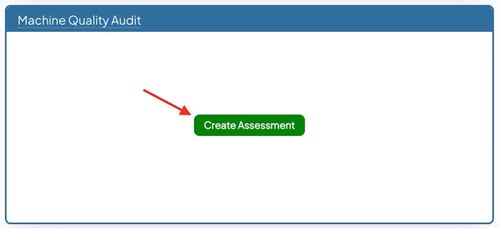
- If this is the first Assessment you are creating for this Item, the create button will appear in the center of the Panel. After the first Assessment has been performed, the button will appear in the Panel's header instead.
- If you don't see the Create Assessment option, you either don't have permission or the maximum number of Assessments has already been performed on this Item.
- The Create window for the Assessment will open. In this window:
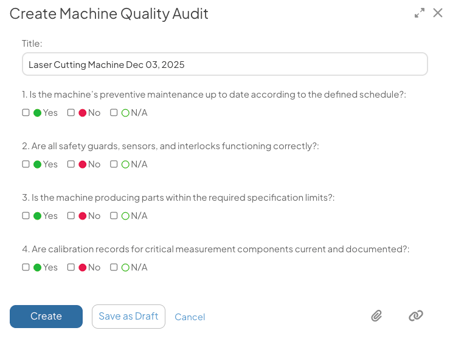
- Title: Give the Assessment Item a title. If an auto-title format was applied during the Assessment's configuration, the settings will be applied automatically.
- Assessment Fields: Different Assessments will have different required and optional fields. Add the necessary information to any Assessment Fields.
- Status & Team: Depending on the Assessment Template's configuration, you can choose the Item's Status and/or assign its Team under this header. If you do not see this section, or only see parts of it, your organization has restricted access to it.
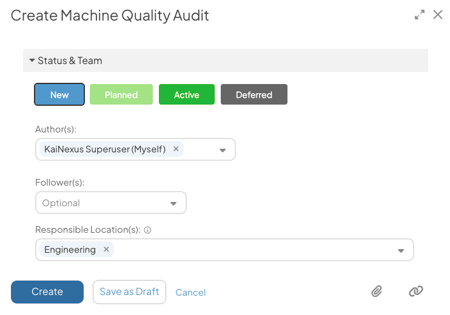
- To switch between Statuses, select the corresponding Status button. If necessary, the dates and team roles available beneath the status buttons will update to reflect the change. Fill out the required or optional information for the selected Status.
- If all but one Status button is grayed out, your organization has configured this Assessment Template so that it must be submitted in that Status.
- Use each Team Role's field to search for the people you want to add or delete existing people as necessary. Some Team Roles are single-select and some are multi-select.
- To switch between Statuses, select the corresponding Status button. If necessary, the dates and team roles available beneath the status buttons will update to reflect the change. Fill out the required or optional information for the selected Status.
- Add attachments to the Assessment Item: Click the paperclip icon in the bottom right corner of the window and select the file(s) you want to attach in the resulting screen.
- Add links to the Assessment Item: Click the link icon in the bottom right corner of the window.
- Click Create to create your new Assessment. Alternatively, you can:
- Select Save as Draft to save the Assessment in Draft Status. You will be the only person who can see the draft until you submit it.
Depending on how your organization has configured the Assessment Template, this option may not be available. - Select Complete to complete the Assessment Item at the same time of submission.
Depending on how your organization has configured Assessment Templates, this option may not be available. - Click Cancel to exit the Create window. Your work will be lost.
- Select Save as Draft to save the Assessment in Draft Status. You will be the only person who can see the draft until you submit it.
Create a nested Item from an Assessment Field
Some Assessments are configured so that selecting certain values on certain Fields prompts you to create a nested Item. When you select a value that allows nested Item creation, a Create button will appear beneath the value on the Assessment. Select Create to create the Item as usual.
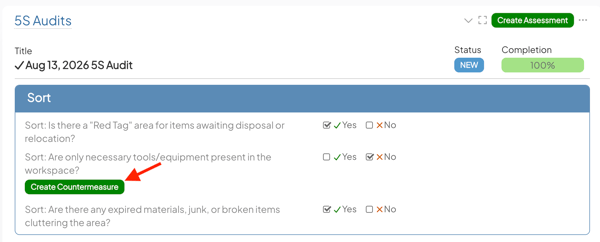
Important: Nested Item creation is configured per Assessment Field Value. For the Create button to appear, the Field Value must allow nested Item creation, a Child Template must be configured for the Assessment, and you must have permission to create Items from that Template. If a Field Value that you expect to prompt nested Item creation does not, contact your organization's KaiNexus administrators.
After you create the Item:
- It is automatically nested beneath the Assessment Item.
- The Create button is replaced by an Item tag showing the new Item's Template icon, title, and Status. Select the Item tag to open the nested Item's work panel.
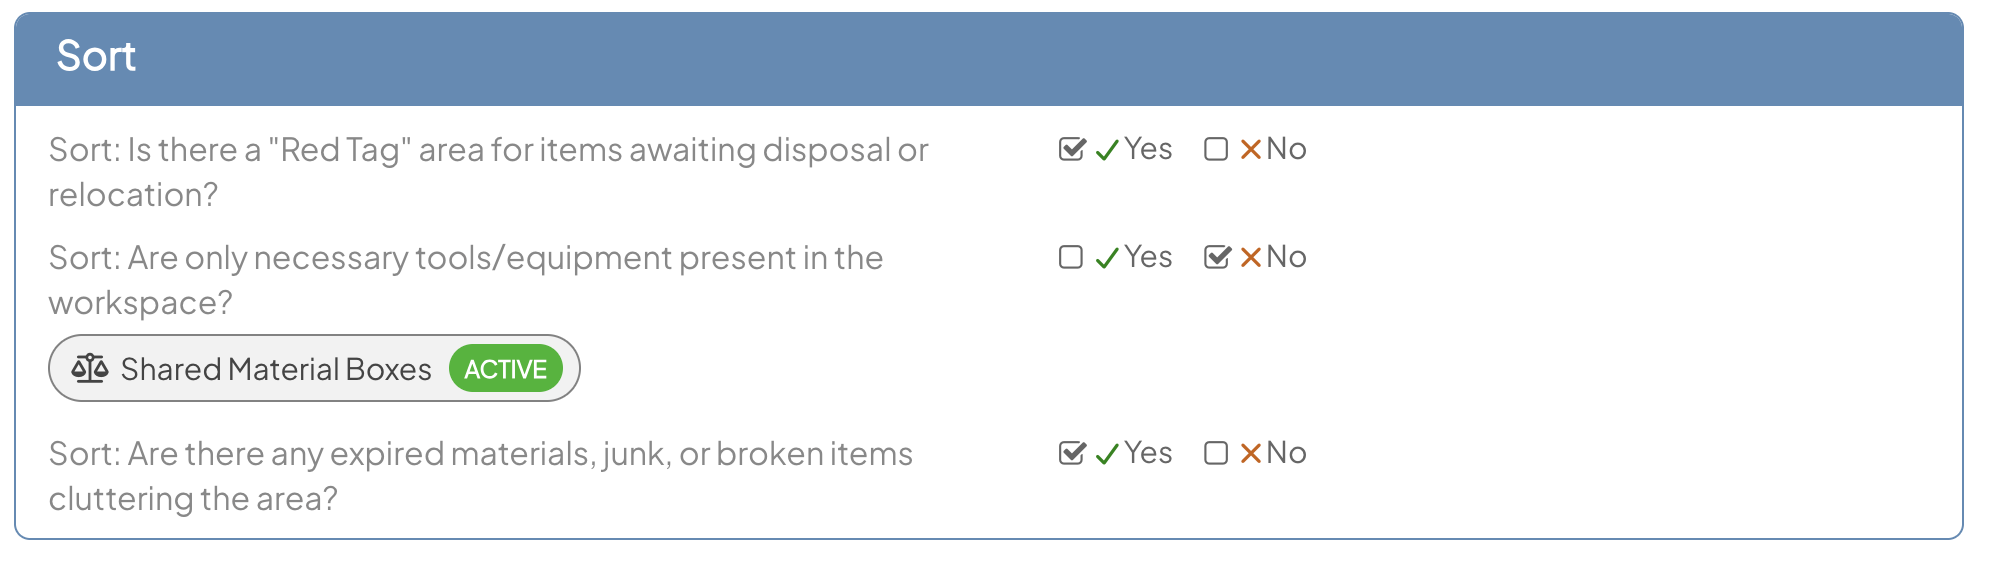
- If you later change the Field to a value that does not allow nested Item creation, the Create button or Item tag will be hidden. The nested Item is not deleted and will reappear if you change the Field back to the original value.
- If you archive the nested Item, it will continue to appear on the Assessment. If you delete the nested Item, it will disappear and the Create button will return.
On the nested Item's own work panel:
- There will be a flag at the top displaying which Assessment and value it was created from.

- Select View Assessment on this flag to open the Assessment Item it was created from. This continues to link back to the original Assessment Item even if the nested Item is later moved under a different parent.
- This flag always displays the Field value the Item was originally created from, even if that value is later changed on the Assessment.
View an Item's Assessments
Assessment Panels offer three views that allow you to view Assessments and gain insight to them: List, Detail, and Summary.
List view
List view allows you to view all Assessment Items in a list with customizable columns that showcase key details about each one.
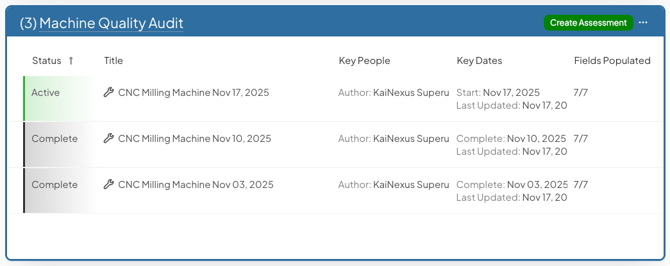
- Which columns are included can be customized in the parent Template's configuration.
- You can easily edit Assessment Items in List view by clicking on a column to update its data, or by hovering over an Assessment Item and selecting the ellipsis icon to open the Quick Edit menu. You can also right-click on the Assessment Item to see the same editing options. Learn more about editing Items in lists on this support page.
- To edit multiple Assessments at once, use Bulk Change, just as you would on a nested Item List. Bulk Change is available only when the Assessment Panel is in List view.
- Maximize List view to see Assessment Items as a full Item List, with all the familiar Item List features such as Quick Filters, the Item Filter, search, view switching, and export options.
Detail view
Detail view is a peek into the most recently added Assessment Item, letting you view high-level details about its progress and responses.
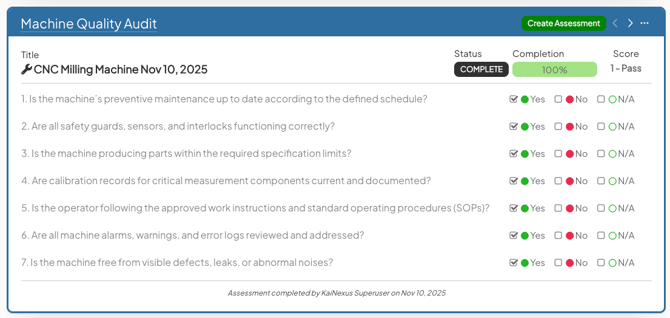
- Detail view includes:
- A header line displaying the Assessment Item's name, current Status, Completion bar, and, if Weighted Scoring is enabled, score.
- The Completion bar shows the percentage of Assessment Fields that have been filled in. Which Fields are included in this calculation is defined in the Assessment configuration. If no Fields are configured to contribute to the completion percentage, the bar does not appear.
- A header line displaying the Assessment Item's name, current Status, Completion bar, and, if Weighted Scoring is enabled, score.
-
- Each Assessment Field and its response. You can update the response to any Assessment Field by clicking it.
- A note about key people and dates for the Assessment, depending on the Assessment's Status.
- Right-click an Assessment’s title to open options to Copy Link or Open in a New Tab.
- Update an Assessment Item's Status by clicking on it.
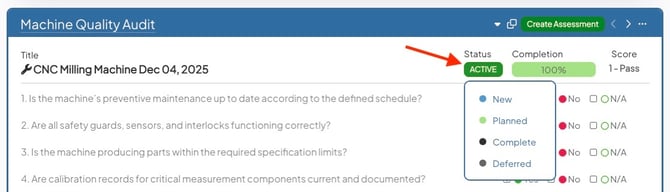
- Use the caret icons to flip through past Assessments.

- Hover over the Panel header, and select the expand icon to view the full Assessment Item being displayed.

- Edit the currently displayed Assessment by selecting the ellipsis icon and selecting Edit in the drop-down menu.
Summary view
The Summary view displays a table that compares how assessment fields were answered across multiple Assessments. This makes it easy to identify patterns and trends over time.
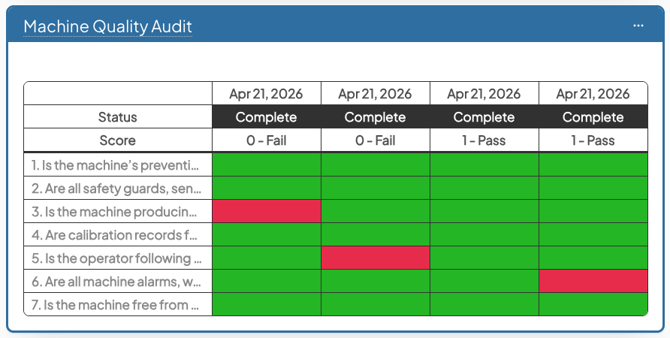
- Columns: Each column represents a single Assessment, identified by its Reference Date.
- Select a date to open the corresponding Assessment Item.
- Rows: Each row represents an Assessment Field.
- Only single-select dropdown, checkbox, and radio button fields are included.
- Multi-select and text or number fields are excluded.
- Cells: Each cell shows the selected value for that field, displayed using its associated color.
- Hover over a cell to display the name of the selected value and any associated notes.
- A maximum of 12 Assessments can be displayed at one time.
Pro Tip: The default date settings for the Assessment Panel are defined at the Template level. This includes which Reference Date is used (for example, Created, Start, or Complete Date) and the default date range shown.
You can maximize the panel to view a larger version of the Summary and adjust the timeframe.
In the maximized view: 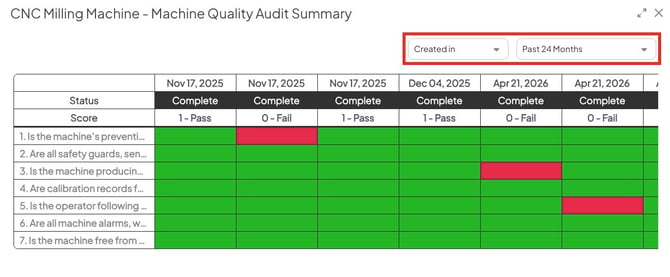
- Reference Date: Select which date is used to identify and organize Assessments. For example, choosing “Created in” will display each Assessment based on its Created Date and include it in the selected time range using that date.
Assessments without the selected Reference Date will be excluded. - Range: Select the date range to determine which Assessments are displayed.
Change the view
To switch between List, Detail, and Summary view:
- Select the ellipsis icon at the top right of the Assessments Panel.

- Hover over View, and select the view you want to see in the fly-out menu.
Open an Assessment Item
If you'd like to view more information for any Assessment Item, you can navigate to it by opening it from the Assessment Panel.
In both List and Detail view, you can open an Assessment Item by clicking on its title. 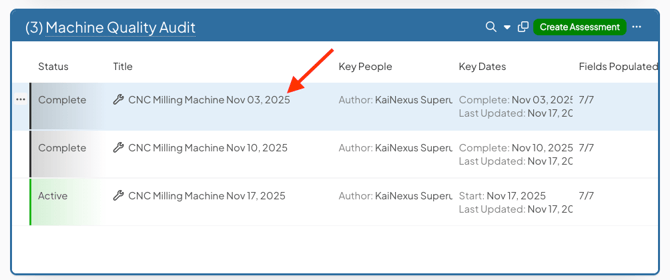
This lets you view all details about the Assessment Item, including its Status, Team, Dates, Location, files, links, and more.
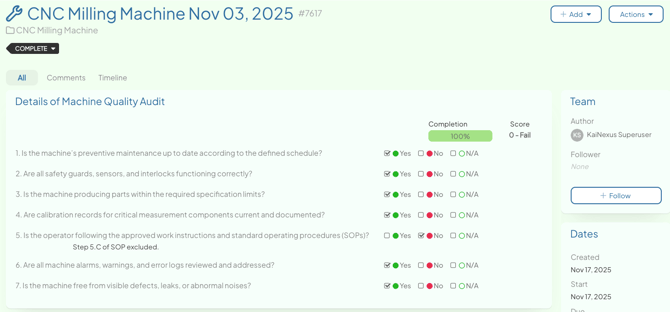
Image of an Assessment Item. Assessment Items are similar to regular Items and are always in a Standard Layout.
Pro Tip: You can edit an Assessment Item the same way you edit everyday Items in the platform. Here are some support pages if you need help knowing how to edit the Assessment Item:
Make the Assessment Recur
If your Assessments occur on a regular schedule, configure them to recur automatically so new Assessments are created for you.
To make an Assessment recur:
- Find the Assessments Panel on the parent Item containing the Assessments, and select the ellipsis icon at the top right.
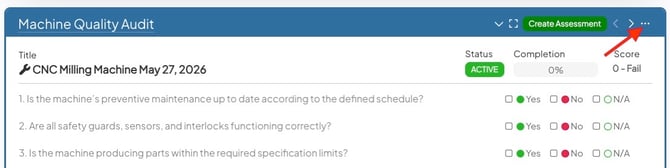
- Select Recur. The Recur window will open.
- In the Recur window:
- The Recurring checkbox: By default, this box is checked when you open the Recur screen, allowing you to configure recurrence settings. Uncheck it if you no longer want the Assessment to recur.
- Auto Title Format: Determine the naming format for the recurring Assessments.
- Leave this field blank to enter a unique title every time an Assessment is performed.
- To automatically include the name of the parent Item or Assessment Type, enter #parentName or #assessmentName.
- To automatically include the date and/or time the Assessment is performed, enter #date or #dateAndTime.
- Recurs: Use the drop-down menu to determine how often the Assessment recurs.
- Immediately: A new Assessment Item will be created in Active Status as soon as it is completed.
- Every Day: The Assessment recurs daily. A new Assessment Item will be created in Planned Status with a Start Date the next day.
- Every Weekday (Monday to Friday): The Assessment recurs on weekdays. A new Assessment Item will be created in Planned Status with a Start Date the next day, except on Fridays when the Start Date will be Monday.
- Every Week: The Assessment recurs weekly. A Day of Week field will appear, allowing you to choose the day the new Assessment Item will start.
- Every Month: The Assessment recurs monthly. A Day of Month field will appear, allowing you to choose the day the new Assessment Item will start.
- Every Quarter: The Assessment recurs quarterly. Two drop-downs will appear, allowing you to select the month (first, second, or third of the quarter) and the day of that month when the new Assessment Item will start.
- Every Year: The Assessment recurs annually. Two drop-downs will appear, allowing you to select the month and the day of that month when the new Assessment Item will start.
- Days After Complete: The new Assessment Item will be created in Planned Status and will start a set number of days after the previous Assessment Item is completed. Use the Days After Complete field to specify how many days later the Assessment should begin.
- Specific Start Time (available for all Recur options except Immediately): Select this box to set a specific time for the Item to activate. By default, the Assessment Item will activate at 12:00 AM on the scheduled Start Date.
- Due Date: Set the Due Date for the recurring Assessment. The available options depend on your chosen recurrence frequency. You can select the end of the day, week, month, quarter, or year, or choose Days to Complete to specify a number of days that will be added to the Start Date to calculate the Due Date.
- Assign To: Enter the person who will be responsible for this recurring Assessment. They will be the default Author, Assigner, and Responsible person.
- You can select any Active or Capture User that you have the ability to assign Items to.
- Ends: Determine when the Assessment will stop recurring.
- Never: The Assessment will continue to recur indefinitely.
- On: Select a specific date. The Assessment will not recur after this date.
- After: Enter the number of times the Assessment should recur. The recurrence will stop once this number is reached.
Pro Tip: Specific scenarios will automatically stop an Assessment from recurring:
- Deletion or archiving of the Assessment Item.
- The max number of Assessments for this Assessment Type has been reached.
-
- Select Save.
After you configure the Assessment to recur, there will be a recurring icon in the header of the Assessments Panel.