
The Lead Time Impact Type tracks time savings related to the total time between receiving an order and delivery.
![]() REQUIRED: To perform the functions in this support article, the Advanced ROI Module must be enabled for your organization and a Lead Time Impact Type must have been created. Reach out to your Customer Success Manager to enable the Advanced ROI Module or, if your organization is already using this Module, to create a Lead Time Impact Type.
REQUIRED: To perform the functions in this support article, the Advanced ROI Module must be enabled for your organization and a Lead Time Impact Type must have been created. Reach out to your Customer Success Manager to enable the Advanced ROI Module or, if your organization is already using this Module, to create a Lead Time Impact Type.
In the standard version of KaiNexus, Impact Types include Cost Savings, Cost Avoidance, Revenue Generation, Time Savings, Quality, Safety, Satisfaction, Health, and Environment. With the Advanced ROI Module, you gain access to additional Impact Types, including the Lead Time Impact Type.
Suppose one of your employees comes up with an idea that decreases a unit's Lead Time by 5 hours a month. That’s great, but wouldn’t it be even better to know how much money that time was worth? These soft savings can be calculated based on a list of your processes — your Lead Times —and the estimated hourly rate of each process.
With this information, when someone resolves an Item with a Lead Time Impact, you know not only how much time was saved, but how much money was saved as well.
Lead Times can be grouped under Folders for organizational purposes. These groupings will be represented in the Process drop-down when adding a Lead Time Impact to an Item's Resolution.
Who can manage Lead Times and Folders?
Anyone with the "Quality Administrator" permission can manage Lead Times and Folders.
People with other Administrator permissions may be able to access the Lead Time Administration page, but will not be able to make changes to it.
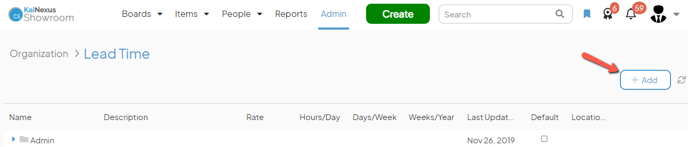
Create Lead Times and Folders
To create a new Lead Time or Folder, navigate to the Lead Time administration page, then:
- Click Add at the top of the list of Lead Times.
-
- To create a new Folder, click Create Folder in the resulting drop-down menu and the Create Folder window will open.
- Name (required): The name will be used to identify this Folder.
- Description: Enter an optional description in this field.
- Locations: Use this field to search for and select the appropriate Locations for this Folder. The selected Locations will be implicitly inherited by any Locations nested under this Folder.
- Click Save.
- To create a new Folder, click Create Folder in the resulting drop-down menu and the Create Folder window will open.
-
- To create a new Lead Time, click Create Lead Time in the resulting drop-down menu and the Create Lead Time window will open.
![]() PRO TIP: To create a new Lead Time and have it automatically nested under an existing Folder, first click the Folder in the list of Lead Times so that it's highlighted, then click Add, and then click Create Lead Time.
PRO TIP: To create a new Lead Time and have it automatically nested under an existing Folder, first click the Folder in the list of Lead Times so that it's highlighted, then click Add, and then click Create Lead Time.
-
-
- Name (required): The name will be used to identify this Lead Time.
-
-
-
- Description: Enter an optional description in this field. The description will appear when hovering over the Lead Time's name in the list of Lead Times.
- Rate: Enter the estimated hourly rate for this Lead Time. This value will be used to calculate the financial impact of any time saved for this type of process.
- Currency: This option is only available if your organization has the Advanced ROI module enabled and is using multiple currencies. Expand the drop-down to select the currency that this type of process uses.
- The Default checkbox: When this checkbox is enabled, this Lead Time will be selected by default whenever someone goes to record a Lead Time Impact, though they will be able to change that selection if necessary.
Only one Lead Time can be selected as the default. - Locations: Use this field to search for and select the appropriate Locations for this Lead Time.
The Location(s) entered here, as well as the Locations entered for the Folder under which this Lead Time is nested, if any, will determine for which users and Items this Lead Time will be available. When resolving an Item with a Lead Time Impact, a user will only be able to add a Lead Time that has no associated Locations, that is in their Location or below, or that is in the Item's Responsible or Originating Locations or below. - The Advanced section:
- Hours/Day: Enter the number of hours per day this process runs. This value will be used to calculate the financial impact of any time saved for this process.
- Days/Week: Enter the number of days per week this process runs. This value will be used to calculate the financial impact of any time saved for this process.
- Weeks/Year: Enter the number of weeks per year this process runs. This value will be used to calculate the financial impact of any time saved for this process.
- Click Save.
-
- Click and drag the Lead Time into the proper position on the list or into (or out of) a folder if necessary.
Edit a Lead Time or Folder
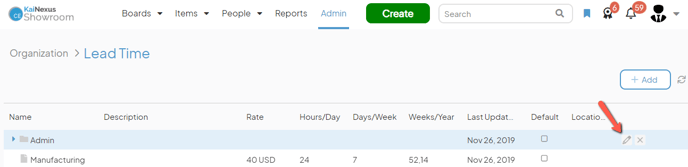
To edit a Lead Time or Folder, navigate to the Lead Time administration page, then:
- Hover over the Lead Time or Folder you want to edit so that it's highlighted blue, then click the pencil icon that appears to its right.
-
- If editing a Folder, the Edit Folder window will open. Update the following information as necessary:
- Name (required): The name will be used to identify this Folder.
- Description: Enter an optional description in this field.
- Locations: Use this field to search for and select the appropriate Locations for this Folder. The selected Locations will be implicitly inherited by any Locations nested under this Folder.
- Click Save.
- If editing a Lead Time, the Edit Lead Time window will open. Update the following information as necessary:
- Name (required): The name will be used to identify this Lead Time.
- Description: Enter an optional description in this field. The description will appear when hovering over the Lead Time's name in the list of Lead Times.
- Rate: Enter the estimated hourly rate for this Lead Time. This value will be used to calculate the financial impact of any time saved for this type of process.
- Currency: This option is only available if your organization has the Advanced ROI module enabled and is using multiple currencies. Expand the drop-down to select the currency that this type of process uses.
- The Default checkbox: When this checkbox is enabled, this Lead Time will be selected by default whenever someone goes to record a Lead Time Impact, though they will be able to change that selection if necessary.
Only one Lead Time can be selected as the default. - Locations: Use this field to search for and select the appropriate Locations for this Lead Time.
The Location(s) entered here, as well as the Locations entered for the Folder under which this Lead Time is nested, if any, will determine for which users and Items this Lead Time will be available. When resolving an Item with a Lead Time Impact, a user will only be able to add a Lead Time that has no associated Locations, that is in their Location or below, or that is in the Item's Responsible or Originating Locations or below. - The Advanced section:
- Hours/Day: Enter the number of hours per day this process runs. This value will be used to calculate the financial impact of any time saved for this process.
- Days/Week: Enter the number of days per week this process runs. This value will be used to calculate the financial impact of any time saved for this process.
- Weeks/Year: Enter the number of weeks per year this process runs. This value will be used to calculate the financial impact of any time saved for this process.
- Click Save.
- If editing a Folder, the Edit Folder window will open. Update the following information as necessary:
Organize the list of Lead Times
Lead Times can be nested under Folders. Folders and Lead Times are otherwise automatically alphabetized in the list.
To move a Lead Time in or out of a Folder, navigate to the Lead Time administration page. Next, locate the Lead Time you want to move, then click and hold its name and drag and drop it to its new position. A dashed line will appear in its new position before you release it. Dropping a Lead Time directly onto a Folder will nest it under that Folder.
Delete a Lead Time or Folder
![]() CAUTION: When you delete a Lead Time or Folder, it is permanently removed from KaiNexus and cannot be recovered.
CAUTION: When you delete a Lead Time or Folder, it is permanently removed from KaiNexus and cannot be recovered.
What happens when a Lead Time or Folder is deleted?
- Deleted Lead Times that have already been added to an Item's Resolution will remain in place and continue to contribute to the organization's metrics until that Resolution is next updated, at which point they will need to be replaced.
- Deleted Lead Times and Folders will no longer appear when working with Items' Resolutions or filtering Item Lists or Reports.
Delete a Lead Time or Folder
![]() Folders containing nested Lead Time can not be deleted. You will need to move any Lead Times out of the folder before proceeding.
Folders containing nested Lead Time can not be deleted. You will need to move any Lead Times out of the folder before proceeding.
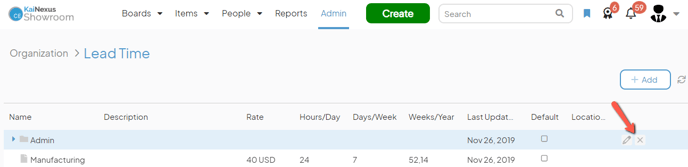
To delete a Lead Time or Folder, navigate to the Lead Time administration page, then:
- Hover over the Lead Time or Folder you want to delete so that it's highlighted blue, then click the x icon that appears to its right.
- In the resulting confirmation window, click Delete.