
 REQUIRED: The Escalation Module must be enabled for your organization and Escalation must be enabled on your Item to perform the functions on this support page. Reach out to your Customer Success Manager to enable Escalation.
Escalations are put in place to efficiently move issues up to a higher level to solve a problem and to ensure everyone understands the scope of their own authority through a clear process.
Who can escalate an Item?
To escalate an Item, you must have permission to view and edit it.
Only the following people can view an Item:
- Anyone on the Item's Team.
- Potentially anyone on the parent's Team.
- If the Item is not private and not in the New status, anyone with the "View" permission for Items in its Location(s).
- If the Item is private, anyone with the "View Private" permission for Items in its Location(s).
- If the Item is in the New status and is not private, anyone with the "View New" permission for Items in its Location(s).
Only the following people can edit an Item:
- Anyone on the Item's Team except for Followers or Participants.
- Anyone with the "Edit" permission for Items in this Location(s).
- Anyone with the "Assign (Which Items)" permission for Items in this Location(s).
Pro Tip: For more information on Team Roles (like Authors, Facilitators, Participants, and more!) check out this article.
Anyone with the "Escalation" permission for Items in this Location will be able to escalate or deescalate to or from any of the Escalation Tiers that are configured on this Item.
Escalate an Item
Note: Escalation is highly customizable. Certain options may not be enabled or may be grayed out based on your permissions or an Escalation Tier's configuration. If you need help troubleshooting, reach out to your Customer Success Manager.
To escalate an Item, open the Item with which you want to work, then:
- Click Actions in the top right corner of the page.
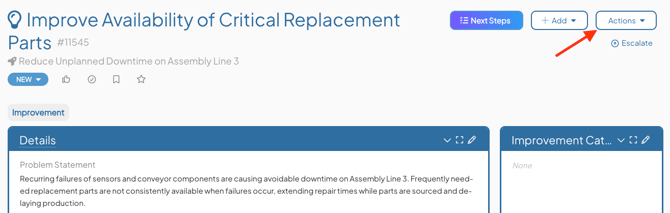
- Click Escalate in the resulting drop-down menu and the Item's "Escalate" window will open.
- Reason for Escalation (required): Enter an explanation as to why you're escalating the Item. The explanation will be added to the Item as a comment.
- Escalate To: Expand the drop-down to choose to which tier you want to escalate this Item. These tiers have been configured by your organization so they'll be unique to your organization, but there are three types: Location Tiers, Role Tiers, and User Tiers.
-
Location Tiers: Escalate the Item to one or more Locations. Escalating an Item to a Location marks that Location as the escalation target, allowing users to filter for Items escalated to their Location and displaying the Location in the escalation flag at the top of the Item.
Escalating an Item to a Location does not transfer the Item to that Location or give users there additional access. It also does not automatically send a notification unless they have a Notification Preference configured for escalations.
- Location(s): Use this field to search for and select the Location(s) to which this Item should be escalated. The presence and default selection is determined by the Escalation Tier's configuration. If the Escalation Tier has been configured such that your Item must be escalated to a particular Location, this field will be grayed out and uneditable.
-
User Tiers: Escalate the Item to one or more users. Escalating an Item to a user marks that user as the escalation target, allowing users to filter for Items escalated to them and displaying their name in the escalation flag at the top of the Item.
Escalating an Item to a user does not change the Item's Team or give that user additional access. It also does not automatically send them a notification unless they have a Notification Preference configured for escalations.
- User(s): Search for and select the user(s) to whom the Item should be escalated. Whether this field appears and which users are selected by default depends on the Escalation Tier's configuration. If the Escalation Tier requires escalation to a specific user, this field is grayed out and cannot be changed.
-
Role Tiers: Escalate the Item to one or more System Roles. Escalating an Item to a Role marks that Role as the escalation target, allowing users to filter for Items escalated to their Role and displaying the Role in the escalation flag at the top of the Item.
Escalating an Item to a Role does not change the Item's Team or give users with that Role additional access. It also does not automatically send them a notification unless they have a Notification Preference configured for escalations.
- Role(s): Use this field to search for and select the Role(s) to which this Item should be escalated. The presence and default selection is determined by the Escalation Tier's configuration. If the Escalation Tier has been configured such that your Item must be escalated to a particular Role, this field will be grayed out and uneditable.
-
- Click Escalate.
Who is Notified after an Escalation?
When an Item is escalated:
- A flag will appear at the top of the Item. It will show who escalated the Item, when the escalation occurred, and the Escalation Tier.
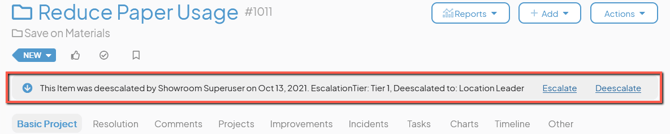
- You might be able to escalate the Item further or deescalate it by selecting Escalate or Deescalate on the flag. Your ability to do this will depend on your permissions and the Escalation Tier's configuration.
- Everyone on the Item's Team will receive an in-app notification that the Item has been escalated.
Individual Users, System Roles, and Locations will not automatically receive a notification that an Item has been escalated to them. Instead, Users should configure custom Notification Preferences if they want to receive in-app or email notifications about escalations.