
/Ofie/Ofie%20Profile%20Pic.png?width=50&height=50&name=Ofie%20Profile%20Pic.png) Important: The actions described on this support page require the Assessments Module, which is currently in a closed Beta. Contact your Customer Success Manager for questions about the module.
Important: The actions described on this support page require the Assessments Module, which is currently in a closed Beta. Contact your Customer Success Manager for questions about the module.
As your processes change, so might your Assessments. This support page will cover:
- Who can edit an Assessment's Fields and Sections?
- Edit a Field on an Assessment
- Configure the values for an Assessment Field
- Make Assessment Fields conditional
- Edit an Assessment's Sections
- Change the order of an Assessment's fields
Pro Tip: Need to edit settings for the Assessment itself? Check out the Edit an Assessment support page.
Who can edit an Assessment's Fields?
Anyone with the "Quality Admin" System Role Permissions can manage an Assessment's Fields and Sections, which includes adding new Fields, editing values of drop-downs, checkboxes, and radio buttons, adding conditional logic, changing the order of Fields, and editing Sections.
Edit a field on an Assessment
To edit an Assessment's Fields, navigate to the Assessments administration page, and select the name of the Assessment. This will open the Assessment's individual administration page, including all its current fields.
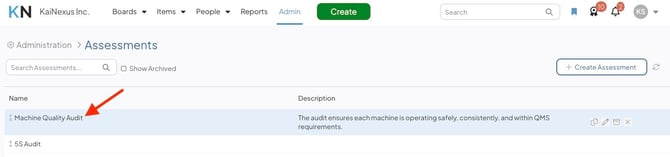
Once you've opened the Assessment's individual administration page:
- Hover over the field you'd like to edit, and select the pencil icon.
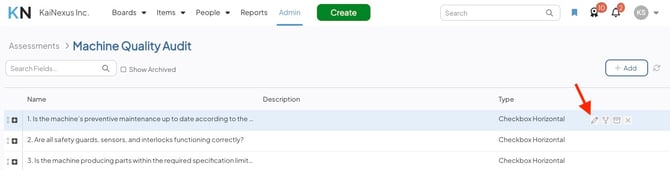
- In the Edit Field window:
- Name: Enter a name for the field. This is the prompt that will be presented to users filling out the Assessment.
- If this field is used in another Assessment Type, a warning will appear at the bottom of the window. It reminds you that changing the field’s name here will also update it in all other Assessments where the field is used.
- Description: Enter an optional description. This description will appear in the "Description" column on the Assessment's individual admin page.
- Type: Specify the type of Field. Your options will be limited based on the Assessment Field's current type.
- If your Field is a Text Field, Text Area, File Field, Number Field, Date Field, or Date Time Field, you cannot edit the Type.
- If your Field is a dropdown, checkbox, or radio button, you can switch it between any of these types.
- Required: Specify whether filling out this Field is required to submit, assign, or complete the Assessment.
- No: The Assessment Field will be optional on this Assessment Type.
- To Create: The Assessment Field will be required to submit this Assessment Type.
- To Assign: The Assessment Field will be required before this Assessment Type can be moved to Active Status and assigned to a Responsible Team Role.
- To Complete: The Assessment Field will be required before this Assessment Type can be moved to Complete Status.
- Show On: Specify on which Status transition screens the Assessment Field appears. Some options may be required, depending on when the Assessment Field must be filled out.
- Create: Select this checkbox to display the Assessment Field on the Create screen when a user is submitting an Assessment.
- Assign: Select this checkbox to display the Assessment Field on the Assign screen when a user is activating an Assessment and assigning it to a Responsible Team Role.
- Complete: Select this checkbox to display the Assessment Field on the Complete screen when a user is completing an Assessment.
- Name: Enter a name for the field. This is the prompt that will be presented to users filling out the Assessment.
-
- If your selected Field Type is dropdown, checkbox, or radio button:
- Selection: Determine whether users can only select a single value or if they can respond with multiple values.
- If the field uses an Attribute Value Group, you will see which group is being utilized, but you cannot change it. If the values need to be updated, contact your Customer Success Manager for help updating the Attribute Value Group.
- If your selected Field Type is dropdown, checkbox, or radio button:
- Expand the Additional header to configure the following options:
- If your selected Field Type is dropdown, checkbox, or radio button:
- The Hide Value Name checkbox: When enabled, the names of this Assessment Field's Values will not appear on Item work panels or Item Lists. Instead, only their icons will be visible.
- Note Label: If notes are enabled on any of this Assessment Field's values, the text entered in this field will be displayed as the title of the note field. If left blank, the title will be "Note."
Custom Note labels configured on the individual values will override the text entered here. - Note Type: Choose how users provide notes for this Assessment Field's values. Select Text Area to allow free-text notes or File Field to request a file upload instead.
- Changing the Note Type does not convert existing note data. If you switch from Text Area to File Field, existing text notes are retained until a file is uploaded. If you switch from File Field to Text Area, any attached files remain on the Item and their file IDs are displayed in the note field.
- If your selected Field Type is dropdown, checkbox, or radio button:
-
-
- The Show Value in List checkbox: This option only appears if Weighted Scoring is enabled for this Assessment. If selected, the total weight of the Assessment Field Value will be displayed when viewing a column for this Assessment Field in List, Tree, and Gantt View.
- The Set Default Value checkbox: When enabled, an additional drop-down appears where you can select a value to automatically populate the Assessment Field whenever a new Assessment is created. If not enabled, the field will remain blank until a user enters a value.
- Enabling this option does not prevent users from changing the value.
- If no values have been created for this Assessment Field yet, there will be no options to select as a default. You’ll need to create the values first and then set the default later.
- The Label Align Top checkbox: When enabled, the Assessment Field's name will appear above the field on the Assessment Panel. When disabled, the name will appear to the left of the field. Placing the label on the left also gives you an option to set the label width:
- Label Width: Enter a numerical value to specify how many pixels wide this Assessment Field's label should be on the Assessment Panel. For example, if the name of your Assessment Field is a long question, then you may want to set a wider Label Width to give the field's name more room before it starts wrapping.
-
-
-
- The Complete % checkbox: When enabled, this Assessment Field will contribute to the Assessment’s completion percentage, which measures how fully the Assessment is filled out by dividing the number of fields with values by the total number of fields. This option is selected by default, but you can uncheck it if you don’t want this field to count toward completion.
- If your selected Field Type is Text Field or Text Area:
- Min and Max: Enter the minimum and maximum number of characters that can be entered into this Field.
- Placeholder - Create/Edit: Enter the text that should be displayed on the Create and Edit windows when this Field is empty.
- Placeholder - Work Panel: Enter the text that should be displayed on the Item work panel when this Field is empty.
- Regex (Text Fields Only): Enter the format in which data must be entered into this Text Field using regex.
- Regex Invalid Text (Text Fields Only): By default, if a user enters a value that does not match the regex format, they'll see the warning "The value in this field is invalid." This is likely not enough information for frontend users, so it is helpful to enter a customized warning message into the Regex Invalid Text field that explains the correct format in human language (rather than regex code).
- The Set Default Value checkbox: Check this box if this field should have a default value; uncheck this checkbox to stop using a default value that has already been configured. When enabled, the Lock Value checkbox will appear to its right and the Default Value text area will appear below it.
- The Label Align Top checkbox: When enabled, the Assessment Field's name will appear above the field on the Assessment Panel. When disabled, the name will appear to the left of the field. Placing the label on the left also gives you an option to set the label width:
- Label Width: Enter a numerical value to specify how many pixels wide this Assessment Field's label should be on the Assessment Panel. For example, if the name of your Assessment Field is a long question, then you may want to set a wider Label Width to give the field's name more room before it starts wrapping.
-
-
-
- The Complete % checkbox: When enabled, this Assessment Field will contribute to the Assessment’s completion percentage, which measures how fully the Assessment is filled out by dividing the number of fields with values by the total number of fields. This option is selected by default, but you can uncheck it if you don’t want this field to count toward completion.
- If your selected Field Type is a File Field:
- Allow Multiple Files: When enabled, users can upload multiple Files to this field instead of only one.
- Placeholder - Work Panel: Enter the text that should be displayed on the Item work panel when this Field is empty.
- The Label Align Top checkbox: When enabled, the Assessment Field's name will appear above the field on the Assessment Panel. When disabled, the name will appear to the left of the field. Placing the label on the left also gives you an option to set the label width:
- Label Width: Enter a numerical value to specify how many pixels wide this Assessment Field's label should be on the Assessment Panel. For example, if the name of your Assessment Field is a long question, then you may want to set a wider Label Width to give the field's name more room before it starts wrapping.
-
-
-
- Complete %: When enabled, this Assessment Field will contribute to the Assessment’s completion percentage, which measures how fully the Assessment is filled out by dividing the number of fields with values by the total number of fields. This option is selected by default, but you can uncheck it if you don’t want this field to count toward completion.
- If your selected Field Type is Number Field:
- Format: Enter the numeric format that should be used when displaying values added to this Field on Items and Item Lists. This format will also be used for the Total and Average on Item Lists.
Zeroes are used to denote the required number of decimal places, while the pound sign is used to represent optional digits. Other special characters will appear in the specified place.
There's no way to configure a Number Field to use periods as the thousands operator or commas as the decimal separator. - Min and Max: Enter a (non-negative) numerical value to specify the lowest and highest numbers that can be entered into this Field.
- The Allow Decimals checkbox: When enabled, decimals included in this Number Field will be displayed on the Item work panel and on Item Lists.
When disabled, if users enter a decimal into this Number Field, the value will appear rounded to the nearest whole number on the Item work panel and on Item Lists.- The Format configuration overrides the Allow Decimals checkbox, so make sure these settings are configured in a way that makes sense.
- The Label Align Top checkbox: When enabled, the Assessment Field's name will appear above the field on the Assessment Panel. When disabled, the name will appear to the left of the field. Placing the label on the left also gives you an option to set the label width:
- Label Width: Enter a numerical value to specify how many pixels wide this Assessment Field's label should be on the Assessment Panel. For example, if the name of your Assessment Field is a long question, then you may want to set a wider Label Width to give the field's name more room before it starts wrapping.
- Format: Enter the numeric format that should be used when displaying values added to this Field on Items and Item Lists. This format will also be used for the Total and Average on Item Lists.
-
-
-
- The Complete % checkbox: When enabled, this Assessment Field will contribute to the Assessment’s completion percentage, which measures how fully the Assessment is filled out by dividing the number of fields with values by the total number of fields. This option is selected by default, but you can uncheck it if you don’t want this field to count toward completion.
- If your selected Field Type is Date or Date Time Field:
- The Allow Past Dates checkbox: When enabled, users can select dates in the past. When not enabled, users can only select today's date or a date in the future.
- The Label Align Top checkbox:
- The Complete % checkbox: When enabled, this Assessment Field will contribute to the Assessment’s completion percentage, which measures how fully the Assessment is filled out by dividing the number of fields with values by the total number of fields. This option is selected by default, but you can uncheck it if you don’t want this field to count toward completion.
-
- Select Save.
Important: When you edit an Assessment Field, the changes apply to both existing and new Assessment Items. In contrast, if you archive or delete a field, the change only affects new Assessment Items and ones remain unchanged. If you want to update a question without affecting past Assessments, it’s often better to archive the old question and create a new one.
Configure values for Assessment Fields
If your Assessment Field Type is any of the following and does not use a Shared Value Group, you will need to configure the values for the Assessment Field:
- Dropdown
- Checkbox Horizontal
- Checkbox Vertical
- Radio Horizontal
- Radio Vertical
For these types of Fields, there will be a + icon to the left of the Field. Select it to view existing values.
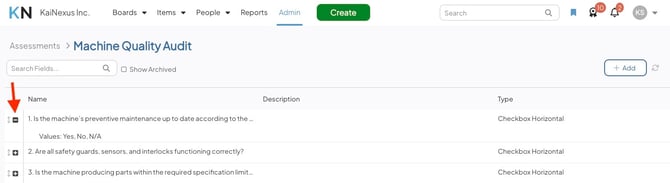
To add new values to the Assessment Field, select its name. This will open the administration page for the individual Assessment Field.
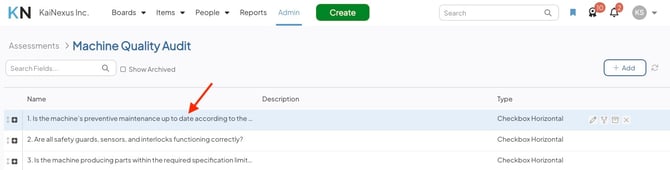
Here, you can add and manage the values, including setting weights if your Assessment uses Weighted Scoring. This page works the same as Attribute Value configuration, so check out the follow support pages to learn how to customize the values for an Assessment Field:
- Create an Attribute Value or Folder
- Edit an Attribute Values or Folder
- Delete an Attribute Value or Folder
- Archive an Attribute Value or Folder
If your Assessment allows child Item creation, you can choose which Field Values prompt users to create a nested Item when selected. To enable this, select the Allow Nested Item Creation checkbox when creating or editing the Field Value.
Make Assessment Fields conditional
You can make any Assessment Field conditional, which means it will only appear when certain criteria are met. Conditions can be based on:
-
Other fields within the same Assessment. For example, depending on how someone answers one field, an additional field may appear or stay hidden.
- The Assessment's Originating or Responsible Location.
To make an Assessment Field conditional, navigate to the Assessments administration page, and select the name of the Assessment you want to add fields to. This will open the Assessment's individual administration page. 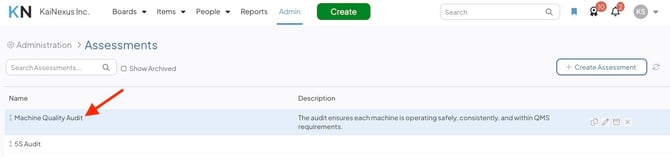
Hover over the Assessment Field you want to make conditional, then:
- Select the branching logic icon.
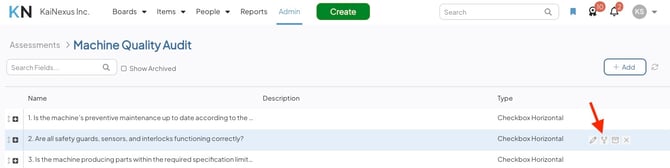
- In the Edit Conditional Logic window, you can create one or more conditions that must be met for the Assessment Field to appear.
- Field Rules: In this section, you'll create rules that trigger the Field based on another Field on the Assessment Item.
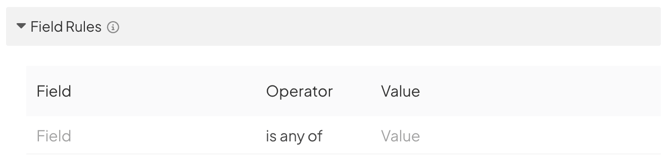
- Field: Select an Assessment Field to build this condition around. Only Assessment Fields with defined values (drop-downs, checkboxes, and radio buttons) will be available.
- Operator: Expand this drop-down and choose between the following options.
- Is all of: With this configuration, the defined Assessment Field must be assigned all of the selected values for this condition to be met.
- Is any of: With this configuration, the defined Assessment Field must be assigned one or more of the selected values for this criteria to be met.
- Value: Expand this drop-down to choose the values(s) that should trigger this Assessment Field being added to an Item. No values will be listed in the drop-down until an Assessment Field has been added to the Field field.
- Location Rules: In this section, you'll create rules that trigger the Field based on the Assessment Item's Originating or Responsible Location.
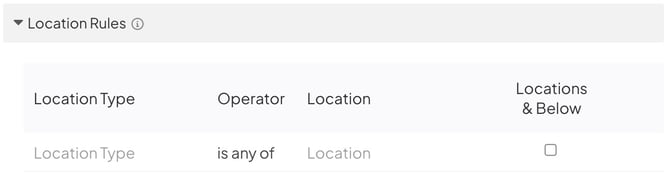
- Location Type: Expand this drop-down to choose the Location Type that should trigger this Field being added to the Item. Your options are Originating Location or Responsible Location.
- Operator: Expand this drop-down and choose between the following options.
- Is all of: With this configuration, the selected Location Type must have all of the following Locations for this rule to be met.
- Is any of: With this configuration, the selected Location Type can have any of the following Locations for this rule to be met.
- Field Rules: In this section, you'll create rules that trigger the Field based on another Field on the Assessment Item.
-
-
- Location: Expand this drop-down to choose the Locations that should trigger this Field being added to an Item.
- Location & Below: When selected, each Location in the rule also includes all Locations nested beneath it. This means an Assessment Item can match the rule even if it is tagged with a nested Location instead of the exact Location specified in the rule.
- If the rule uses Is all of, enabling Location & Below does not require an Assessment Item to be tagged with every nested Location. The Assessment Item only needs to match each selected Location or one of its nested Locations.
-
-
- To add another condition, hover over any existing condition, and select the + icon.
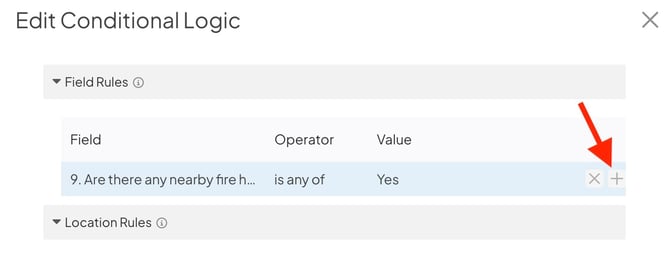
- A new row will appear where you can build another rule. You can repeat this action as many times as necessary.
- All conditions must be met for this Assessment Field to appear.
- To remove a condition, hover over any existing condition, and select the x icon.
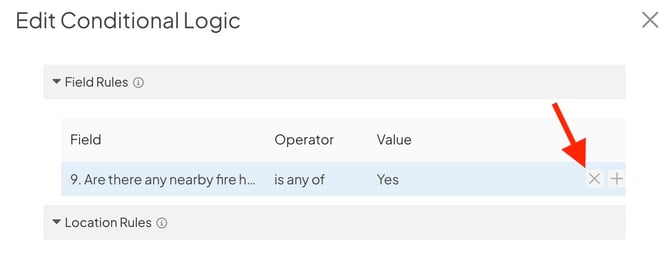
- To add another condition, hover over any existing condition, and select the + icon.
- Select Save.
After applying conditional logic to an Assessment Field, a blue branching logic icon will appear to indicate that the Field is conditional.
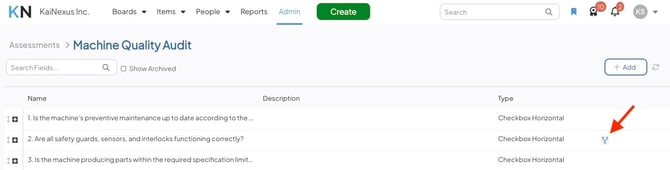
Pro Tip: Be careful when creating conditional fields. If a field’s conditions aren’t met and it doesn’t appear on the Item, but it’s set to count toward the Assessment’s completion percentage, it will still be counted as unfilled. This can affect the Assessment’s Complete % even though the field isn’t visible.
Edit an Assessment's Sections
Assessments, audits, and checklists often organize related questions into categories. For example, a 5S audit might group questions under Sort, Set in Order, Shine, Standardize, and Sustain.
Sections allow you to organize Assessment Fields in the same way by grouping related Fields under a titled, colored header. Sections are purely organizational and do not affect how Fields behave. They simply make Assessments easier to read and complete by breaking them into logical groups.
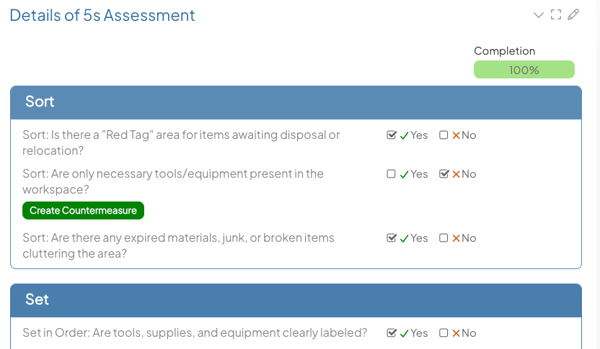
To edit a Section, navigate to the Assessments administration page, and select the name of the Assessment. This will open the Assessment's individual administration page, including all its current fields and sections.
- Hover over the Section you'd like to edit. This will cause action icons to appear.
- Select the pencil icon.
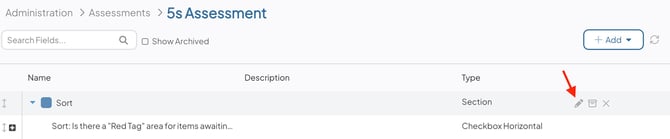
- This opens the same Edit Section window used to create the Section, pre-filled with its current Name, Description, and Color. Update any of these fields as needed.
- Select Save.
Reorder Assessment Fields and Sections
You can reorder Assessment Fields and Sections using drag and drop. Assessment Fields can also be moved into or out of Sections.
To reorder Assessment Fields and Sections, navigate to the Assessments administration page and select the Assessment you want to modify. This will open the Assessment's administration page.
To reorder an Assessment Field or move it into a Section:
- Hover over the Assessment Field you want to move. The row will be highlighted in blue.
- Click and hold anywhere on the row, then drag the Field to its new position. A green line will indicate where the Field will be placed when you release it.
- To move a Field into a Section, drag it onto the Section name.
- Repeat as needed until the Fields are arranged as desired.
To reorder Sections:
- Click and hold a Section, then drag it to a new position. A green line will indicate where the Section will be placed when you release it.
- Any Assessment Fields within the Section will move with it.