
A Field is a free space allocated for users to capture and record information on Items within KaiNexus. For more information on the different types of Fields, check out this support article.
/Ofie/Ofie%20Profile%20Pic.png?width=50&height=50&name=Ofie%20Profile%20Pic.png) Important: New Fields can only be created by KaiNexus staff. If you need a new Field added to your system, contact your Customer Success Manager for assistance.
Important: New Fields can only be created by KaiNexus staff. If you need a new Field added to your system, contact your Customer Success Manager for assistance.
Who can edit a Field?
Anyone with the Quality Admin permission can edit Fields.
People with other admin permissions may be able to access the Fields Administration page, but will not be able to make changes to it.
Edit a Field
To edit a Field:
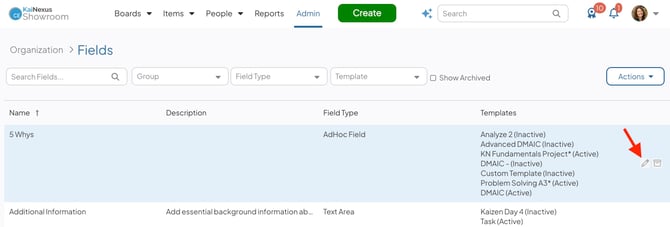
- Navigate to the Fields administration page.
- Hover over the Field you want to update, and select the pencil icon that appears to its right.
In the Edit Field window:
- Name (required): The name will be used to identify this Field. Ensure the Field has a unique name. If you try to save a Field with the same name and type as an existing Field, you'll receive an error.
- Description: Enter an optional description in this field. This description will only appear in the "Description" column on the Fields administration page.
- Type: This option displays the Field's type and will be locked and uneditable. For more information on the different types of Fields, check out this support article.
- The Text Field Format checkbox (Header Fields only): When enabled, this Header Field will be formatted like the label on a regular Field. When disabled, this Header Field will appear on Item work panels with a gray background.
- Format (Number Fields only): Enter the numeric format that should be used when displaying values added to this Field on Items and Item Lists. This format will also be used for the Total and Average on Item Lists.
Zeroes are used to denote the required number of decimal places, while the pound sign is used to represent optional digits. Other special characters will appear in the specified place.
- For example, if a user enters "1234.56" into this Field on an Item:
- If Format is blank, the value will be displayed as "1,234.56", adding a thousands separator but otherwise matching the user's input.
- If Format is set to "$#", the value will be displayed as "$1235", rounding to the nearest whole number because there are no optional or required decimal places and adding a dollar sign. A thousands separator will not be added because one was not included in the format.
- If Format is set to "#,#.##0%", the value will be displayed as "1,234.560%", adding a zero to meet the requirement for a third decimal place, a percentage sign, and a thousands separator.
- There's no way to configure a Number Field to use periods as the thousands operator or commas as the decimal separator.
- For example, if a user enters "1234.56" into this Field on an Item:
- Allow Decimals (Number Fields only): When enabled, decimals included in this Number Field will be displayed on the Item work panel and on Item Lists.
When disabled, if users enter a decimal into this Number Field, the value will appear rounded to the nearest whole number on the Item work panel and on Item Lists.
Pro Tip: The Format configuration takes priority over the Allow Decimals checkbox. Make sure that these settings are configured in a way that makes sense.
For example:
- If the Format is set to "#.00", values will be displayed with two decimal places, even if Allow Decimals is disabled.
- If the Format is set to "#", values will be displayed without decimal places, even if Allow Decimals is enabled.
- Show Total (Number Fields only): When enabled, if this Number Field is added as a column on an Item List, the total value for all Items in the List will appear at the bottom of the List.
- Show Average (Number Fields only): When enabled, if this Number Field is added as a column on an Item List, the average value for all Items in the List will appear at the bottom of the List.
- Allow Multiple Files (File Fields only): When enabled, users can upload multiple Files to this field instead of only one.
- Click Save. You may need to log out and back in to see your changes take effect throughout the rest of the system.