
/Ofie/Ofie%20Profile%20Pic.png?width=50&height=50&name=Ofie%20Profile%20Pic.png) Important: The actions described on this support page require your organization to have the Assessments Module, which is currently in a closed Beta. Contact your Customer Success Manager for questions about the module.
Important: The actions described on this support page require your organization to have the Assessments Module, which is currently in a closed Beta. Contact your Customer Success Manager for questions about the module.
Assessments are a group of customizable fields that you can add to Items to perform regular audits or checklists.
This support page will discuss how to create Assessments, including:
After you create the Assessment, you will add Fields to it to complete your custom form.
Who can create a new Assessment?
Anyone with the "Quality Admin" System Role Permissions can view the Assessments Administration page and create new Assessments.
Create an Assessment
Important: Your organization has a maximum number of Assessment Types it can create. Once you reach that limit, you won’t be able to create new Assessments unless you archive or delete existing ones. If you’re unsure how many Assessments you have remaining, please contact your Customer Success Manager.
To create a new Assessment, go to the Admin section and navigate to the Assessments administration page.

This page will contain a list of existing Assessments. To create a new Assessment:
- Select Create Assessment.
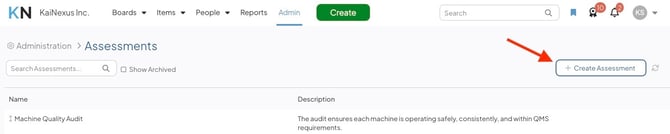
- In the Create Assessment window:
- Name (required): Give your Assessment a name.
- Description: Enter an optional description. The description will appear in the Assessments administration page and as a tooltip when users add the Assessment to an Item.
- Max # of Assessments Performed (required): Define how many instances of this Assessment users can create beneath the same parent Item.
- This field has a minimum of 1 and maximum of 366.
- Parent Templates - Auto Create: The Assessment will be automatically added as a Panel to new Items belonging to one of the Templates in this field. Expand the drop-down to select the appropriate Templates.
- Only Templates with Assessments enabled will be available in this drop-down.
- To set additional rules for when the Assessment will be automatically added to new Items belonging to one of the specified Templates, click the filter icon to the right of the drop-down. Add the necessary rules, then click Save.
This Assessment will only be added to new Items that belong to one of the specified Templates and meet these additional requirements.
-
- Parent Templates - Available: The Assessment will be available to be added to Items belonging to one of the Templates in this field. Expand this drop-down to select the appropriate Templates.
- Only Templates with Assessments enabled will be available in this drop-down.
- To set additional rules for when the Assessment will be made available on Items belonging to one of the specified Templates, click the filter icon to the right of the drop-down. Add the necessary rules, then click Save.
This Assessment will only be available to be added to Items that belong to one of the specified Templates and meet these additional requirements.
- Parent Templates - Available: The Assessment will be available to be added to Items belonging to one of the Templates in this field. Expand this drop-down to select the appropriate Templates.
-
- Child Template: Select the Template that can be created as a nested Item beneath Assessments of this type. When Allow Nested Item Creation is enabled for an Assessment Field Value, users will see a Create button that allows them to create a nested Item using this Template.
- Only Templates configured for use as Assessment Child Templates will be available in this drop-down. Contact your Customer Success Manager to configure which Templates are available.
- Each Assessment can have only one Child Template.
- Auto Title Format: Use this field to automatically add extra information to the title of each newly created Assessment Item. This helps ensure a consistent naming format across all Assessment Items.
- Enter #parentName to automatically add the parent Item's name to the title of the new Assessment Item.
- Enter #assessmentName to automatically add the Assessment's name to the title of the new Assessment Item.
- Enter #date to automatically add the current date to the title of the new Assessment Item.
- Enter #dateAndTime to automatically add the current date and time to the title of the new Assessment Item.
- Child Template: Select the Template that can be created as a nested Item beneath Assessments of this type. When Allow Nested Item Creation is enabled for an Assessment Field Value, users will see a Create button that allows them to create a nested Item using this Template.
-
- Required Roles: By default, an Assessment can be added to an Item by anyone with the "Edit" permission for Items in the relevant Locations, or the "Assign" permission for Items using the Standard Team Type, as well as anyone on the Item's Team except for Followers or Participants. However, you can restrict this Assessment such that it can only be added to an Item by someone with a particular System Role.
Expand this drop-down to select the appropriate System Roles.
- Required Roles: By default, an Assessment can be added to an Item by anyone with the "Edit" permission for Items in the relevant Locations, or the "Assign" permission for Items using the Standard Team Type, as well as anyone on the Item's Team except for Followers or Participants. However, you can restrict this Assessment such that it can only be added to an Item by someone with a particular System Role.
-
- Required Locations and Level Types: By default, an Assessment can be added to an Item by anyone with the "Edit" permission for Items in the relevant Locations, or the "Assign" permission for Items using the Standard Team Type, as well as anyone on the Item's Team except for Followers or Participants. However, you can restrict this Assessment such that it can only be added to an Item by someone with a particular Location or Locations belonging to a particular Level Type.
Expand this drop-down to select the appropriate Locations or Level Types.
- Required Locations and Level Types: By default, an Assessment can be added to an Item by anyone with the "Edit" permission for Items in the relevant Locations, or the "Assign" permission for Items using the Standard Team Type, as well as anyone on the Item's Team except for Followers or Participants. However, you can restrict this Assessment such that it can only be added to an Item by someone with a particular Location or Locations belonging to a particular Level Type.
Pro Tip: There is an "and" relationship between Required Roles and Required Locations and Level Types, meaning if you enter requirements in both fields a user must have both the specified Role and Location/Level Type to add a new Assessment Item.
-
- The Enable Weighted Scoring checkbox: This checkbox will be available if at least one of your organization's Weighted Score Groups is enabled for Assessments. It allows you to generate Weighted Scores for Assessment Items. When selected, an additional drop-down will appear.
- Weighted Score: Any Weighted Score Groups set as "Available on Assessments" will appear in this single-select dropdown. When you associate an Assessment with a Weighted Score Group, any of its fields using the dropdown, checkbox, or radio button type can have weights applied to their values. These weights are then used to calculate the overall score based on the configuration of the selected Weighted Score Group.
- The Enable Weighted Scoring checkbox: This checkbox will be available if at least one of your organization's Weighted Score Groups is enabled for Assessments. It allows you to generate Weighted Scores for Assessment Items. When selected, an additional drop-down will appear.
- Select Save.
Copy an Assessment
If you want to create a new Assessment that's similar to an existing one, you can copy the existing Assessment to use as a starting point.
To copy an Assessment:
- Navigate to the Assessments administration page in the Admin section.
- Hover over the Assessment you would like to copy, and select the copy icon on the right.
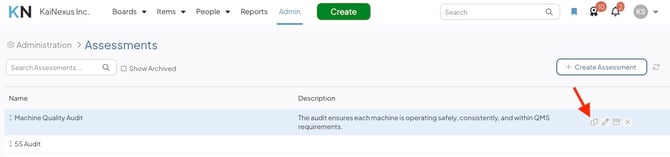
- Confirm your decision by selecting Copy in the Copy window.
The copied Assessment will have the same description, Fields, and weight score details. All other Assessment details, including parent Templates, required Roles, Locations, and Level Types, will not be copied.
Next Step
After you create your Assessment, your next step is to add Assessment Fields to it: